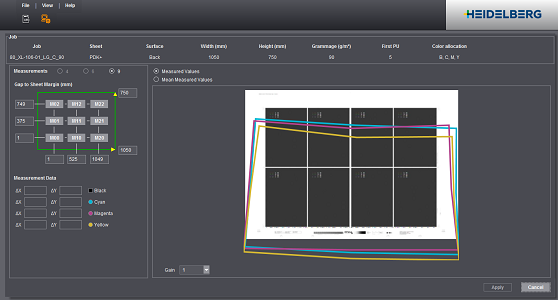
"Capture Measurement Data" Dialog
Measurement data are entered, checked and saved relating to a specific job in the dialog for capturing measurement data.

Use the information in "Job" to check whether you selected the correct job for a data set. The width and height of the press sheet as well as the offset of the marks to the paper edge (see Check offset to sheet margin (mm)) are important because the position of the measurement marks is calculated based on these dimensions. Grammage is also an important item of information.
Measured values that are assigned to the wrong jobs can lead to unforeseeable results after calibration. For that reason, you must pay great attention when you are capturing and assigning measurement data.

This is where you set the number of measuring points that you measured on the press sheet. The input is relevant mainly for manual input of the measurement data. If the selection should be dimmed, click "Mean Measured Values" once and then "Measured Values".
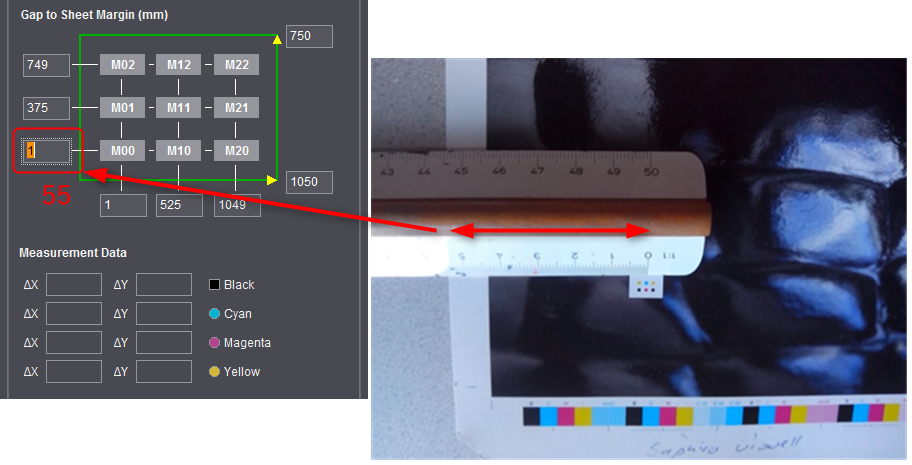
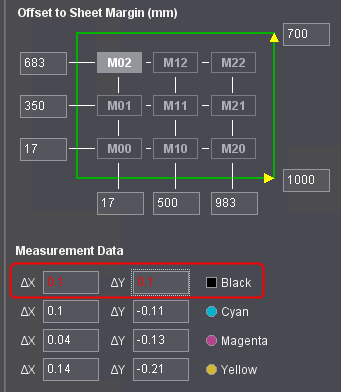
Check offset to sheet margin (mm)
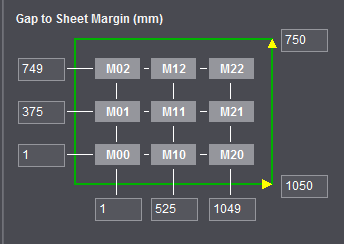
The values (highlighted in red in above diagram) indicate the offset in mm to the edge of the press sheet. These are automatic values that must be verified. Use a ruler to check the values as shown in the diagram below.
Start by checking mark "M00". The boxes of this mark are computing boxes. If changes are made, the values of the other marks change automatically because it is assumed that the image is positioned symmetrically on the sheet. If the image position is not symmetric, you can match the distances of marks "M01", "M02", "M03", etc. manually.
1.Click a mark (1).
This enables the boxes below for capturing the measurement data.
2.Enter the captured misregistration into the boxes (2).
The first color (generally black) is the reference color (square icon). You should not edit the measurement data in the boxes if these data come from the "iRegister" app. The measuring accuracy of the app is sufficiently high.
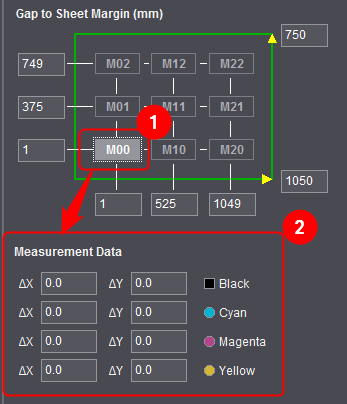
3.Click the mark again to conclude the input (1).
4.Repeat steps 1 and 2 for the other marks.
Measured data in red type
Values of the reference color of a job compensated automatically are displayed in red if they are changed:
The red values of the reference color indicate that the values of the other colors are no longer correct. To correct the compensation, you must increase/decrease all the values by the values of the reference color. If you enter an X-value of 0.1 for the reference color, you must increase the X-values for all colors by 0.1 as well.
Use measured data of another color
If the measured data of several colors are identical, it is enough to capture the data once. You can then use the measured data for the other colors. This function is only available for spot colors.
Proceed as follows to use the measured data:
1.First, capture the measured data of the initial color.
An initial color can be a process color and a spot color.
See Enter/edit "measurement data" for details on capturing the measurement data.
2.Click the pen beside the spot color whose measured data you would like to use (1).
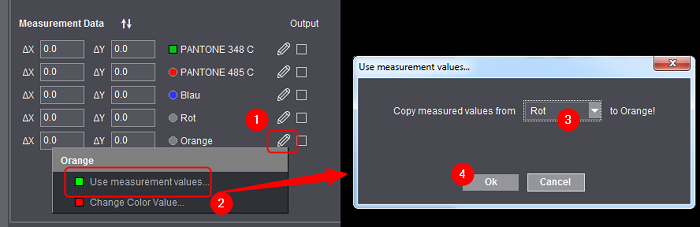
3.Select "Use measurement values" (2).
The "Use measurement values" dialog displays.
4.Select the initial color (3).
5.Confirm with "OK".
The measured data of the initial color are copied for the spot color.
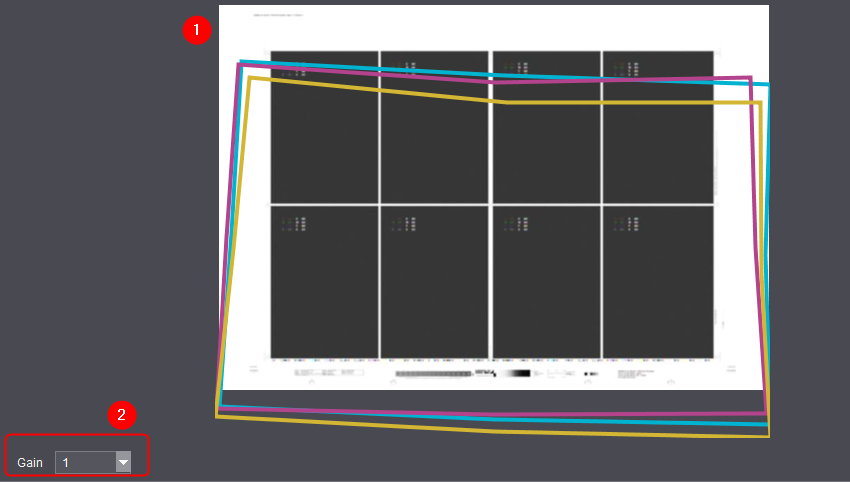
The graphic view (1) lets you assess the quality of the measurement data. You can exaggerate the display of misregistration using the gain factor (2). This has no effect on the measurement data themselves.
"Measured Values" and "Mean Measured Values" options
The "Measured Values" option is to be used if you have to capture or correct measured values. The input boxes for the measured values are active only in this mode.
The "Mean Measured Values" option is to be used if all the measured values were entered correctly and they are to be saved relating to a specific job. To do this, enable "Mean Measured Values" and click "Apply". The register settings of the machine are then calculated from them. After the measured values are saved, they can be recaptured and overwritten at any time.