
Measurement with Nonius Marks (visual)
If you have neither a USB microscope camera nor an iPhone with the iRegister app, you can read off misregistration visually using Nonius marks (see Nonius mark). Like the USB microscope camera, this method lets you measure spot colors in any print order. However, this method is very time-consuming and prone to errors.
Measurement with a Nonius Mark - Spot Color Example
In the example below, we describe measurement for individual compensation. The sheet was already output via APSC and automatic compensation was run on the four process colors with a characteristic curve. Now residual misregistration of the spot color is to be measured and the plate re-imaged.
Prerequisite: The printed sheet is at hand. The Nonius marks are placed on the sheet (see Nonius mark).
Proceed as follows to measure the spot color:
1.Go to the APSC job list.
2.Select the job.
Make sure to select the correct sheet surface.
3.Click "Measured Data Individual".
The "Measurement Editor" opens. The correct job is automatically selected in the top list.
4.Click "Create".
The dialog for capturing measurement data displays:
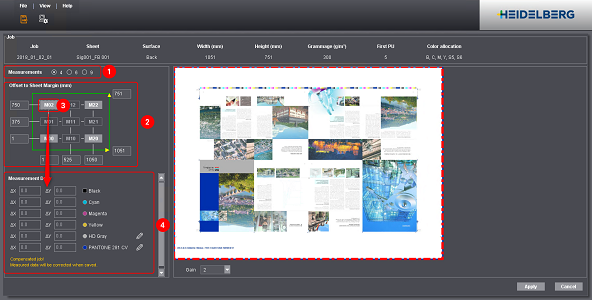
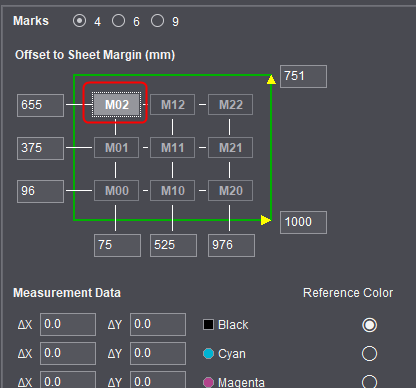
5.Select the number of marks that are located on the sheet (1).
6.Enter the offset of the marks to the sheet margin (2).
See Check offset to sheet margin (mm).
7.Click the first mark (3).
8.Read off the misregistration on the sheet and enter it in APSC (4).
See also Enter/edit "measurement data".
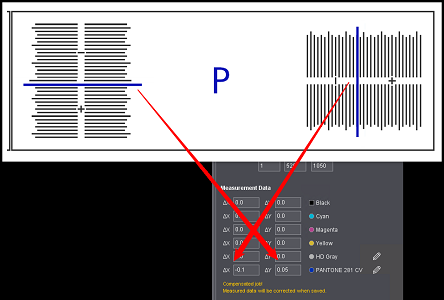
The following screenshot shows an example of what to enter for a mark. The offset between two graduations is 0.05 mm (line width = 0.02 mm; line offset = 0.03 mm)
9.Click the mark again to confirm your input:
10.Capture misregistration for all the other marks. To do this, click the next mark and enter the misregistration that you read off.
11.Click "Apply" when you have captured all the marks.
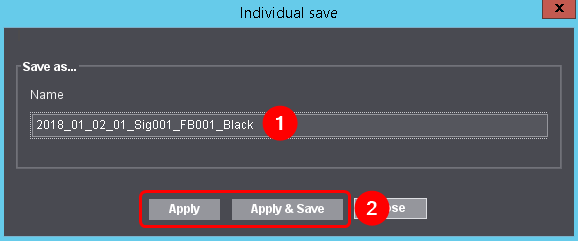
12.Give the measurement data set a unique name (1).
13.Click one of the following options (2):
·“Apply”
The data are compensated with the new measurement data set.
·"Apply & Save"
The data are compensated with the new measurement data set and the measurement data set is saved. This is useful for repeat jobs.
After confirmation, the TIFF files are compensated again straightaway and transferred to the imagesetter.
Message - TIFF files are missing
When saving the measurement data for individual compensation, the following message may display:
"The following TIFF files are missing for this job. You must copy these TIFF files to the matching hotfolder!"
The reason why this message displays is that the TIFF files were already deleted by the delete rule. In order to compensate the data with the new measurement data set, prepress must copy the TIFF files again to the hotfolder.
If you work with individual compensation more often, we recommend that you change the settings for the delete rule. See Delete Job (Delete Rule)