
Sending Presetting Data Offline to the Press
In some cases, it is not possible to send presetting data (area coverage values) online through the network to the press.
This is the case in the following situations:
•The press cannot be connected online.
•There are problems in the network.
•The job is outsourced.
•A software update is currently running , preventing an online connection to the press.
In such cases, you can save the presetting data of a job to a job memory card or a USB mass storage device and load them to the press.
For details, see:
•Sending Presetting Data via USB Mass Storage Device to the Press
•Sending Presetting Data via Job Memory Card to the Press
Sending Presetting Data via USB Mass Storage Device to the Press
It is possible to save presetting data (area coverage values) to a USB mass storage device and then load them to the press solely for the Prinect Press Center.
Basically we recommend an online connection for sending the presetting data to the press. Only in an exception, like for example a problem in your network, should you resort to the USB mass storage device.
Note: Remember that you do not get any feedback from your press in this procedure.
•To be able to use this function, you as the user need the "Job memory card" permission.
•A commercially available USB mass storage device is adequate for storing your data.
•The folder in the top directory of the USB stick (root directory) must be named "PressCenter" because the press cannot read the data if this is not the case.
•You can save presetting data only if area coverage values were already calculated for the sheets.
Writing presetting data to the USB mass storage device
1.Plug the USB mass storage device into a free USB port on the Prinect client computer (can be plugged to any Prinect client, for example, near the press).
2.Go to "Jobs" and select the job you want.
3.Open your job.
4.Go to the "Press" tab.
5.Select a sheet.
·Select "Job Memory Card" in the context-sensitive menu. Alternatively, click the "Job Memory Card" button.
·The "Job Memory Card" window displays.
See Brief description of the "Job Memory Card" window for a description of the window.
6.In the open window on the right, enter the path to the USB directory.


·The top folder must be named "PressCenter". For example, the path name is "H:\PressCenter".
·The directory is active when the dot in front of the path name turns green.
·When you open the window again, the path is already set, and you no longer have to enter it.
7.Drag-and-drop the sheet you want from the left (sheet with the area coverage values of the client computer) to the right (USB mass storage device).
·The "Change sheet data" window displays. This is where you can map colors manually and edit the sheet name (see also Change sheet data).
8.Click "OK".
·Shortly afterwards, you can see the sheet on the right and it is now stored on the USB mass storage device.
9.Eject the USB mass storage device when you have stored all the presetting data you need.
USB mass storage device at the press
The control station of the press has a USB port into which you have to plug the USB mass storage device. Then set the USB data storage device to active in data storage administration.
You can now load the presetting data from the USB data storage device in the Job selection.
Sending Presetting Data via Job Memory Card to the Press
Saving presetting data (area coverage values) to a job memory card and then loading them to the press is suitable for presses with CP2000 and older versions.
Basically we recommend an online connection for sending the presetting data to the press. However, some older press control stations do not have a WPI adapter. In this case, the job memory card saves the presetting data for ink zone control. You can then import the saved values on the press with the job memory card drive.

Note: Remember that you do not get any feedback from your press in this procedure.
•Connection of a job memory card drive
•Brief description of the "Job Memory Card" window
•Configuration of the job memory card output
•Save presetting data to the job memory card
Prerequisites
•To be able to use this function, you as the user need the "Job memory card" permission.
•To save the data, you need a job memory card and a job memory card drive.
·The driver must be installed for the job memory card drive. You can find the driver on the installation DVD of the Prinect Pressroom Manager/Prinect Integration Manager.
•You can save presetting data only if area coverage values were already calculated for the sheets.
Connection of a job memory card drive
1.Install the flash card driver from the installation DVD for the job memory card drive.
2.Switch the computer off.
3.Plug the USB plug of the job memory card drive into a free USB port on the Prinect client computer (can be done on any Prinect client) or the Prinect Pressroom Manager/Prinect Integration Manager server.
·The power is supplied via the USB interface.
·The green signal lamp on the Job Memory Card drive must light up.
4.Switch your computer back on.

Caution: Never try to remove the Job Memory Card while the red LED is lit up.
The Job Memory Card supports two different formats:
•The D1 format for CPC 1-02/03 press control systems
•The D2 format which is imported by Prinect Classic Center (CPC 1-04) and Prinect CP2000 Center press control systems.
Comparison of the D1 and D2 formats
|
Designation |
D1 |
D2 |
|---|---|---|
|
Number of memory locations |
50 |
50 |
|
Memory location of the CPC 1 values |
1-50 |
1-50 |
|
Memory location of the CPC 3 values |
1 (the CPC 1-02/03 only selects the first memory location on the Job Memory Card) |
1-50 |
|
Number of printing units per job |
1-8 |
1-16 |
|
Color order |
B,C,M,Y,X,Z,U,V |
B,C,M,Y,X,Z,U,V,S1,S2,S3,S4,S5,S6,S7,S8 |
|
General |
|
•The presetting values are saved in the CDK format. (CPC 1-CPC 3-CPT - data communication system) •There are at least two files for each sheet. |
Brief description of the "Job Memory Card" window
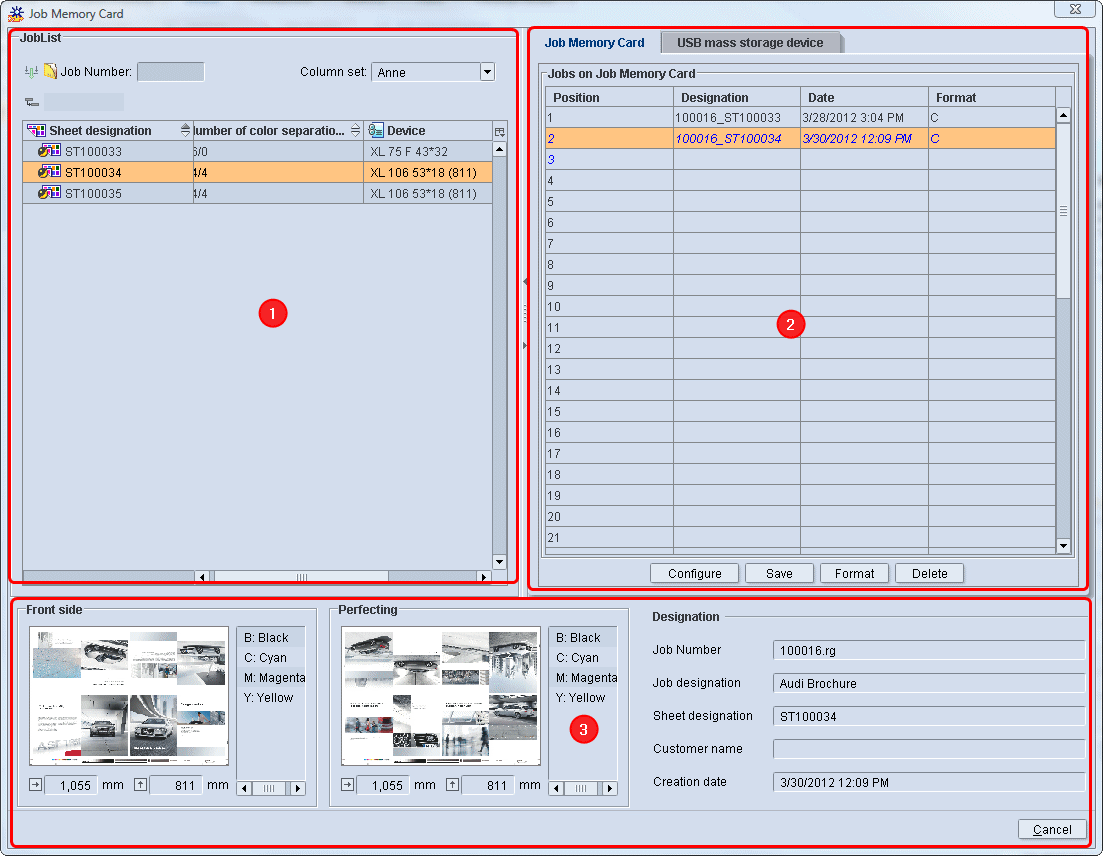
The "Job Memory Card" window is divided up into three sections:
"JobList" section (1)
This section shows all the press sheets of the selected job, for which area coverage values were already calculated. This means that the "SheetfedPrinting" sequence is completed.
"Job Memory Card" section (2)
In the "Job Memory Card tab, all 50 positions on the job memory card are listed to which you can save a sheet.

Note: All sheets (area coverage values of a sheet) that were dragged-and-dropped to the job memory card but have not yet been saved (written) display in blue font and italics.
Information pane with sheet preview (3)
You will find details about the selected sheet in the lower part of the window. This includes:
•Job Number
•Job designation
•Sheet name
•Customer Name
•Creation Date
In addition, you also have a sheet preview for the front and perfecting sides for checking purposes. The sheet preview displays only if you set "Sheet Preview Generation" in the "ImpositionOutput" sequence.
You cannot edit any information in this section. Only when you copy a sheet from the "JobList" to the Job Memory Card can you make changes. To do this, the "Manual printing unit/color allocation" option must be set in the job memory card setup (see Configuration of the job memory card output).
Configuration of the job memory card output
1.Click the "Configure" button.
Here you can make the following default settings for saving jobs to the Job Memory Card:
•Activating a manual printing unit color allocation.
•Making the CPC 1-02/03 settings.
•Defining the date format.

Note: The settings you make here apply to all Job Memory Cards.
Manual printing unit/color allocation
•Enabled: Tick in box
You can assign colors manually and change the sheet names only with this option. When you drag a sheet to the memory card, the "Change sheet data" window displays (see Change sheet data).
•Deactivated: no check in the box
You cannot assign colors manually or change sheet names.
CPC 1-02/03 settings
Only for CPC 1-02/03 (automatic color allocation)
Front or perfecting side
Color allocations are saved for the front side only when at least one color allocation is present for front side. Otherwise, the perfecting side is saved.
4/4
The first four colors are automatically reserved for the front, the next four for the perfecting side. If a job contains special colors, this setting offers the same features as the front or perfecting side.
CPC 1-03 with perfector
The process colors on straight printing are saved first, followed by the spot colors on straight printing and the colors on perfecting (if available in each case). The perfecting ink profiles must always be added separately.
Setting the date format
1.Go to the "General" tab.
The following window appears.

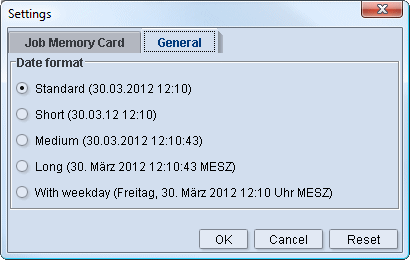
2.Enable the date format you wish to have displayed in the "Job Memory Card" section.
Save presetting data to the job memory card
After you open the "Job Memory Card" window, you can drag the presetting data of the open job to the job memory card.
1.In "JobList" on the left, select the relevant sheet and drag-and-drop it to the position you want on the right.
·The "Change sheet data" window displays if you enabled "Manual printing unit/color allocation" in your setup (Configuration of the job memory card output).
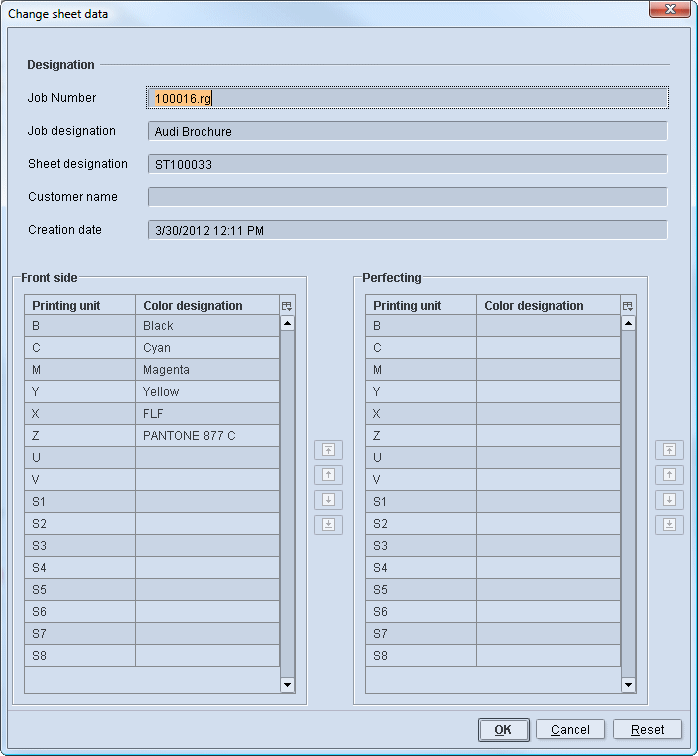
Job designation
In "Job designation", enter the name that will be available later for selecting the sheet at the press. The job name is always entered by default. A unique name is advisable to be able to tell apart several sheets of the same job at the press. For example, you can add the "Sheet designation" to the name.
Front and Back
You can change the color allocation of the front and back in the lower part of the "Change sheet data" window. This functionality is important especially for packaging printers who normally do not work with the four process colors CMYK. In this case, spot colors with the codes X, Z, U, etc. can be used.
2.After that, click "OK".
·The sheet displays on the job memory card in a blue font and in italics.
3.Click "Save" and confirm the window with "Yes".
4.Wait until the job memory card is fully written and the pilot lamp turns green.
What else should I be aware of for CPC1-02/03?
On printing presses with CPC 1-02/03, the job that is imported should be in the first position. These CPC versions only recognize the first job on the job memory card.
If you wish to save the area coverage values of a sheet to the Job Memory Card, you must, therefore, always drag this sheet to the first position.
If this should already have data, you must delete the job of this position (select position 1 and then click "Delete") or simply overwrite it (drag sheet to position 1). When overwriting, the prompt shown below appears. You have to confirm this by clicking "Yes".
Insert the job memory card at the press
The control station of the press has a job memory card drive into which you have to plug the job memory card with the presetting data. Then set the job memory card to active in data storage administration.
You can now load the presetting data from the job memory card in the Job selection.