
You can create or rename product parts and versions in this window.
Note: No version-specific boxes display if the "Versioning" option is not enabled.
The name of a master version can no longer be changed after the "Versioning" step in the Prepare sequence has run. Normal versions are dimmed until they are assigned to a layout. After that, the version names can no longer be changed.
You can set up hierarchy levels for the product parts. In other words, product parts can in turn contain product parts and are nested in this way.
This function lets you edit only product parts or versions in one hierarchy level. To do this, select the product part you want on the left and run the function.
The top hierarchy level is marked by the term "End product". The window caption bar always displays the name of the product part whose elements you are currently editing.
You create product parts with versions in two steps. You create a product part in the first window you display. You then create the versions for this product part in a second window because these are already one hierarchy level lower down.
Product / Version
These options let you decide whether you wish to create or modify a product part or a version. Type the name beside "Version Name" or "Product Name", depending on what you want.
Master Version (for "Versioning" in Prepare)
If you are going to create or modify a version, this option lets you decide whether this version will be the master version. The name of a master version can no longer be changed after the "Versioning" step in the Prepare sequence has run.
Version Name
Name of the new or edited version.
Product Name
Name of the new or edited product.
Article Number/Shape ID/Shape Name

Note: These items are required only for packaging printing.
"Apply" button
The "Apply" button lets you edit all the product parts or versions of one hierarchy level without having to quit the window.
This means that if you wish to create a number of new product parts, you must enter their names beside "Product Name" and click "Apply" for each product part. As a result, a list of new or modified elements for this one hierarchy level is produced at the bottom of the window.
Click "OK" to accept all of these "collective" changes.
"Copy" button
This button helps you create a number of similar product parts as is the case when you work with several versions. Normally, you then have two or more product parts with the same versions.
Take a look at the graphic below.
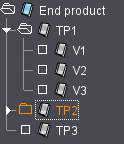
If "TP2" is to have the same content as "TP1", select this "TP1" product part in the list box beside "Copy".
1.Now select "Edit > Product Part". The "Edit Products of" dialog opens.
2.Select product part "TP2" from the list box and click "Copy".
All the elements of "TP1" now appear. You can copy these immediately with "OK".
"Delete" button
You can remove a selected product part from the list box by clicking "Delete".
List box for product parts
This is where you choose from the available product parts. The name of the selected product part displays in the appropriate boxes depending on the version you select (in "Version Name") or the product you select (in "Version name" and "Product Name").