Prinect Remote Access and Customer Administration
This section describes what parts of customer administration relate specifically to Prinect Remote Access.
What are external and internal users?
The distinction between internal and external users applies to Prinect Remote Access only.
For technical reasons, customer and user administration overlap when you set up users for Prinect Remote Access.
•Internal users: These are all the users of the Prinect Integration Manager, i.e. print shop users.
You always set up internal users in the user administration (Administration > "Users" tab).
•External users: These are all customer users.
You always set up external users in the customer administration (Administration > "Customers" tab). Each time you set up a contact with person for a customer, you can create an external user account for this person. This external user immediately appears in the user administration.
Structure of the Customer Administration
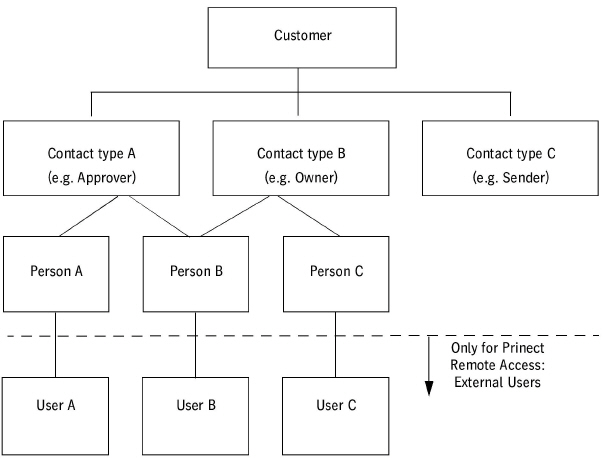
The following chart shows an example of how you could set up a customer with different contact types and persons.
•"Customer": Set up a customer first. The customer represents the company or organization.
•"Contact Type": The contact mode divides the company into several areas. Persons are normally allocated to one contact type. But you can also create contact modes without persons. Each customer is automatically allocated to the "Customer" contact mode. You cannot delete this mode. You can create or delete any other contact modes for this customer.
•"Person": A person always belongs to a contact mode. The persons represent the customer's employees. You can define only one person for the "Customer" contact mode.
•"Users" (for Prinect Remote Access only): To work with Prinect Remote Access you need external users. When you set up a contact mode with a person in the customer administration, you can also set up a user account for an external user for this person right away. This external user appears in the user administration.
In the above chart, you can see person B is allocated to both contact modes A and B. In spite of different contact modes, this person has the same user account.
You can specify the optional agency function for each customer (see Customer context menu > "Properties" (customer entry in the customer table > right mouse button) "Agency" item).
The agency function means to work as a service provider for another customer. This is always job-specific. This means that you can assign an agency to a job when creating a job (see Selecting an Agency While Creating a Job ).
In the following chart you see the possible relations between customers and agencies.
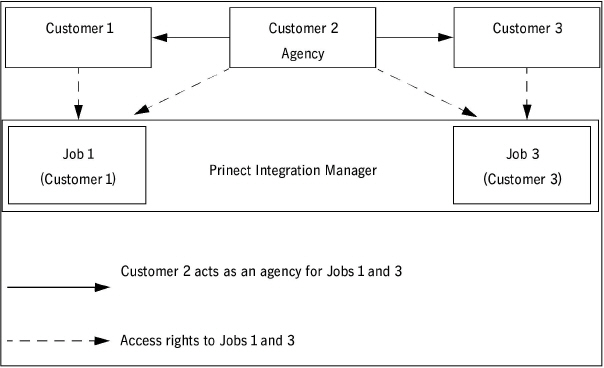
Set up a Job 1 for Customer 1 in Prinect Integration Manager. Allocate the "Customer 2" agency to this job when setting it up. In other words, Customer 2 is to act as agency "Customer 2" for this Job 1.
Consequently, all users of agency "Customer 2" have the same permissions to Job 1 as Customer 1.
Customer 2 can work for several customers as an agency. When setting up Job 3 for Customer 3, you can accordingly allocate Customer 2 as agency "Customer 2". This will give agency "Customer 2" permissions for Jobs 1 and 3.
Customer Administration UI (Administration > Settings > Customers)
Customer table > "Remote Access" column:
"Remote Access" column: The "Yes" or "No" entries show whether the customer was set up for Prinect Remote Access. The "Agency" entry indicates that the customer acts as an agency.
Button "New" below the customer table => "Create Customer" dialog (create new customer)
•"Remote Access": Enable this option only if the customer is to be set up for Prinect Remote Access.
•"Quota": This is where you can specify the maximum size of the data exchange area available to the customer on the Prinect Remote Access server.
One customer permission group for each new customer
A permission group is automatically generated for the customer if you enable the "Remote Access" option (see before) while creating a new customer. The name of the permission group comprises the following elements that you can to some extent edit in "Administration > Settings > Preferences > Permissions".
•Element 1: String, e.g. "X"
•Element 2: "Customer ID" or "Customer Name"
•Element 3: "Customer ID", "Customer name", "Customer Nickname" or no entry. Element 3 is omitted if you do not select an entry here.
Elements 2 and 3 are separated by a hyphen if you have enabled an Element 3.
The name of a customer permission group could be made up of:
"XCustomer ID-Customer name"
Using customer ID "12345" and customer name "Heidelberg", the customer permission group would then be named
X12345-Heidelberg.
The "Remote Access" dialog automatically opens when you close the "Create Customer" dialog. Here you can allocate permissions to the permission group. You can change this assignment at any time later (see Customer context menu > "Permissions" (customer entry in the customer table > right mouse button)). (Afterwards, the dialog for allocating the contact opens automatically, see Customer Shortcut Menu > "Assign Customer Sales Representative..." (customer entry in the customer table > right mouse button) (for Prinect Remote Access only)).
The new permission group immediately displays in the user administration ("Administration > Settings > Users > Groups").
Each external user you set up for this customer automatically becomes a member of this customer permission group, i.e. he has the same permissions as the customer.
Button "Delete" below the customer table => "Delete Customer Entry" dialog (delete customer)
The following could happen with Prinect Remote Access: You delete a customer with customer ID "12345". When you then set up a new customer with the same customer ID ("12345"), this new customer has the same permissions for all jobs as the customer deleted beforehand.
You can disable all external users instead of deleting a customer (and, consequently, all user accounts of the external users). To do so, click "Disable" or, if you have selected several customers, "Disable all" in the query.
Customer Shortcut Menu > "Assign Customer Sales Representative..." (customer entry in the customer table > right mouse button)
A customer might wish to have an internal employee as contact partner.
The "CustomerSalesRepresentatives" permission group comprises all internal users who are potentially available as contacts for customers.
With "Assign Customer Sales Representative" you can assign an internal user as a contact to a customer.
The "Assign CSR" dialog displays.
To the left you see all the members of the "CustomerSalesRepresentatives" permission group. Select one or several potential contact partners you wish to allocate to your customer. Click "Add" and confirm with "OK".
You can also select several customers and make or break the allocation. The allocated internal users (to the right in the "Assign CSR" dialog) can then be indicated as follows:
•Standard font: Internal users in standard font are allocated to all selected customers.
•Italic font: Internal users in italics are allocated to at least one but not all selected customers.
The following happens when you allocate an internal user from the "CustomerSalesRepresentatives" permission group to your customer: This internal user automatically becomes member of all permission groups specific for Prinect Remote Access, i.e. the Customer permission group and the "RemoteAdministrators" and "RemoteUsers" groups.
If you undo the allocation of the internal user to a customer, his membership in all permission groups for Prinect Remote Access remains unchanged nevertheless. You must manually delete the user from these permission groups in the user administration if you do not wish this.
Customer context menu > "Permissions" (customer entry in the customer table > right mouse button)
This lets you edit the permissions you allocated to the customer (the customer permission group). Please note that by default all external users are members of the customer permission group and therefore automatically receive these permissions. See the New button > Create Customer dialog > "Remote Access".
You can also select several customers in the customer table and choose "Permissions" in the shortcut menu. The options in the "Remote Access" dialog can then be as follows:
|
Icon |
Explanation |
|---|---|
|
|
This permission is not set for any of the selected customers. |
|
|
This permission is not set for any of the selected customers. |
|
|
This permission is set for all selected customers. |
Customer context menu > "Properties" (customer entry in the customer table > right mouse button)
•"Remote Access": This option lets you define whether or not the customer can use Prinect Remote Access. The customer permission group and all external users it contains are deleted when you reset an option set once. You are prompted by a query.
•"Quota": This is where you can specify the maximum size of the data exchange area available to the customer on the Prinect Remote Access server.
•"Agency": This lets you define whether or not the customer can basically act as an agency. This customer will appear in all lists where you can pick an agency. These lists appear:
·When creating a job if you wish to assign an agency to the customer (and the job) (see also Selecting an Agency While Creating a Job ).
·When you wish to allocate a default agency to a customer (see the next item)
•"Default Agency": "No agency set" appears when no agency is set by default.
•"Select": This lets you select an agency that will always be assigned to the customer (and the job) by default when you create a job (see also Selecting an Agency While Creating a Job ).
In the "Select Agency" dialog you see all the customers that could act as an agency. You can select your agency by way of the customer name, the customer ID or the customer nickname.
"New" button next to the "Contact List" => "Create Contact dialog (create a person of a certain contact type)
•"User" section
Set up the external users you need for working with Prinect Remote Access in the "User" section. (Setting up external users is possible only here, not in the user administration.)
The user account must always be related to a real person. In other words: you can only edit this area when you have defined a person for the contact type beforehand (see before).
The user you created immediately appears in the user administration ("Users" tab > "Users", the "External" option must be enabled).
·"External User": An external user will be set up if you enable this option. This user automatically becomes member of the customer permission group. Consequently, he has the same permissions as the customer. See also the New button > Create Customer dialog)
·"User name": User name of the external user.
·"Password": Password of the external user. The password must be at least 6 characters long. You must retype the password in the "Confirm" box.
·"External Administrator" The external user becomes member of the "RemoteAdministrators" permission group (in addition to the customer permissions group) when you enable this option. This means he has the permissions of both groups.
"Remote Access" Group
"Agency Information": Select a customer in the customer table. If the customer is an agency, this lets you view the other customers who have this selected customer as their agent. See also Agencies.


