
Sequence Templates - Group Templates
You can define group templates in "Administration > Resources > Templates > Group Templates". You can combine several sequence templates with group templates and link them with each other. This lets you set separate workflow configurations to match different purposes. Assigning group templates to single print jobs makes the setup of jobs much simpler.
To edit group templates, click "Group Templates" in the "Name" column in the "Templates" section. If you already have group templates, you can open a list of group template items or subfolders by clicking the folder icon in front of "Group Templates".
First of all, in the "Templates" list mark "Group Templates" in the "Name" column or, if you want, mark an existing subfolder below this item. Click the "New" button to create a new group template.
Assign a sequence template to a group template
Prerequisite: You must have configured the relevant sequence templates first before you assign them to a group template (see for example Sequence Templates - Preliminaries and following).
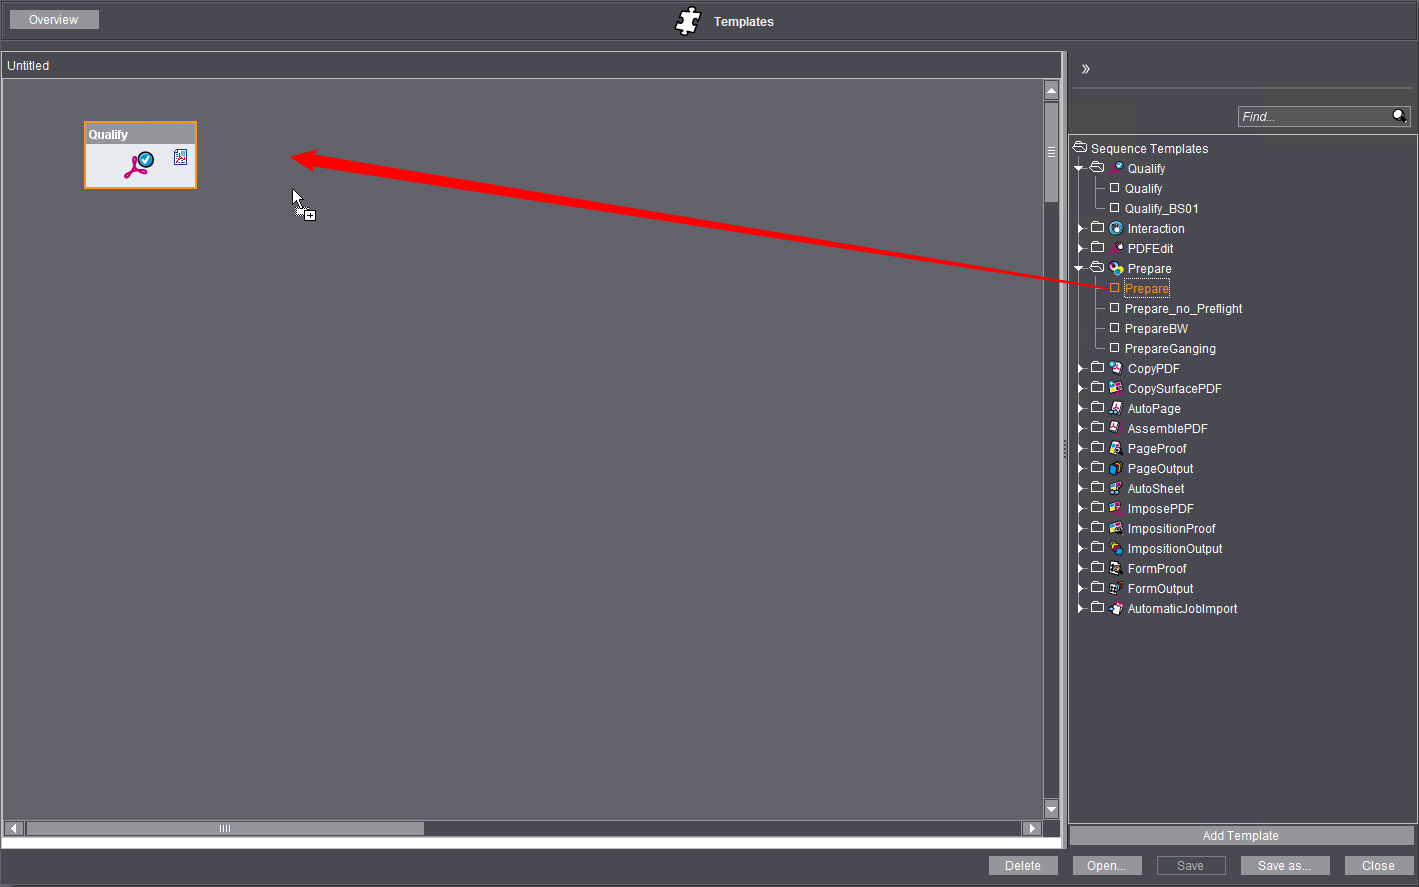
An empty window ("untitled") opens, to which you can now add the sequence and/or group templates. All available sequence templates display to the right of the window.
Add Sequence Templates
You can add sequence templates to a group template as follows:
•Click the sequence template you want and move it with drag-and-drop,
•double-click a sequence template item or
•click the template and click "Add Template".

Note: You cannot use the "Archive" and "Retrieve" sequence templates in a group template.

Note: You can also assign an existing group template to a group template.
You can show or hide the view of available sequences by clicking the double arrow (1). You cannot add any templates if this view is hidden.
When you have set up all the sequences you need for your workflow, you can combine all these sequence templates to a group template. In this way, you can create group templates matching your different workflows.
When you use a group template while you are editing a job (open job in "Jobs" section > "Processing" section), you have all the sequences and steps of this group template that you need in the job. If necessary, you can also assign several group templates to a job. Group templates allow you to prepare different workflows so that users only have to select the group template (or templates) that matches their workflow, without having to deal with setting the various workflow parameters.

Note: You can also assign single sequence templates to a job instead of a group template. However. we recommend that you work with group templates for workflow configurations that are used frequently as this simplifies configuration and potentially avoids errors.
Click "Save as..." to save the new group template.
Modify sequence templates within a group template
If you wish to modify certain parameters of a sequence in a group template, mark the sequence concerned and click "Open". As an alternative, you can open a sequence template by double-clicking the relevant icon.
The section of the relevant sequence template opens and you can edit it. Finally, you can save your changes.

Note: Remember the following items when you modify sequence templates within a group template:
·The sequence template icons found in a group template represent the original sequence templates. This means that if you modify a sequence template, you also change the original template. In other words, the changes affect all group templates containing the sequence template that was modified.
When you add a sequence template to a job, you work with a copy of the template in the job. For that reason, modifications in the original do not affect existing jobs where the sequence template was added before the modification but do affect jobs where the sequence template is added after the modification.
·One the other hand, modifications that you make to sequence templates not in a group template affect all group templates which have the respective sequence templates.
·If you modify sequence templates in "Processing" (see 'Processing' Section) within an open job, these changes affect only this job. The original sequence templates remain unchanged for other jobs. This is also valid for group templates within a job.
The user interface displays the group template again after you closed the sequence template.
You can link certain sequences to each other within a group template. As a result, these sequences will be processed automatically one after the other without any need for user intervention. Sequences that are suited for such links have a small icon on the left and/or right of the sequence icon. This small icon indicates the document type that can be sent on or used at the appropriate point. The icon for the documents that are used is found on the left of a sequence icon, while the icon for the documents that are sent on after processing is located on the right. To link two sequences, click the "send" icon of a sequence and, holding down the left mouse button, draw a line to the "use" icon of the next sequence and let go of the mouse button (i.e. drag-and-drop). You can only link document icons of the same kind (e.g. PDF page, sheet layout). An appropriate error message displays if you try to link different kinds of icons.
You can undo the link between two sequence icons by clicking the connecting line and then clicking "Delete" or by using the shortcut "Ctrl + Del".
You can control how sequences that process pages are submitted automatically to subsequent sequences through the use of conditions. In other words, you can define conditions that specify when the documents will be submitted to which subsequent sequence.

Prerequisite: The "SmartTemplates" license is required for this functionality.
A group template also has to comprise at least one sequence with page output and at least two sequences with page input.
Example:
A group template comprises a Qualify and a Prepare sequence (both are linked), and two PageProof sequences with different proofers (Epson and HP).
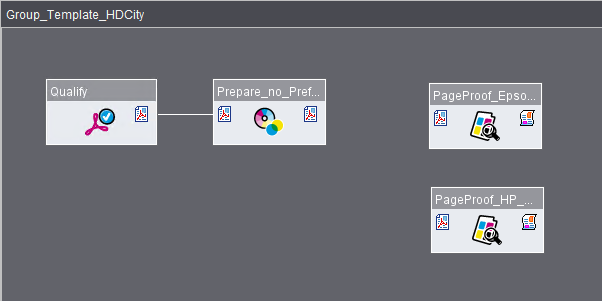
Automatic submission is to work as follows: pages in Portrait orientation are submitted to the Epson proofer, whereas pages in Landscape orientation are submitted to the HP proofer.
Procedure:
1.First draw a connecting line between the Prepare sequence and the PageProof sequence set up for the Epson printer. You can set up conditions for this link with the context menu item "Open" or the key shortcut Ctrl + O. The "Configure Conditions for Submitting" dialog opens.
2.You can also draw a second connecting line between the Prepare sequence and the PageProof sequence set up for the HP printer. In this case, the "Configure Conditions for Submitting" dialog opens automatically as soon as you release the mouse button:

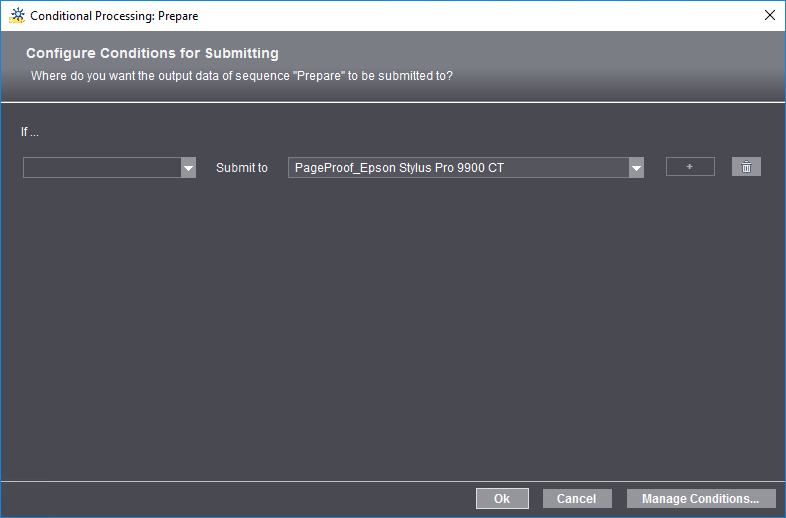
The screenshot shows the state without any condition set up yet. In this section you configure conditions for submitting.
3.Click "Manage Conditions". First, enter a name for the new condition - "Portrait" in the example - and confirm with "OK". The "Create and Manage Conditions" window opens:

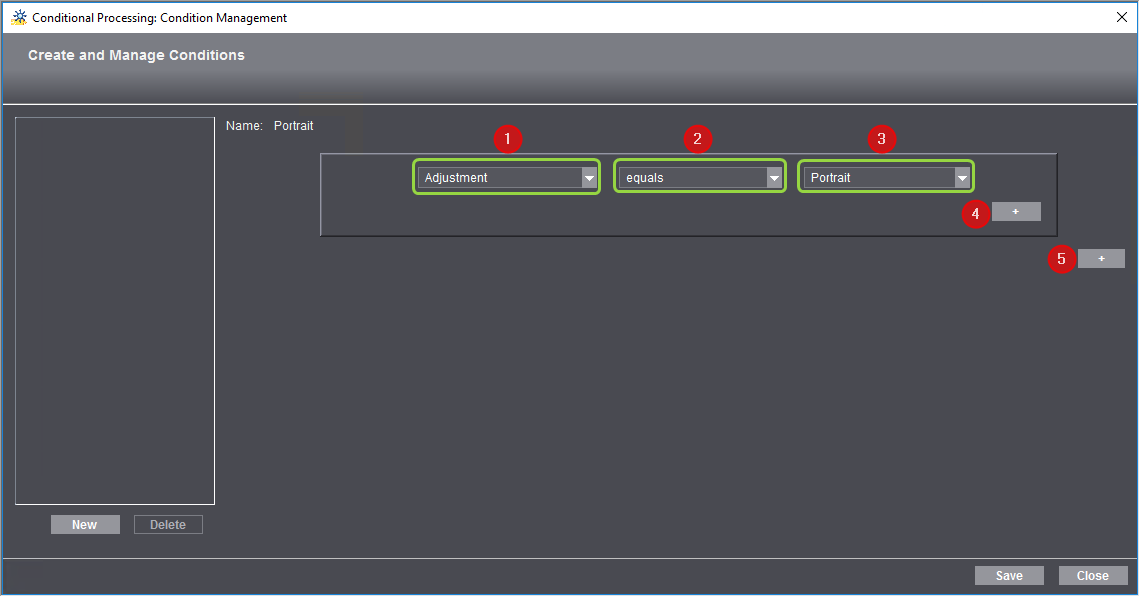
4.Select a parameter in the list box (1) to define the first condition. This list offers properties of PDF documents that are suited as selection criteria for conditional submission. The available options in boxes (2) and (3) change, depending on the property selected here. The "Adjustment" property serves as an example. In box (2), you can now select "equals" or "not equal". In box (3), you can select one of the properties "Portrait" or "Landscape". The condition could be: "Adjustment equals Portrait".
With this condition, all documents in Portrait orientation are submitted to a PageProof sequence (to be defined later).
5.You can add another condition by clicking the Plus button (4).

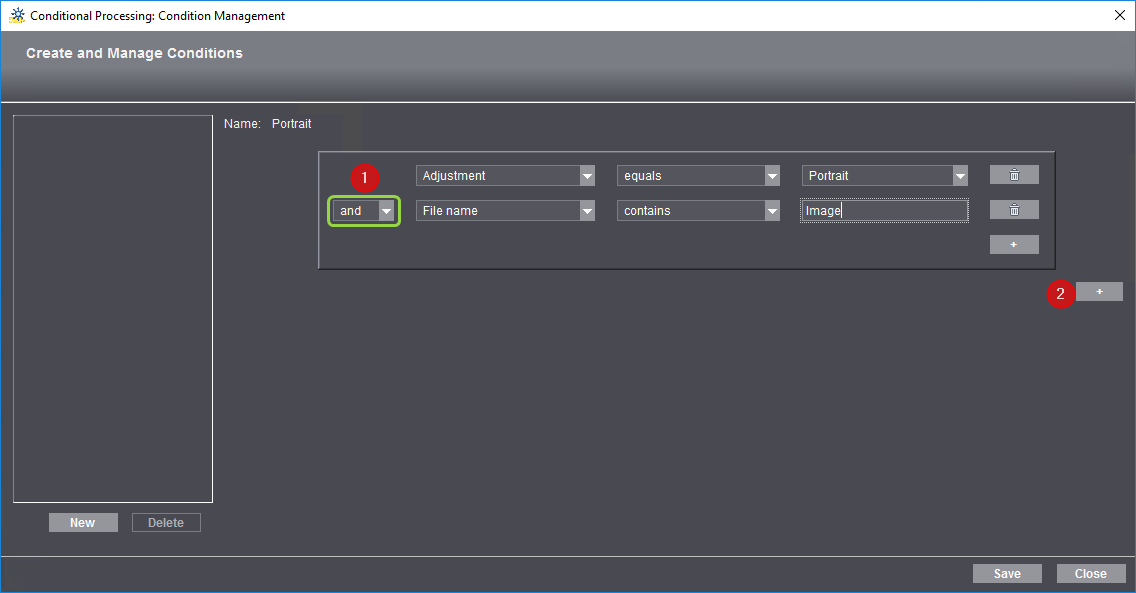
In box (1), you specify if the second condition is to also apply - "and" - (both conditions have to apply) or exclusively - "or" - (at least one condition has to apply. The same parameters as for the first condition are available for the other boxes.
In this way, you can set up a maximum of 7 supplementary conditions in addition to the main condition.
6.All Landscape pages are to be submitted to the PageProof sequence "HP_Designjet_Z5200CT". To do so, you need another main condition. You can add another main condition by clicking the Plus button (2).

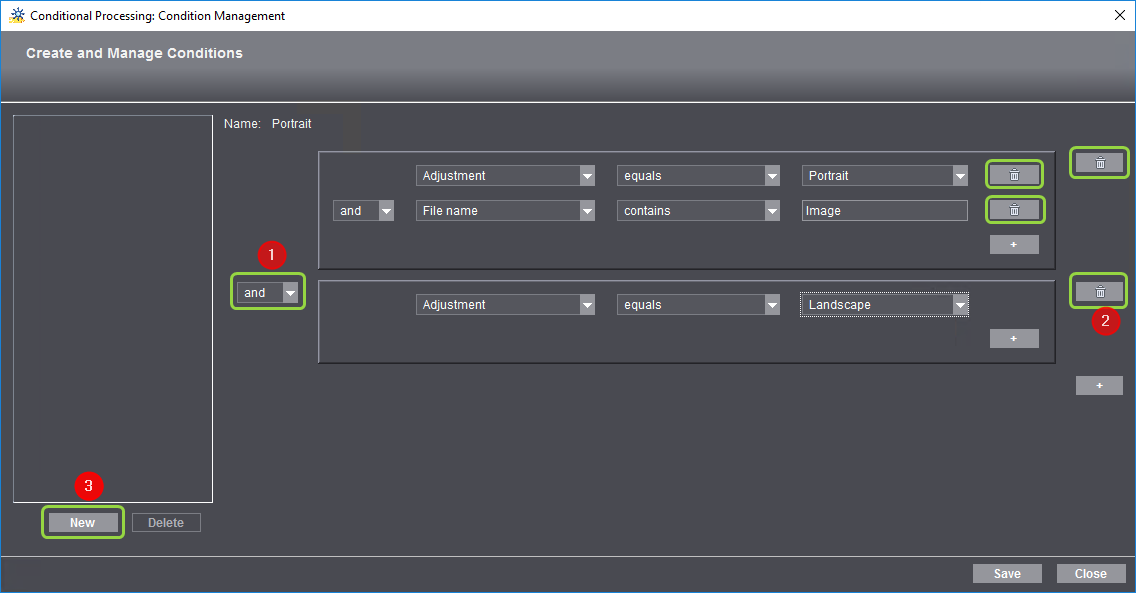
7.Here, you also specify with the list box (1) if the condition is to be effective as "and" or as "or". You can also define supplementary conditions to this main condition. You can define up to 8 main conditions.
If needed, click the pertaining Recycle Bin buttons (2) to delete any of the main or supplemental conditions.
8.Click "Save" to save the condition.
9.Click the "New" button (3) to generate a new condition. This will open a window where you can type the name of the condition.

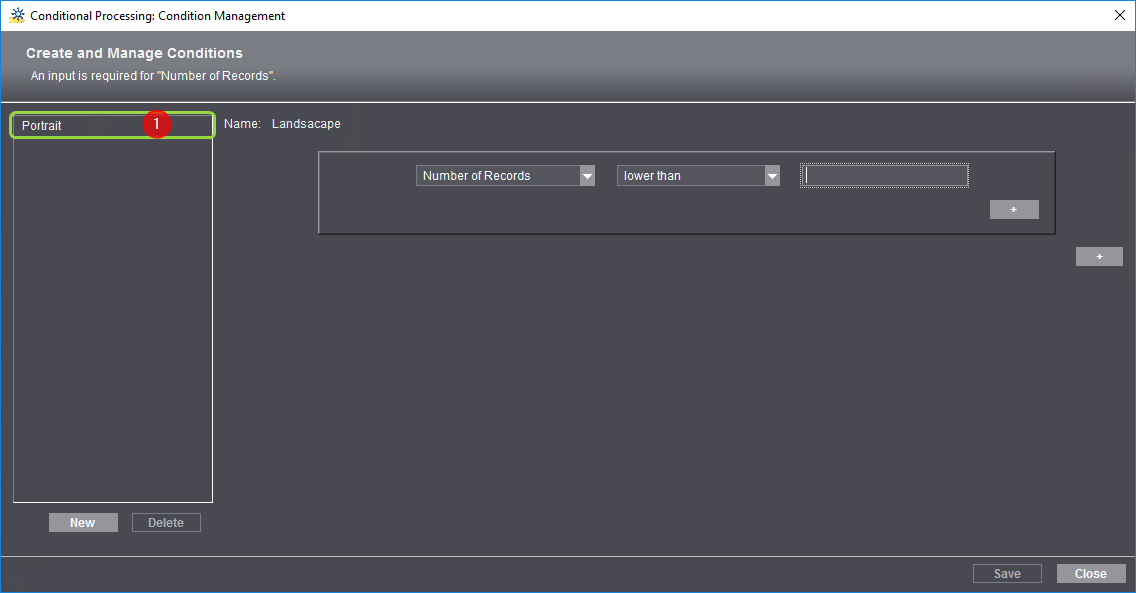
After confirming, the condition defined before will appear in the list box (1). In the right section of the window, you can set up the parameters of the new condition.
10.Click "New" to define new conditions without leaving the Editor window. With "Delete", you can delete items selected in the list.
11.Click "Close" to quit defining conditions.

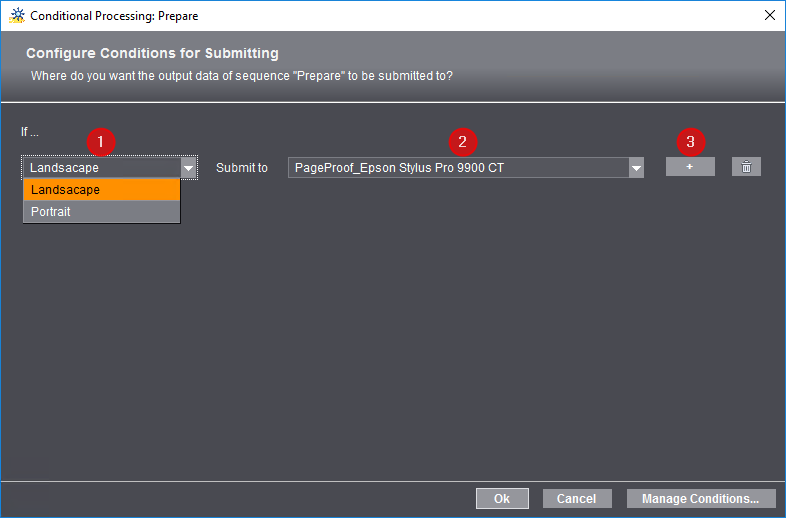
The "Configure Conditions for Submitting" window now lists the new conditions in the "If ..." list box (1). Now assign the submitting conditions to the various sequences.
12.In the "Submit to" list box you can select one of the available sequences suitable for submitting. Jobs complying with the conditions are submitted to this sequence automatically. In the example, the "Landscape" condition for submitting is assigned to the "PageProof_HP_Designjet_Z5200CT" sequence.
13.You can add an additional assignment of another submit condition to another sequence by clicking the Plus button (3). In the example, the "Portrait" condition for submitting is assigned to the "PageProof_Epson Stylus Pro 9900 CT" sequence.

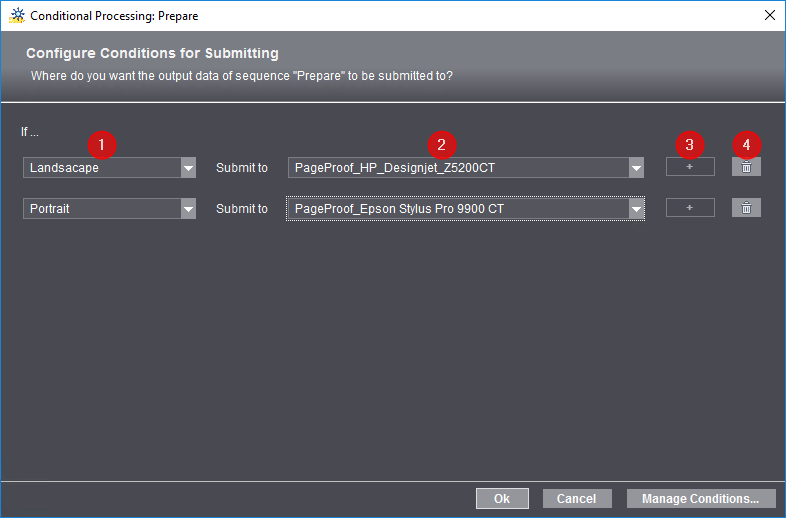
You can generate as many submit conditions as there are suitable sequences. In the present example, there are 2 suitable sequences; for this reason, only 2 conditions can be generated (no Plus button active). You can add any of the assignments by clicking the respective Recycle Bin button (4).

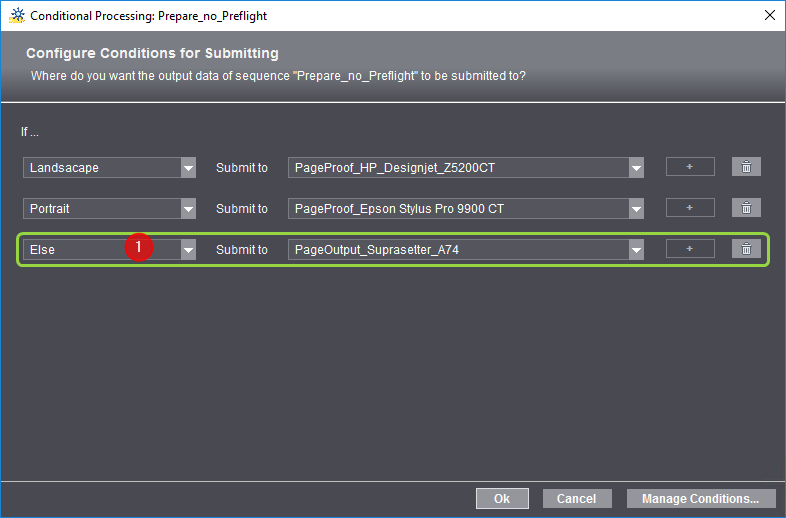
Note: As a rule, only those pages are submitted that meet at least one of the conditions; pages not complying with any of the conditions will not be submitted automatically. For this reason, it is feasible to always define a condition for which the "Else" (1) option is selected in the "If ..." list. In this case, all pages that do not comply with any of the defined conditions, are submitted to the sequence assigned to "Else".

14.Save your settings for conditional submitting with "OK".

Note: If you cancel editing, the dialog "Configure Conditions for Submitting" closes, and the conditions will not apply. The connecting lines are generated but all documents are submitted to both sequences simultaneously without conditions. The conditions defined before (in the "Portrait" and "Landscape" examples) are not removed and can be used for later definitions.
The connecting lines now are displayed with the names of the set conditions.

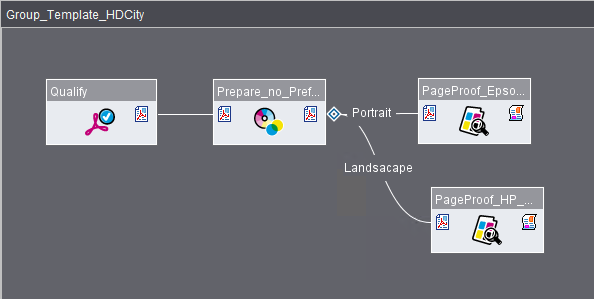
Double clicking the diamond icon opens the dialog "Configure Conditions for Submitting". If needed, you can edit the submit conditions or define new conditions here.

Note: Once defined, submit conditions are available in the entire system for group templates and for smart templates (see also Conditional Submit Process).
Deleting sequence templates from a group template
To remove a sequence from a group template, mark the sequence concerned and click "Delete" or use the shortcut "Ctrl +Del".
Click "Save" to save the changes you made to an open group template.
Click "Save As..." if you wish to modify an existing group template and save it using a new name. The "Save Template" dialog opens:
Type a name that will be used when saving the group template and if necessary, type in a comment.
Click the "Close" button to close the group template. If the template was modified since it was last saved, a dialog opens where you can select whether you wish to save the changes or to close the template without saving. In this case, any changes made are lost. As a third option, you can cancel Close.