
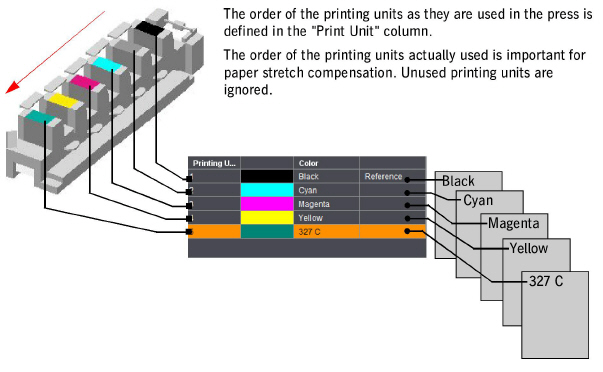
You set the number and order of the process colors in this tab, exactly as they will be printed on the press. A table on the left of the window lists the process colors that are taken into account in the paper stretch compensation template. The "Print Unit" column indicates the order in which the paper sheets will run through the single printing units. The "Color" column must contain the placeholders for the process colors in the order they will be used in printing.

Note: The items entered in the "Print Unit" column do not have to correspond exactly to the "real" printing units on the press, for example, if only the last four printing units are used on an 8-color machine. What is important is the correct order of the process colors.
To change the order, you can select a color and move it up or down by clicking one of the "arrow buttons". You can delete a color from the list by clicking the "trashcan" icon. These operations let you match the color scheme to specific needs. "Reference" in the right column denotes the color or printing unit with which the reference marks with the scale are printed. You can define a color as a reference color by marking it and clicking "Reference".

Note: To make sure that you don't get the order of colors mixed up, we strongly recommend that you always match the order or keep to the same order at the following points in the entire printing process:
•in the "Printing Order" and "Compensation Values" tabs in "Resources > Paper Stretch Compensation",
•when defining the imaging order of plates/films in the "Job Settings" tab > Colors" of an open job and
•in the order of colors when printing on the press.
The right part of the "Printing Order" tab lets you select which process colors will be taken into account in paper stretch compensation.
Proceed as follows to define a color list for paper stretch compensation:
1.The process colors first display in the color list on the left half of the window. To add spot colors, you can select one of the color tables in the system in the "Color Table" list box on the right.
2.The spot colors in the color table are listed below the "Color Table" list box. Select the spot color that you will add to the color list for paper stretch compensation. The name of the spot color appears in the "Name" box. Click "Add". The color is added to the list below the process colors.
3.You can add other colors in the same way.
4.To replace a color in the color list by another color, mark the color concerned in the list, then select the new color in the list of spot colors and click "Overwrite".
5.To delete a color from the color list, mark the item concerned and click "Remove Printing Unit" (trashcan icon).
6.You can change the order of the colors in the color list by marking a color and then moving the item up or down with the "Up" (arrow facing up) or "Down" (arrow facing down) buttons.
7.Mark the color that you will use as the reference color and then click the "Reference" button.

Note: You will also find color tables from the Master Data Store (MDS) if you use an MDS in your system environment.