You open the "Template Properties" window by selecting a template and then clicking the "Properties" button or selecting "Properties" in the context-sensitive menu:
This window shows you details about the selected template (name, when it was created or modified and who created or modified it).
You can write or edit a comment in the "Comment" box (e.g. detailed description of the use of this sequence).
Enable the "Active for JDF Import" option if you wish that this sequence template will be available for jobs that are generated through a connected MIS, Web-to-Print Manager or Portal Services.
The "Criteria for Sequence Replacement" section is designed for the automatic integration of a sequence in a web-to-print workflow or for the import of MIS or Portal Services print jobs (see the Succession).
You can enable various criteria for different sequence types or select a parameter for a criterion, e.g. "Customer ID".
For example, if a sequence template that is customized for a particular customer is required for an automated web-to-print job, you can use the "Customer ID" criterion to define that this sequence template will only be used for this customer in the web-to-print workflow.
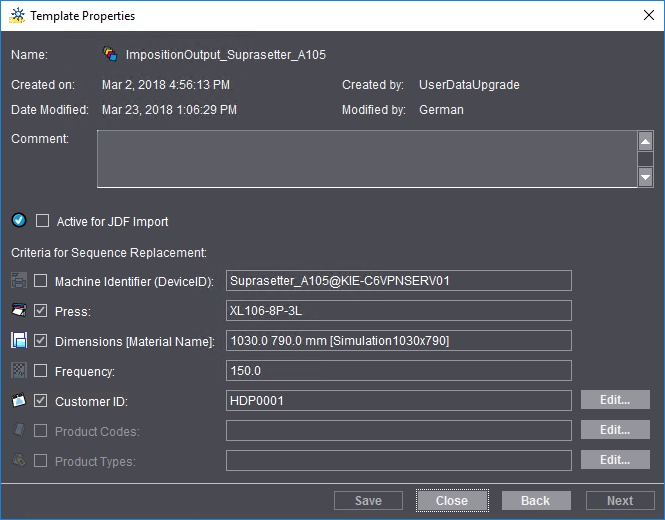
The properties window of an ImpositionOutput sequence is shown in this example. You can set the following special parameters for this type of sequence:
•Machine Identifier (Device ID):
The device ID of the selected CTP device is entered in this box. The Device ID is defined in "Administration > System". See also System.


The machine ID is used as a replacement criterion when this option is enabled.
•Press
When this option is enabled, the press whose calibration data were set up in the ImpositionOutput sequence is used as the criterion.

Prerequisite: To be able to enable this option, "Calibration" must be set up and enabled in the ImpositionOutput sequence as shown in the example below:


The press for which the selected process curve set is valid must be set in the "Press" box. If there are two different presses for the same plate size in the system environment, you must select the matching press in this box. The press that is set in this box displays in the "Template Properties" dialog and can be selected as a replacement parameter.
•Dimensions [Material Name]:
This is where you can select the plate dimensions or the material name that is set in the "Rendering" option as the replacement criterion.
•Frequency:
This is where you can set the screen frequency that is defined in the "Screening" option as the replacement criterion.
•Customer ID:
You can select a customer ID from customer administration with "Edit" and enable this criterion. By doing this, the current ImpositionOutput sequence is used only for jobs of the selected customer.
Product Codes and Product Types
In the Prinect Business Manager, the "Product Type" parameter is available for job planning and estimating. A product type like "Label", "Booklet", "Postcard, "Poster" is a rough categorization of the product and can be freely configured in the Business Manager.
Likewise, the Web-to-Print Manager has a parameter called "Product Code" that identifies a single product (e.g. Postcard A6, Flyer A4, single-sided). Each new product that is added to a web shop must have a product code.
If "Product Type > Brochure" is assigned to a sequence template, this sequence template is then used for brochure printing in the automated workflow, provided that the other criteria you set also match. This sequence was set up in advance in a way that the single steps for brochure printing are set correctly.
You can open the "Product Codes" dialog with "Edit" to define a product code. If product codes already exist, you can also open this dialog by selecting the code and double-clicking.
You can define product types in the Prinect Manager (see Product Types).
Click "Next" or "Back" to view the properties of the next or previous template in the structure. This means that if you want to view the properties of another template, you don't have to close the window first and then mark and open the other template. You can simply scroll backwards and forwards in the structure as you want.