
Manual Creation of a Print Job
Manual Creation of a Print Job
This chapter will show you briefly how to create a new print job in the Cockpit manually. "manually" because that print jobs can also be created automatically.
Print jobs can be created automatically as follows:
•By filing documents to a suitably configured hotfolder (see "Hotfolder" option).
•By dragging-and-dropping documents to an existing, suitably configured digital print job in the job list (applicable only for digital print jobs).
Note: You can also create new jobs with the Prinect Portal. Details about this can be found in the Online Help of the Prinect Portal.
Special characters in job names

Note: The following characters must not be used in job names:
|
" |
% |
’ |
* |
; |
< |
> |
? |
^ |
‘ |
{ |
| |
} |
~ |
/ |
\ |
1.In the Prinect Cockpit, go to "Jobs", mark a group item e.g. "PRJOBS" (1) in the job list and click "New Job" (2). The "Create new Job" dialog opens:

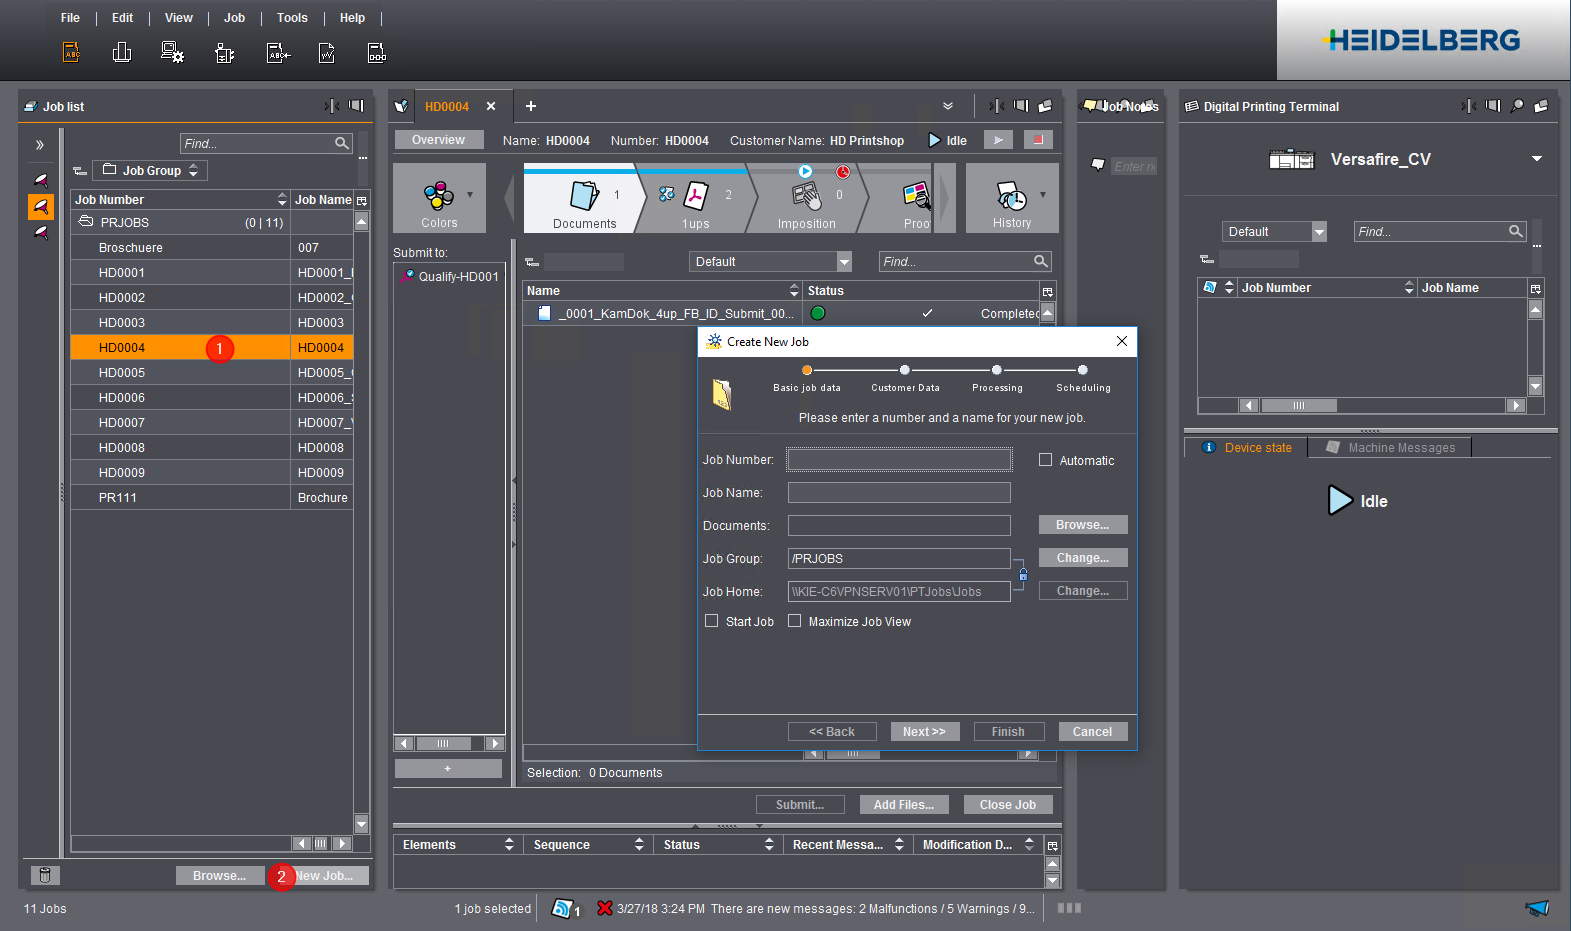
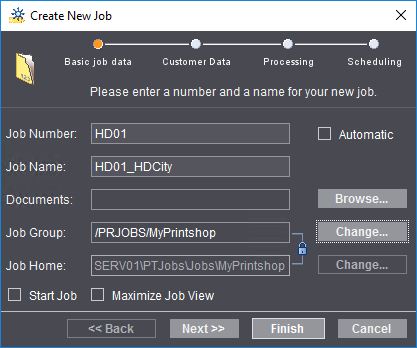
2.This dialog has four views that you can go between with "Next" or "Back". First fill out the boxes in the "Basic job data" view:
·Assign a job number. You can take the job number, for example, from the job ticket of a customer job. Job numbers must be unique in the Prinect system. This means that each job number can be assigned only once.
·Your next step is to assign a job name. Job names as well must be unique. When you go to the "Job Name" box, the job number is copied automatically to this box. You can use the job number as a prefix for the job name or overwrite it. Heed the above notes on characters that must not be used in job names! In the example, the job name "HD01_HDCity" was entered.
·In the "Documents" box you can now assign the documents (supplied by the customer) to the job. You can also do this step later in the created job.
·By default, "Job Group" and "Job Home" are linked. This means that if you define a new job group, a folder of the same name will be created automatically for this job group. Click "Change", if you want to create a new job group . The "Select Group" dialog opens.

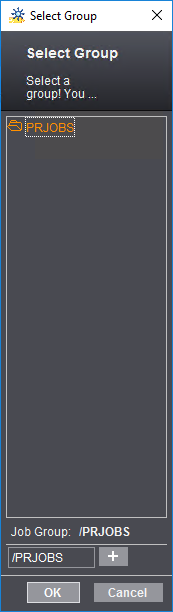
·To create a new subfolder, click the plus sign beside the box with the folder name. A new text box displays.
·Assign a group name, e.g. "MyPrintshop". Once again you can click the plus sign to create more subfolders. You remove a folder by clicking the minus sign. Click "OK" to confirm your settings. The "Select Group" dialog closes.

3.The job starts immediately after it is created if the "Start Job" option is enabled. The new job first has "waiting" as its status if this option is not enabled.
4.Click "Next" to open the "Customer Data" view.
5.Select a customer in the "Customer Name" list box (customer must have been defined in customer administration). "Customer ID" and "Nickname" are also taken from there. "Customer Job ID" and "Customer Job Name" are copied from the basic job data you defined beforehand. You can overwrite these items if you have other customer job data that differ from the job data set in the Prinect system.
6.Click "Next" to open the "Processing" view: In this view, you can add prepared sequence templates to the job.

Note: You can also add or remove templates or edit templates at a later point in the job (see 'Processing' Section). For that reason, it is not absolutely necessary to add templates at this point.

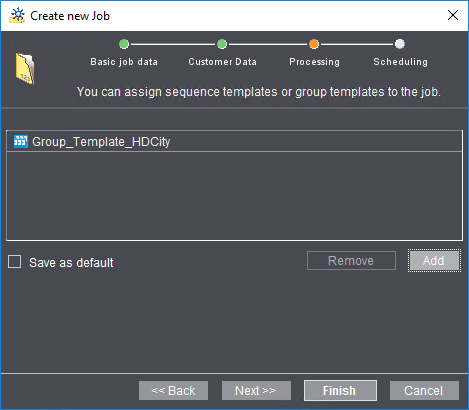
Click "Add". The "Select Templates to Add" dialog opens:

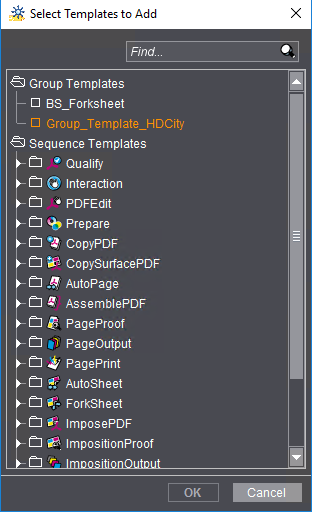
7.In this dialog, you can also select one or more group templates, if available, instead of single sequence templates (see Group Templates). Click "Add". A group template generally contains all the sequence templates needed for processing this job. The selected templates are also loaded automatically for jobs created at a later date if "Save as Default" is enabled. You should enable this option only if you wish to always assign the same sequence templates or group templates to all jobs. Otherwise you have to manually remove templates that are not needed.

Note: The "Save as default" option works differently for each user logged in to the Cockpit. This means that each user can save custom sequences as a default.
8.If "Prinect Archiver Pro" is licensed, you can select the Archiver server and an Archiver folder template for this job.
9.Click "Next". The "Scheduling" view opens. You can set the following data in this view:
·Select the Cockpit user responsible for this job
·Set a due date
·Define the job type (production, product, preliminary job, CAD, reuse, job template) (see Job type) and
·assign a priority. Leave the predefined settings as they are.
·In "Pages" (or "1ups"), enter the number of pages of a single, printed copy.
·In "Delivery quantity" enter the quantity of the printed copies. These details are for planning only; they do not affect the actual processing of the job.

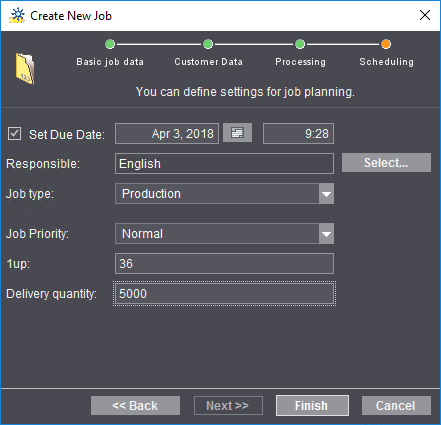
10.All the data needed for creating the new job are now entered. Click "Finish".
The new job is created and opens in the "Job" window. If applicable, double-click the caption bar of the "Job" window to maximize the width of the window. The view in which a job was last open displays at first. You can switch the job view at any time.