In this section, you can define a special "proof sheet layout" for proofing that lets you position several sheets on a layout. You can also define marks. Based on these settings, the pages are output as sheets by the selected proofer.
"Automatic Page Positioning" group
This is where you can set that several pages will be positioned on a proof sheet. During processing of the job, the document pages are positioned automatically on the sheet for proofing.
"Orientation" parameter
You can use this parameter to define that pages will be rotated during positioning. You can choose between automatic rotation of the pages or rotation of the pages at a set angle.
You can select the angle of rotation in the list box if rotation is to be by a defined angle. All the pages are rotated by the same angle. Pages can be rotated by 0°, 90°, 180° or 270°. Rotation is carried out in steps of 90°, counter-clockwise.
"Automatic" option
When this option is enabled, the pages are automatically rotated by 90° counterclockwise if this action leads to a better utilization of the proofer page size. If this is not the case, the pages are not rotated.
"Maximum Number of Pages" parameter
These values let you set that several pages will be placed on a proof sheet. Use the first value to set the maximum number of pages that will be positioned horizontally side by side. Use the second value to set the maximum number of pages that will be positioned vertically one below the other. For example, if you set 4 x 2, eight pages in groups of four will be positioned in two rows on a proof sheet.
"Duplex printing" parameter
You can use this parameter only if the selected proofer supports output in the duplex mode. If this is the case, you have the following options:
•"Off"
Only one face of the proof sheet is used, i.e. the front proof face will be used.
•"Tumble"
The two sides of the proof sheet are used. For example, the sheet is turned from front to back, with the page marks remaining on the page, but the front mark going to the back.
•"Turn"
The two sides of the proof sheet are used. For example, the sheet is turned from right to left, with the page marks going from right to left, and the front mark remaining at the front.
•"Tumble, back surface only"
The sheet is tumbled, the front surface of the proof page is not used but the back surface is.
•"Turn, back surface only"
The sheet is turned, the front surface of the proof page is not used but the back surface is.
"Back Margin" parameter
You can define the horizontal and vertical width of the back margin in these boxes if you set that several pages will be positioned in a proof layout in "Maximum Number of Pages". The net page size including trim is taken as the basis for determining the page gaps. In other words, back margin width indicates the spacing between the trim edges.
You can enter values for format marks in "Offset", "Length" and "Line Weight" when you enable the "Format Marks" option. These format marks are printed with proofs.
"Slugline" group
In this group, you can set that a slugline will be inserted on the proof sheet layout.
"Add Slugline" option
Use this option to enable that a slugline will be used.
"View" group
This is where you set how and where the slugline will be displayed (position, spacing, font, etc.).
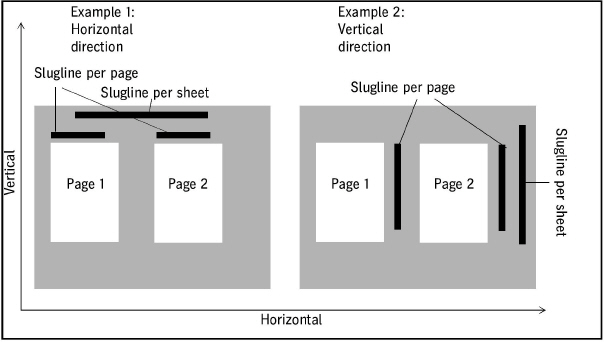
"Preferred Position" group
This is where you set whether the slugline will be positioned vertically or horizontally on the proof layout.
"Distance" parameter
This is where you define the space between the slugline and the next edge of the page. The net page size including trim is taken as the basis for determining the space.
Example 1 in the diagram below displays slugline printing per page and per signature, example 2 shows it in vertical direction.
"Font/Size" parameters
This is where you set the font and the font size for the slugline text.
"Content" group
In this group you define which information will appear in the slugline. You can enable the following contents:
•"Device Name"
Name of the output device
•"Job Number"
The number of the Prinect print job is inserted.
•CMM Information
Details about color management settings display in the slugline.
•"Sheet Name/Elements"
The sheet name of the layout sheet used is shown.
•"Screen Information"
Output of screening parameters, "Screen Type", "Dot Shape", "Frequency".
•"Text"
You can enter your own text in this text box.