
Administration of spot color tables or color measurement data from a central point is possible using the central color database. To organize a large number of color files, you can create folders for different color combinations and import color files as CxF files to them.
The user interface is divided into three sections:
•A view of the folder structure (see "Folders" Group)
•A view of the colors contained in a folder (see "Colors" Group) and
•a view of the properties of a selected color (see "Color Properties" Group).
This view provides you with important information about each selected color, depending on whether the color data exist as a spectrum (graphics) and/or as L*a*b* color data.
In "Folders" and "Colors", the following functions are available for configuration of the lists and for looking for data:
This lets you group items in the list of folders or colors by column headers. These groups then display as folders. You can create multi-level groups, with each group creating another level lower down in the structure. You will find more information about the grouping function at the following point: Structured view.
You can confine the number of columns shown in the list. To do this, you can select a predefined "column set" in the list box or you can use "Customize" to customize which columns will display in the list. You can save the columns you selected as a custom column set with "Save as". You will find more information about this at the following point: Define a custom column set .
The text box for the search function is located above the tables. You can enter any elements of a folder or color name (letters, digits, permissible special characters) in this box. The list then only displays those items whose names include the characters you entered. The input of characters impacts the list view immediately. The previous content of the list displays again when you delete the characters entered in the search box (all inputs are deleted if you click "X").
This is where you manage the color folders of the central color database. You can create folders in folder structures that have further subfolders.
The columns of the folder table contain the following information:
•Folder: Structure and names of the color folders. If a folder has subfolders, you can open the folder by clicking the icon.
•Colors: Number of colors in the folder.
•Created by: Name of the Prinect user who created the folder.
•Created on: Date/time the folder was created on.
•Modified on: Date/time the folder was last modified.
You can search by folders or colors above the list of folders/colors. The search affects folders or colors, depending on which option is enabled before the search box. If you select "Color", the system looks for matching color names in all the folders. The color search in this box is case-sensitive. This means that if you enter "HD_Blue" a color with the name "hd_blue" is not found.
When you enter text into the search box and "Color" is enabled, the same search text displays in the search box in the "Colors" section. If the search is successful, only the folders with colors whose name matches that of the search text display in "Folders". If you now click one of these folders, only the colors found in this folder and whose names contain the search text display in "Colors".
See also Search function.
Use this to create a new folder. The new folder is created either on the topmost level of the folder structure (if no folder is selected in the list) or as a subfolder of the folder you selected beforehand.
"Import" button
This button lets you import color data that are available as CxF files (see Import Colors from CxF Files).
"Export" Button
This button lets you export the colors in the selected folder to a CxF file. See Export colors of a folder to a CxF file.
"Delete" button
Use this button to delete a folder you selected beforehand (and all the subfolders, if any). After you click the button, an alert message that you have to confirm displays.
Caution: Deletion not only deletes the item in the table but also the folder concerned with its contents is removed from the central color database.

Prerequisite: CxF files as the result of color measurements are available in the system environment of the Prinect server (preferably in the "PTDocs", "PtConfig" or "PtJobs" folder).
The "CxF" (Color Exchange Format) file format makes it possible for you to copy spectral colors, i.e. colors are measured based on wavelengths of light, to the Prinect workflow or the Master Data Store. To do this, you can import spectral color data from CxF files and file them to color folders. During the import, the color spectra are converted to L*a*b* color values so that these colors can be used in the Prinect environment. Often each color has several spectra because of different measurement conditions ("M0", "M1", " M2", "M3"). If a color has several spectra, all the variants are assigned to this color. You can then toggle between the measurement conditions in the color properties and view the related diagrams.
Proceed as follows for import:
1.In "Folders", either do not select any folder or select the folder to which the colors of the CxF file will be imported or select the folder where you will create a new subfolder.
2.Click the "Import" button. The "Import Colors from CxF File" dialog opens.
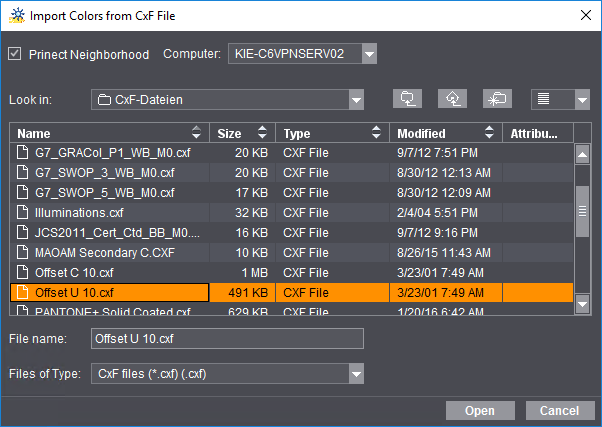

3.In the system environment, go to the folder where the CxF files needed are filed and select the CxF file you want. Confirm with "Open". The "Import Colors" dialog opens:

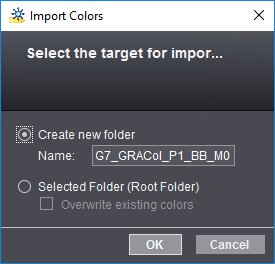
In this dialog, you can select whether you want to create a new folder or whether the colors will be imported to the selected folder. You must enter a name for a new folder (or subfolder) you want to create.
If you select "Selected folder", you can enable "Overwrite existing colors" if desired. Then colors in the folder with the same name as the colors to be imported will be overwritten by the imported colors.

Caution: When you enable this option, any colors of the same name are overwritten without any further prompt.
4.The import starts when you click "OK".
Export colors of a folder to a CxF file
You can export the colors from a folder in the central color database to a CxF file.

Prerequisite: The folder must have colors and the colors may not be write-protected as, for example, the preinstalled Pantone or HKS color tables are.
Proceed as follows:
1.To do this, select the item you want in "Folders" and click "Export". The "Export Folder Colors to CxF File" window opens:

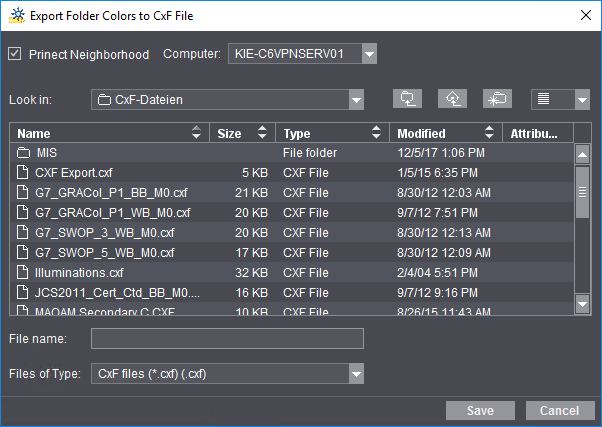
2.In the system environment, go to the folder where the exported CxF file is to be saved and give it a file name. Confirm with "Save".
In this way, you can make exported color tables available for use elsewhere.
You open the "Folder Properties" dialog with "Properties" in the context menu:
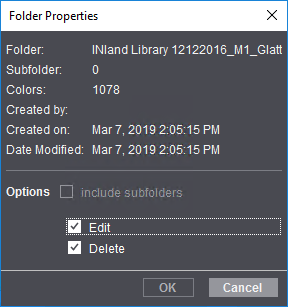
The properties of the folder display in the upper part.
In the lower part, you can define whether the selected folder may be edited or deleted. If you enable "include subfolders", these settings also affect the subfolders in it.
Subsequent changes to the setup of a subfolder
Example: A folder named "Import_CxF" has two subfolders, "Sub1" and "Sub2". Firstly, the properties of the "Import_CxF" folder are set so that the "Edit" and "Delete" options are enabled if "include subfolders" is enabled.
Then the properties of the "Sub1" subfolder are changed so that "Delete" is disabled for this folder in order to protect it.
The "Folder Properties" dialog is now invoked again for the "Import_CxF" folder:
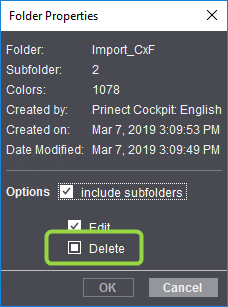
If you now enable "include subfolders", the "Delete" option will have a special tag. This tag indicates that the subfolders of the selected folder have different settings for this option. You can overwrite this setting by clicking the checkbox and enabling or disabling the option. Then the deviating setting is applied to the subfolder(s).
You can invoke the following commands in the context menu for the folders:
|
Context menu |
Function |
|---|---|
|
New |
Creates a new subfolder below the selected folder. See "New" button. |
|
Import |
Is equivalent to the function of the "Import" button. See Import Colors from CxF Files. |
|
Export |
Is equivalent to the function of the "Export" button. See Export colors of a folder to a CxF file. |
|
Cut Paste |
You can cut the selected folder and paste it in another folder. This lets you move subfolders to another place. |
|
Rename |
This command lets you rename the selected folder. |
|
Delete |
Use this command to delete the selected folder (and all the subfolders, if any). After you click the button, an alert message that you have to confirm displays. |
|
Properties |
You can edit the properties of folders with this command. See Edit properties of folders. |
|
Refresh |
This function is equivalent to the Cockpit Refresh function that you can also trigger with the F5 function key. In some cases, for example, if large color tables will be imported or exported, it can take some time until the Cockpit is updated to the current operating state. You trigger an immediate refresh of the Cockpit display with "Refresh". |
This group displays the colors that are in the currently selected folder. The table has the following columns:
•Color: Name of the color:
•L* a* b*: The L* a* b* values of the color concerned.
•Paper Grade (ISO): The paper grade used for the color measurements.
•Measurement Condition: The measurement condition used for the color measurements (M0, M1,...).
•Modified on: Date/time of the last modification.
•Modified by: Process that caused the last modification.
When you click a color item, details about this color display in "Color Properties".
"Delete" button
Click this button to delete a color you selected beforehand. After you click the button, an alert message that you have to confirm displays.

Caution: Deletion not only deletes the item in the table but also the color concerned is removed from the central color database.
|
Context menu |
Function |
|---|---|
|
Cut |
You can cut the selected color and paste it in another folder. This lets you move colors to another folder. |
|
Rename |
This command lets you rename the selected color. |
|
Delete |
The selected color is deleted. After you click the button, an alert message that you have to confirm displays. |
|
|
You can print the color table to a system printer with this command. In the case of large tables, a note displays, drawing your attention to the expected size of the printout. |
An overview of the following technical details of the color display at the top of this window:
•Type: Type of color, i.e. "Spectrum" and/or "L*a*b*".
•Created on: Date/time the color was created (color measurement).
•Modified on: Date/time the color was last modified. An example of a modification is when the colors are imported to the central color database.
•Modified by: Process that caused the last modification, e.g. import to the central color database.
•Paper Grade (ISO): The paper grade used for the color measurements.
•Density filter: Any density filter (e.g. red, green, blue) used for the color measurement displays in this column.
•Trapping: This displays the density of the color for trapping.
•Opacity: This displays the opacity of the color if a certain opacity is defined for the color.
The spectral values (1), if defined, display in a diagram in the lower part of "Color Properties" and/or the L*a*b* values (2).
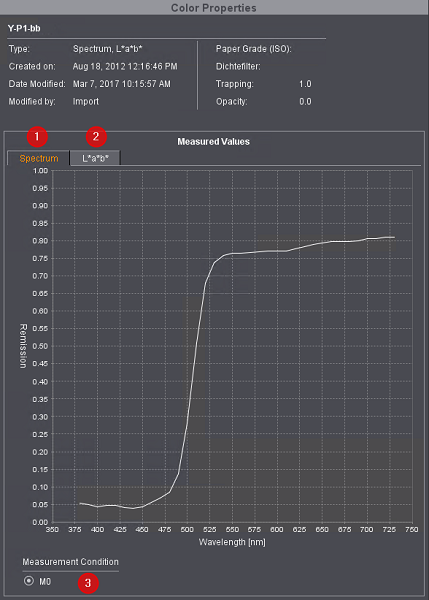

You can toggle between the spectral value view (diagram) (1) and the L*a*b* view (numerals) (2) by clicking the tab you want.
If a color has several measurement conditions, you can toggle between them (3). Then the spectral values or L*a*b* values matching the selected measurement condition display.