Administration - Printing Materials and Substrates
Printing Materials and Substrates
In this section you manage the printing materials (paper grades for offset printing) or substrates (paper grades for digital printing) that will be used for printing. In this context, the term "substrate" will be used for digital presses because it is more general (generic) than the term "printing material". In some digital presses, the paper can be coated with an undercoat or varnish in additional to the inking. That is why the term "substrate" is used for this. The printing material parameters that you enter in this tab support a standardized output process. The printing materials and the substrates are each managed in a separate tab.
The information about the printing materials and substrates is stored in the Master Data Storage (MDS) and, as a result, is available to all computers connected to the Prinect Server.
In this tab, you manage the printing materials (paper grades) used for printing with an offset press.
Create/modify printing materials
You will find several options for creating and modifying printing materials in the list of printing materials.
"Create Printing Material" button
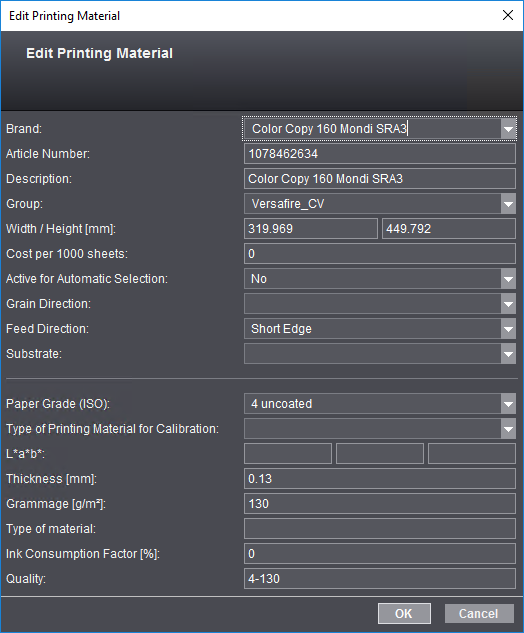
You define new printing materials with "Create Printing Material". The "Create Printing Material" dialog opens.
"Substrate from Printing Material" button
This button is enabled only if you marked a printing material beforehand in the table. This button lets you create a new substrate whose properties are derived from the selected printing material. This means that the "Create Substrate Based on Printing Material" dialog has some boxes that are already filled with properties of the selected printing material (see also Define Substrates). The new substrate you defined is added to the list of substrates in the "Substrates" tab.
This button is enabled only if you marked a printing material beforehand in the table. You can modify an existing printing material with "Properties". The "Edit Printing Material" dialog opens. This dialog shows the same boxes as the "Create Printing Material" dialog.
The following parameters are available for naming and identifying printing materials:
•"Active for Automatic Selection" option
•Type of Printing Material for Calibration

Note: If you do not know various parameters when you are creating a new printing material, you can take the values from the reference table to complete your data:
|
Grade (ISO) |
Grammage |
L*, a*, b* |
Thickness |
|---|---|---|---|
|
1 glossy coated |
135 g/m² |
95, 0, 0 |
120 µm |
|
2 matt-coated |
135 g/m² |
95, 0, 0 |
120 µm |
|
3 web, glossy coated |
– |
– |
– |
|
4 uncoated |
135 g/m² |
95, 0, 0 |
120 µm |
|
5 uncoated, yellowish |
135 g/m² |
88, 0, 6 |
120 µm |
You can enter a brand in this box, for example, the one used by the manufacturer.
Article numbers are entered automatically if the Prinect Manager is connected to an MIS system. If this is not the case, you can enter brands for new printing materials in this column.
Printing materials are defined in Prinect Business Manager if the Prinect Manager works with Prinect Business Manager as its MIS system. This is where printing materials are managed solely by article number. As a result, different article numbers may be defined for one brand. In this case, it's possible for you to define an alternative identifier for the printing materials in the "Name" column. A name is generated automatically if you don't enter an identifier in this column. The automatic name is generated based on the following pattern:
•The brand is used if there is no article number.
•The name is made up of the brand and the article number, separated by a stroke, if there is an article number.

Note: Please do not use the term "Default" as the name.
The "Group" parameter lets you group printing materials for faster identification if you should have a large number of materials. You can enter a freely selectable group identifier in the "Group" column, but it is not mandatory that you specify this. Using the "Group" parameter is a good idea especially if you wish to group the materials (see the section Grouping Printing Materials).
Enter the geometric data of the paper in this box.
This is where you can type in the cost for 1000 sheets. This value can make it easier to determine the printing costs if print jobs with multiple sheet optimization (Prinect Signa Station) are to be calculated.
"Active for Automatic Selection" option
You can assign "Active for Automatic Selection" to printing materials for creating gang job layouts on Prinect Signa Station. These printing materials are then automatically set by default for the gang job layouts on Prinect Signa Station.
This attribute displays in its own column in the list of printing materials.
The grain direction is important for folding the paper. You can choose between the following grain directions:
•Long grain and
•Short grain
This parameter lets you set the feed direction of the paper in the machine. This parameter is designed solely for digital printing and makes it possible to specify the direction in which paper grain is oriented for printing materials used in digital printing. This detail lets you specify the correct orientation of a paper grade for digital printing. This parameter also displays in the table of printing material parameters.
This is where you can select a substrate defined in the "Substrate" tab (see Substrates).

Note: When you assign a substrate to a printing material, the properties of the substrate relevant for the printing material are not copied to the printing material description. This means that the printing material properties set in this dialog continue to be valid.
You can choose between one of five paper types:
•1 glossy coated
•2 matt-coated
•3 web, glossy coated (for web offset)
•4 uncoated
•5 uncoated, yellowish
Type of Printing Material for Calibration
Default calibrated paper types are listed here. Select the (calibration) paper type that you wish to assign to the paper.

Note: Make sure that you have a calibration for the (calibration) paper you selected (refer to "Calibration Manager - User's Guide).
The L*a*b* values for the paper's basic color are entered in these columns. The percentages are entered separately for L*, a* and b*.
Enter the thickness (in mm) of the printing material in this box.
Grammage (grams per m²) refers to the exact weight of the paper.
This parameter is needed for packing materials. The material type must be specified to generate a correct PDF 3D with the Cutting Die Editor.
The ink consumption factor (in percent) is a gauge for the paper-specific consumption of ink with a defined area coverage density in print.
If necessary, you can enter quality information here. This parameter is not available for all printing materials or is not used by all processes in the workflow referring to printing materials.
To give a clearer structure to a long list of printing materials, you can group the list based on the properties of the printing materials. The properties display in the columns in the list. To group the list by a property, mark the appropriate column header and, holding down the left mouse button, drag-and-drop it onto the icon named "Group" above the printing material list.
In this way, all the printing materials that have the same properties of the selected column are grouped. The group displays in the table as a popup list and the parameter on which grouping is based displays in the box beside the group icon. The grouped list has a small arrow.
You can expand the group when you click this icon.

Note: Like in the column headers, you can sort each group in ascending or descending order by clicking the small up and down arrows beside the group parameter.
Now you can select another parameter to continue grouping the list. To do this, select the next column header and drag-and-drop it to the group icon. This new parameter becomes the new main group level. The group hierarchy also displays in the boxes beside the group icon. The top group level is always at the far left. You can create other group levels if required.
If you should discover that a selected group level is no longer needed, then you can undo the group step-by-step. To do this, mark any cell that displays beside the group icon and drag-and-drop it back to the column headers. The order of the hierarchy levels doesn't matter in this case.
These parameters are ungrouped and the single parameter values display again as table columns. In this way, you can undo the entire group.
When you click "Delete" or use the key shortcut (Ctrl + Delete), the printing material marked will be removed from the structure and deleted from the data directory on the server after you confirm the alert message.
Duplication of printing material entries is recommended especially if the values of the printing material you have are only slightly different to the new one.
1.Select a printing material that is similar to the one you want.
2.Click "Duplicate".
A copy of the selected printing material with all settings is created.
3.Open the copy and edit the values in question.
Context menu for the printing material list
|
Menu command |
Function |
|---|---|
|
Adaptive Quality Assignment |
Use this menu command to invoke the assistant for adaptive quality assignment for the selected printing material(s) (multiple selection is possible) (see Assistant for adaptive quality assignment). |
|
Create Printing Material |
|
|
Substrate from Printing Material |
|
|
Duplicate |
See "Duplicate" button. |
|
Properties |
See "Properties" button. |
|
Delete |
Assistant for adaptive quality assignment
This function lets you assign a quality attribute to printing materials (even a large number of them using multiple selection) or modify existing quality attributes. That way, you can modify only printing materials that were already assigned a paper grade and grammage. Printing materials that do not meet this prerequisite are automatically excluded from the selection when you select them. An appropriate message displays.
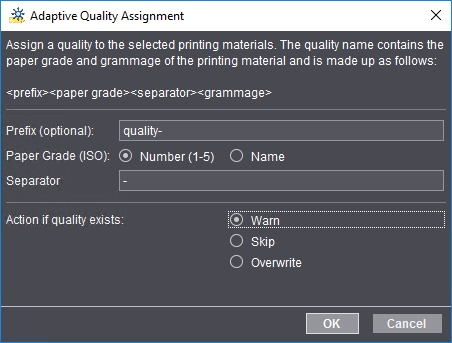
In the top part of the dialog, you are informed briefly about the function and are shown a preview of the structure of the quality attribute: <prefix><papergrade><separator><grammage>.
In the middle, you set what the quality attribute will consist of:
•Prefix: A prefix is optional.
•Paper Grade (ISO): The ISO paper grade that you add to the quality attribute can either be a digit ("Number", e.g. 4) or a name (e.g. "uncoated").
•Separator: This is where you enter a separator between the paper grade and grammage, e.g. "-".
The quality attributes are as follows if "quality-" (Prefix) and "-" (Separator) from the example above are used: "quality-4-100", etc.
In the lower part of the dialog, you can define how the Assistant will react if quality attributes are already assigned to the printing materials to be changed:
•Warn: A warning displays when you click "OK".
•Skip Printing materials that already have a quality attribute are not assigned a new attribute.
•Overwrite: Existing quality attributes are overwritten by the new values.