In this tab, you can set up the contents and structure of tooltips that display for operations. Tooltips are windows with details that display when you left the mouse cursor hover over an element (in this case, an operation) without using one of the buttons. The tooltip window closes automatically after a while.
Tooltips that you set up in this tab show current details about the state of the operation concerned.
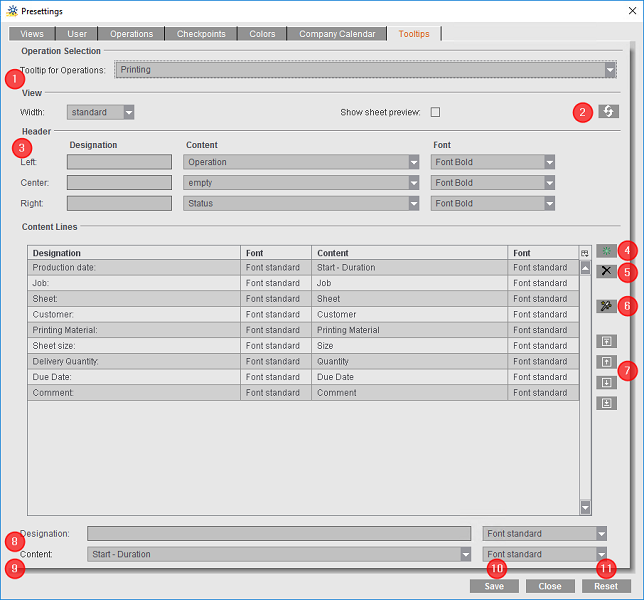
"Operation Selection" group
In the "Tooltip for Operations" list box (1), select the type of operation for which you wish to set up tooltips. The following types of operations are available:
•Cutting
•Folding
•Saddlestitching
•Binding
•Imaging
•Manual Labor
•Punches
•Folding carton gluing
•Digital printing
"View" group
"Width" list box
This is where you set how wide the tooltip window will be (narrow, standard, wide, extra wide).
"Show sheet preview" option
You can view a sheet preview as an icon in the tooltip window if you select this option.
"Header" group (3)
In this section you can set up the headers of the tooltip windows. You can define contents for the left, middle and right parts of the header.
1.In "Content" select a variable that will display in each header part. No content displays if you set "empty".
2.In "Designation" enter the identifier for the selected content. Example: If you select "Operation" as the content and enter "Operation" as the identifier, the tooltip will later display "Operation: Folding" as the header for the "Folding" operation.
3.In "Font" you set what the header will look like. You can choose between bold, italics or bold and italics.
"Content Lines" group
In this group, you set which current contents will display in the tooltip. Some contents are already set up in the table.
•You can edit these items by marking an item and editing the identifier, content and, if necessary, the font. The setup boxes are found below the list.
•You can delete items in the list by marking an item and then clicking the "Remove content line" button (5).


•You can add a new item by clicking the "Create new content line" button (4).


A new line is added to the bottom of the table, and you can set up the content line in the "Designation" (8), "Content" (9) and "Font" boxes.
•You can fill the list of content lines with all types of contents that can occur with the "Recreate all values" button (6). You can remove single content lines again, if required, from this maximum selection.


•The content lines display in the tooltips in the order in which they appear in the list of content lines. Use the sort buttons (7) to change the order of the content lines.
Reset settings
You can reset modifications you made to the tooltip settings in two ways:
"Reset to defaults" button (2)
Use this button to reset all tooltip settings to the factory defaults.
"Reset" button (11)
This button lets you reset all settings to the state they had when you last clicked "Save" (10).
Save settings
Click "Save" (10) to save your settings. The tooltips display as set in this tab after the "Presettings" window is closed.