
"Machines" and "Color Schemes" (1) Section
The tabs in this section are "Machines" and "Color Schemes".
Note: You can show or hide this section by double-clicking the separating line between workspaces (1) and (2).
This tab shows all the machines connected to the Prinect system, making them plannable (offset and/or digital presses, proofers, finishing machines, etc.). The machines display in a tree structure, whose topmost level is labeled "Machinery". An element with a folder icon displays in the structure for each machine type or for each group of machines of the same kind (in other words, for a machine cluster). Click a folder icon to open the next level lower down (click again to close it). In a machine cluster, the next level lower down shows the machines that are part of the cluster.
A "cluster" is a group of presses of the same format or of postpress machines of identical type (machine classes) (see Clusters). Clusters can be set up by the system administrator. Operations can be rescheduled from one machine to another within a machine cluster. This requires that all the machines in a cluster are capable of processing operations that were originally designed for another machine in the cluster.
You can open a context-sensitive menu with the following items for each machine:
•Restart scheduler

Prerequisite: You can use the "Restart scheduler" menu item only if the system is enabled for scheduling with the "Lock/enable" button (see "Refresh" button).
You can use this command if the behavior of the Scheduler does not appear to make sense, for example, if a change in shift for a machine does not display correctly in the planning board. Restarting will reload the Scheduler plugin and the Master Data Store (MDS) and will read out the operation data once again. This command is similar to a Cockpit restart and you should not use it if you have no particular reason.
•Edit Machine Order
This item opens a dialog where you can customize the order of the machine groups and the order of each of the machines within a group (if there are a number of machines in a group). For example, you can set that CD machines will display above the XL machines in the planning board. Use the buttons with the arrows (to start/end of list, one position up/down) to change the order.
•Machine properties

Prerequisite: You can confirm the "Machine properties" and "Presettings" dialogs with "OK" only if the Scheduler was locked with the "Lock/enable" button. In other words, the green bar can be seen (see "Refresh" button).
This menu command opens the "Machine properties" dialog (see "Machine properties" dialog). This dialog also displays when you double-click a machine item.
•Preferences
This menu command opens the "Presettings" dialog (see Presettings). This dialog also displays when you click the "Presettings" button.
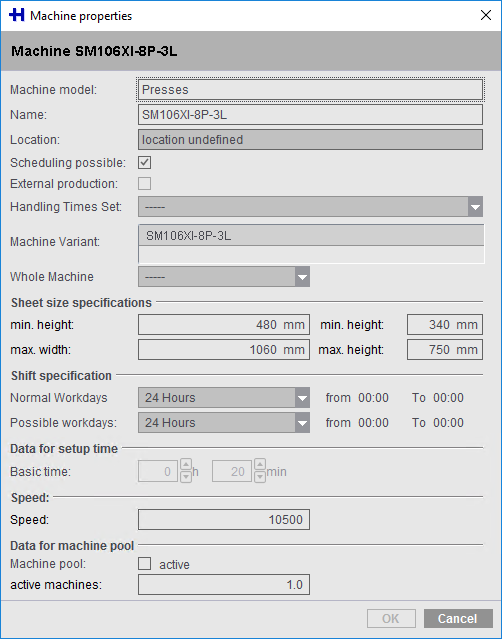
You can view or edit the following parameters in this dialog:
|
Machine model |
•is defined when setting up the device •cannot be edited |
|
Name |
•is defined when setting up the device •cannot be edited |
|
Location |
•can be seen in this dialog only and is a description •editable |
|
Scheduling possible |
•when this option is disabled, the machine concerned is removed from the planning board. Inactive machines are marked by a red cross in the "Machines" tab. •editable |
|
External production |
•is defined when setting up the device. This concerns "external" machines, in other words, machines whose operations were made available by external service providers. •cannot be edited |
|
Handling Times Set |
•To be able to differentiate between normal drying and UV drying, this is where you can select between "Default", "UV inks" and "Long cycle" for print operations. The items in this list box are generated dynamically from the Presettings ("Operations" tab). These lead and follow-up times are used to calculate the time gaps between each of the operations. This results in very short follow-up times between printing and trimming if, for example, "UV printing" was selected. This function is not restricted to printing presses but is available for all machine operations. |
|
Machine Variant |
•can be defined when setting up the device •cannot be edited Example: Postpress machines in particular can be equipped with different units. Variants can be generated from these combinations. |
|
Sheet size specifications |
•is defined when setting up the device •cannot be edited |
|
Shift specification |
•machine shifts can be set in the "Presettings". These shifts can be applied to all machines from the presettings. In addition, you can select single shifts in the "Machine properties" dialog (see "Machine properties" dialog). "Normal Workdays" and "Possible workdays" are defined in the Presettings (see "Company Calendar" Tab) and can be assigned different shifts •editable |
|
Data for setup time |
•are only used when setting up jobs manually and when using the Planning Assistant. This time is also used for recalculating the makeready time when jobs are rescheduled to machines with differing performance parameters (calculation via ratio). •cannot be edited |
|
Speed |
•is only used when setting up jobs manually and when using the Planning Assistant. This time is also used for recalculating the runtime when MIS jobs are rescheduled to machines with differing performance parameters (calculation via ratio). •cannot be edited |
|
Data for machine pool |
•is designed especially for postpress machines. You can use this function to reduce the number of machines of the same kind on the planning board. It also facilitates scheduling. Example: Three folding machines with the same speed and the same units are available. The machines are grouped in a cluster, and two of them are disabled for scheduling ("Scheduling possible" disabled). The "Machine pool" option is enabled for the active machine and you enter a value of '3' in "active machines". As a result, these machines can produce three times as fast as a single one. Consequently, all assigned operations are reduced to 1/3 in the Scheduler view. Because the machines are defined as a "cluster", all of them can load the operations and produce. |