"Print and finishing settings" Tab
Note: This tab is not available for Primefire and Labelfire digital presses because the relevant settings are set in the output conditions.
In this tab you can define settings for digital printing and finishing.
The print and finishing settings differ according to device type:
•Print and finishing settings for toner-based Heidelberg digital presses
•Print and finishing settings for CTP devices operated as a "Digital Platesetter".
•Setup of digital presses with a Digital Print Connector
Print and finishing settings for toner-based Heidelberg digital presses
Various options for the setup of printing and finishing are available if you use a toner-based Heidelberg digital press (e.g. a Versafire model). These options depend on the model and features of your connected press.
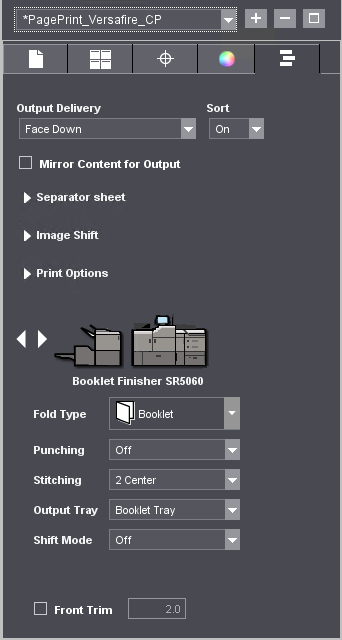
Output Delivery
This is where you select how the printed sheets will be output. The following options are given:
•Face Up
•Face Up - Reverse Order
The order of the pages is reversed, i.e. the last page is output first.
•Face Down
•Face Down - Reverse Order
The order of the pages is reversed, i.e. the last page is output first.
Sort
When this function is enabled, pages are sorted by copies. This means that all the pages of the first copy are output first, then all the pages of the second copy, etc.
When this function is disabled, all the first pages of a production run are output first, then all the second pages, etc.
"Mirror Content for Output" option

Prerequisite: This option is available only for Versafire presses.
The content of the PDF pages is mirrored when this option is enabled.
"Separator sheet" group

Prerequisite: This option is available only for Versafire presses.
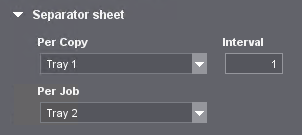
This is where you can set up that separator sheets will be inserted to the delivery stack.
Per copy
This lets you set whether a separator sheet will be inserted after a number of printed copies (see "Interval"). You select the tray in which the separator sheets are loaded in the list box.
In "Interval" you can also set an interval for adding separator sheets. The default is 1. This means that a separator sheet is added after every printed copy. If you enter a value greater than '1', for example, '4', this means that a separator sheet will be added every four copies.
Per job
This is where you can set that a separator sheet will be added after every print job by selecting a tray.
"Insert" group

Prerequisite: This option is available only for more recent Heidelberg Versafire EV/EP presses.
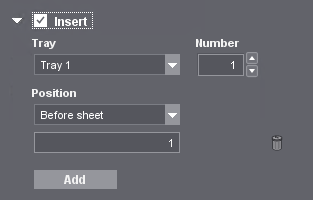
This is where you can set up that inserts will be added. This lets you insert preprinted pages into the printed copy, similar to inserting separator sheets. Different paper trays than those for separator sheets are used for inserts.
"Insert" option
The adding of inserts is enabled with this option.
Tray
This is where you select the tray from which the inserts will be added.
Quantity
This is where you set the number of inserts to be added from the set tray.
Position
In this list box, you can set the position in which the insert will be added. If several inserts are specified in the "Quantity" box, this number of inserts is added accordingly. The position is defined in two levels:
•List box:
·At start: At the beginning of the page stack of a print job.
·Before sheet: Before the sheet that is specified in the input box below this.
·After sheet: After the sheet that is specified in the input box below this.
·At end: At the end of the page stack of a print job.
•Page numbers
In this input box, you can specify the sheet(s) to which the position refers. You can specify a single sheet or a number of sheets. In the case of several sheets, you can enter each sheet number separated by a comma, e.g. 1,3,6,9,12. In the case of sheet ranges, you can enter the ranges using minus signs, e.g. 1-3,7-12. You can also combine single sheets and sheet ranges, e.g. 1-3,5,7,8-12,14.
Restrictions: You may not enter blank spaces, letters or leading zeros. The input box may not be left empty.
Add
When you click the "Add" button, you can set up that further inserts will be added from another tray.
Remove insert section
When you click the recycle bin, you remove the current section and, by doing so, the current insert definition.
Defining the position of inserts if there are index sheets
If not only inserts but also index sheets are inserted, the position defined for the insert always refers to the content pages. The index sheets are not counted when determining the position.
For example, if an index sheet is to be inserted before sheet 9 with "Before sheet" as the position, only the number of content pages inserted beforehand must be taken into account to determine the position of the inserts. In the example shown, an index sheet (1) and one insert (yellow) are already positioned before sheet 9. Only the position of the content page, that is the digit '9', is entered in the "Page numbers" box.
"Tab stock" section
Video Tutorial: You can view the following video on the use of index sheets (tab stock) on Versafire presses:
Printing with Tabs.

Prerequisite: This option is available only for more recent Heidelberg Versafire EV/EP presses.
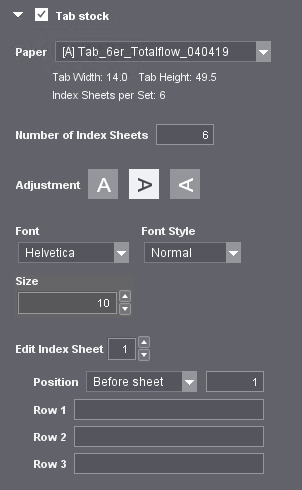
"Tab stock" option
Use this option to enable that index sheets will be inserted.
"Paper" list box

Prerequisite: Index sheets must be prepared and available for the addressed Versafire press in the Prinect Manager. The index sheets are prepared on the control panel of the Versafire machine. The index sheets must be registered in the printing material administration (Administration > Printing Materials and Substrates) of the Prinect Manager and the size matched to the sheet size of the currently processed print job. Then the index sheets display in the "Paper" list box.
Select the prepared index sheet paper in this list box. The following parameters of the selected index sheet paper display below the list box:
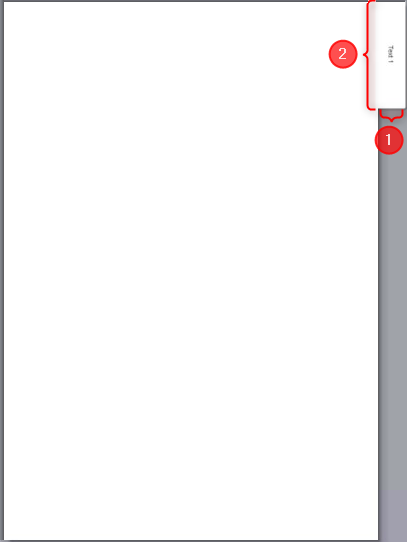
•Tab width: Width of the index tab (1).
•Tab height: Height of the index tab (2).
•Index Sheets per Set: A set is made up of a certain number of index sheets. The index tabs are arranged one below the other in consecutive order on the margin of the index sheet, allowing no gaps to occur. The illustration shows the first index sheet of a set consisting of five sheets, with the index tab at the very top. The properties of the set are predefined with the selected paper.
This is where you define how many index sheets will be used as a whole in the current job. Normally, a multiple of the number of index sheets in the selected set is entered in this box. For example, if the set has five index sheets, a number 5, 10, 15, etc. is normally set in the box. If the number cannot be divided by the number of index sheets of the set, the missing index sheets are filled in by unlabeled index sheets. For example, if you enter 8 as the number while the set has five index sheets, the first eight index sheets will be labeled when output (see below for settings) whereas the last two index sheets will be unlabeled when output. All 10 index sheets display in the preview. The number, the total number of index sheets and the selected paper display below the index sheets:

Orientation
This is where you define the orientation of the text rows on the index tab. You can define up to three text rows. Orientation displays in the preview directly after text was entered.
Font
This is where you set the font for labeling the index tabs. The following fonts are available:
•Helvetica
•Courier
•Times Roman
Font Style
This is where you set the font style for labeling the index tabs. The following font styles are available:
•Normal
•Bold
•Italic
•Bold italic
Size
This is where you set the font size for labeling the index tabs.
Edit Index Sheet
This is where you select the index sheet which the settings you then make apply to. You can select each index sheet that is found in the total number of index sheets. See Number of Index Sheets. If the set has five index sheets like in the example above and you specified eight index sheets, you can define properties for the first eight index sheets. Two index sheets will be unlabeled when output.
You define the properties of the index tabs as follows:
1.In "Edit Index Sheet" select the index sheet that you first want to edit.
2.Define the "Position" and labeling (1, 2 or 3 rows).
3.In "Edit Index Sheet" select the next index sheet and define its properties.
4.Repeat these steps until all the index sheets are set up.
Position
In this list box, you can set the position in which the index sheet will be added. The position is defined in two levels:
•List box:
·Before sheet: Before the sheet that is specified in the related input box.
·After sheet: After the sheet that is specified in the related input box.
•Page numbers
In this input box, you can specify the sheet(s) of the content document to which the position refers. For example, you can position index sheet 3 before sheet 12 of the document by setting index sheet 3 in "Edit Index Sheet" and "Before sheet" as the position with page number 12.
Rows
In these text boxes, you can enter the text for the index tabs. You can enter text for one, two or three rows. The labeling displays in the preview. Formatting of the text and orientation of the text rows are defined in the related options.
Editing documents that already have inserts and/or index sheets

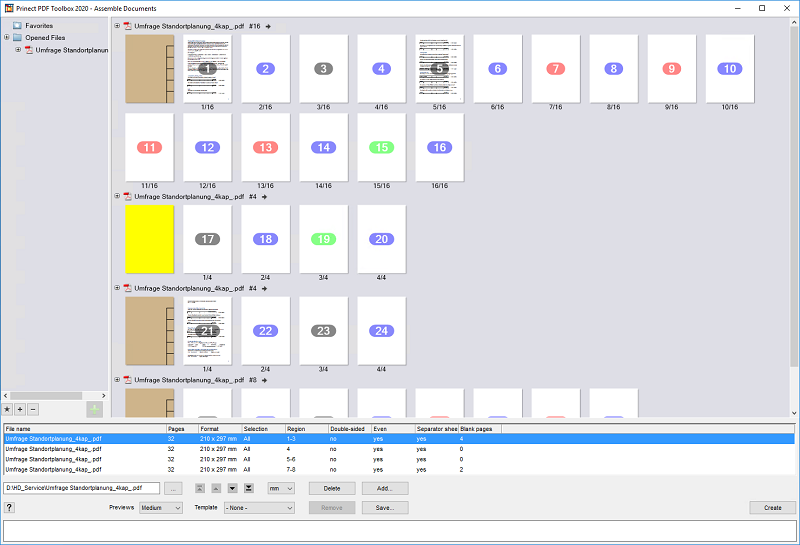
Note: We recommend using the "Assemble Documents" tool of the Prinect PDF Toolbox for the arrangement of content pages, inserts and index sheets if you have more complicated setups with index sheets and inserts.
You can add inserts and index sheets to PDF documents using the "Assemble Documents" tool of the Prinect PDF Toolbox (as of version 2020). When these documents are processed with the Prinect Manager, the inserts and index sheets are detected automatically and handled using the rules that are set up in the "Inserts" and "Index Sheets" sections.
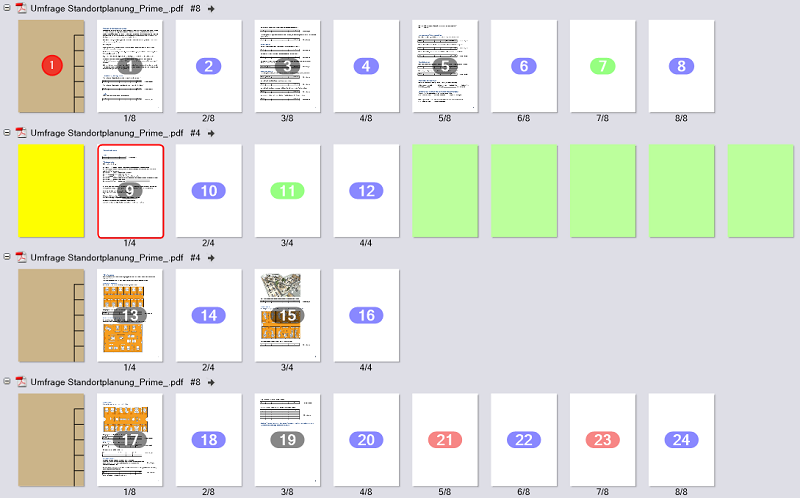
Example: The document shown has inserts and index sheets at the following positions:
•Index sheet before sheet 1 at the beginning of the document
•Insert before sheet 17
•Index sheet before sheet 21
•Index sheet before sheet 25
To process this job, you need a PagePrint sequence template where suitable settings for the inserts and index sheets are set up. To do this, define the PagePrint sequence template in "Administration > Templates" and add it to the job.
Properties of the pages in "Assemble Documents" of the PDF Toolbox
In the "Assemble Documents" tool, you can assign certain properties to the various documents in the table below the page preview that have different impacts on processing in the Prinect Manager.
If "Double-sided = no" is set for the document in the PDF Toolbox, a blank page is inserted after every page to show that the backs are blank. In the Prinect Manager, however, these blank pages are completely normal content pages. For that reason, you should set the layout type to "Double-sided" in the PagePrint sequence template used. See Selection of the layout type.
If "Double-sided = yes" is set in the PDF Toolbox, no blank pages are inserted. This means that you can select both "Single-sided" and "Double-sided" as the layout type in the PagePrint sequence template, depending on whether the job is to be printed single-sided or double-sided.
"Separator sheet" property
When this property is set to "yes", this means that a separator sheet or an index sheet is defined.
Text (separator sheet)
This is where you define the labeling of an index tab. If text is entered, the page concerned is defined automatically as an index sheet. This page is not an insert. Because you can enter only one row in the "Assemble Documents" tool whereas up to three rows are possible in the PagePrint settings, you can enter a semicolon after each row intended. These semicolons are interpreted as row separators when the document is loaded in the Prinect Manager.
Blank Page
You can insert a blank page using "Blank Page After" in the context menu after every (non-blank) content page. Two blank pages are inserted if "Double-sided" is set to "no". See "Double-sided" property.
Comment (blank pages)
Content pages become inserts if a comment is entered in this column. "Double-sided = no" then does not result in doubling the blank pages. The comment itself is ignored in the Prinect Manager workflow.

Note: As a general rule: Only pages that have a counter in the PDF go to the Prinect Manager also as content pages and can be seen in the document page list. Index sheets and inserts are handled separately.
Video with example
Video Tutorial: You can view the following video for an example of print preparation with the Assemble Documents tool of the PDF Toolbox:
Print a user's guide prepared offline
"Image Shift" group
This is where you can manually enter offset values for the image for front and back. These settings let you make sure that the press sheets always match the dimensions set in the sheet layout when output.
"Print Options" group
Screening
This is where you can select the screening process. The processes listed for selection depend on the screens available at the press.

Prerequisite: This section with "Line/Character Enhancement" and "Edge Enhancement" is available only for Versafire EP or CP presses because these functions are based on certain hardware properties of the Versafire EP or CP presses.
"Line/Character Enhancement" option
When this option is enabled, a reduced amount of toner on the outlines of graphic elements enhances the sharpness of the lines, especially when reproducing texts.
|
|
|
|
|
|
"Edge Enhancement" option
When this option is enabled, a supporting edge is placed around screened areas like those that occur around colored texts, for example. This avoids a "fringed" effect in text.
|
|
|
|
|
|
Unwanted glossy effects may occur when printing dark colors with high inking. You can reduce the maximum toner coverage to improve this.
You can enable "Inking Reduction" in "Print Options" in the "Print and finishing settings" tab.
Inking reduction limits the maximum toner coverage for all colors to approx. 220%.
"Use Maximum Toner Density" option

Prerequisite: This option is available only for Versafire presses.
You can select one of the following options, "Off", "K" or "CMYK", in this list box. Select "K" or "CMYK" for a linear increase of the area coverage as of 85% up to 100% of the maximum toner coverage possible. In this range, this overwrites calibration that limits toner coverage generally below 100%. Because this setting is written to the data only during calibration, it cannot display in the preview.
Fuser Mode
You can change the temperature of the fuser for Versafire presses:
•Low temperature
•High temperature
This lets you match it to different printing materials (film, paper).
"Cutting" group
Cutting data for Compucut cutters will be created if you enable this option. In the "Compucut Folder" box, you can select a folder in the system environment of the Prinect server where the Compucut data will be filed. When the print job is submitted, a JDF file containing the cutting data, a job ID and a time stamp is generated in this folder.
In the Compucut software, you can select these files with "Sheet/Cutting Program > Prepress". You can set the order of cutting with "Cutting Program Generator". Use "Communication" to sent these data to the cutter.
Finishing
At the bottom of the screen, a figure of the set digital press displays and, just next to it, a finisher. If a number of finishers are configured, you can toggle between them using the arrow buttons. The available finishing options depend on the features of the set finisher.
For example, you can set up the following finishing options:
•"Folding": Folding method for the folding unit.
•"Folding Sequence": Folding inwards or outwards.
•"Punching"
•"Stitching"
•"Output Tray": Selection of one of the output trays.
If two stackers are connected to the press (only Versafire), you can set up the press so that it supports continuous printing to both stackers. In this case, the "Output Tray" list box displays. You can choose between "Stacker Tray", "Stacker Tray 2" and "Automatic" in this list box. If "Automatic" is selected, output is first to the tray of stacker 1 until this is full. Then output moves without interruption to the tray of stacker 2 until this is also full. If the tray of stacker 1 was emptied in the meantime, then output returns to the tray of the first stacker.
•"Cover": If a booklet finisher is installed, you can use this option to combine a booklet with a preprinted cover.
•"Shift Mode": Staggered output of the printed sheets. You can choose between the following options for Versafire presses:
·Off
·Per job
Output is staggered after each completed print job.
·Per set and job
Output is staggered after each copy and each job.

Note: The staggered output does not affect single data records in the case of PDF/VT documents. In this case as well, output is staggered after every job or after every copy and every job.
•"Offset interval": If the shift mode is enabled, you can set in "Offset interval" how many copies (sorted) or sets (unsorted) will be output before they are staggered. For example, if you enter '3' in this box, three copies at a time are output and only then are they staggered. In the default setting ('1'), each copy is output staggered.
•Other options when required....