
Administration - Prepress Devices
Prerequisite: This group can be seen in the Cockpit only if the "Prinect Renderer" is installed and registered as the RIP.
This group lists all the prepress output devices that are driven by the Prinect Renderer. The following device types can be listed in this group: CTP devices, proofers, soft proof export processors, Tiff-B export processors.

Note: The term "devices" indicates that these are physical devices (CTP devices, proofers). The term "processors" indicates that these proofing facilities only generate files that are designed either for assessment on the screen, for editing with external applications or for transfer to a Prinect Shooter.
You can configure proofers that are driven by the Color Proof Pro software for certain output options. You will find all the output devices and processors linked to the Renderer in the list. Digital presses have their own render engines and consequently are not listed in this group.
The "Open" button is enabled when you mark a proofer, and you can define other settings for the proofer.

Note: You can set other data for proofer setup in the Color Proof Pro Engine Manager or the Proofing Engine Manager. You can configure a Heidelberg Suprasetter imagesetter in the Speedway Engine Manager if the imagesetter is connected directly to the Prinect server. You can launch the Engine Managers on the Prinect server from the Windows Start menu with "Start > All Programs (or All Apps) > Heidelberg Prinect Workflow".
To configure a proofer, mark the appropriate item in the list and click "Open" (or double-click the item). The setup window of the proofer displays:
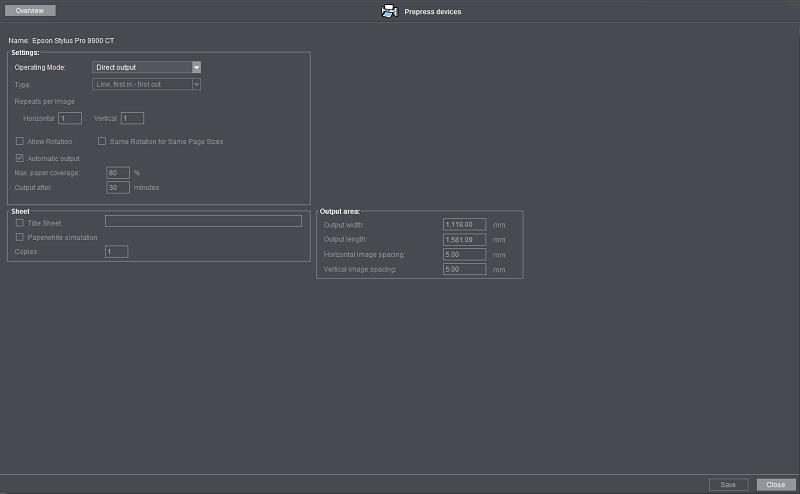
You can define different settings for proofing in this group.
"Operating Mode" list box
You can choose between the following options in the "Operating Mode" list box.
•Direct output
The incoming job is sent directly to the output device and output. Other settings are not necessary in this window.
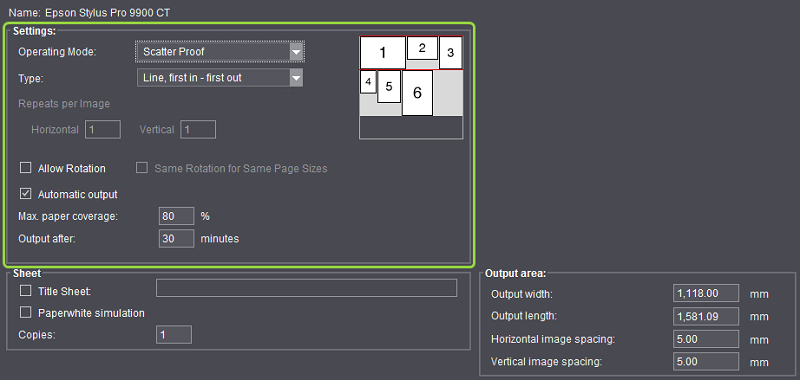
•Scatter Proof:
The "Scatter Proof" operating mode is enabled.
•Step and Repeat
The "Step and Repeat" operating mode is enabled.
"Scatter Proof" operating mode
In the "Scatter Proof" operating mode, the pages of several jobs are gathered for output and are positioned in one of several economic ways on a sheet and output.

Note: The settings refer only to the proofers set up in the application and not to the device (hardware) itself. This means that a device (printer) can be set up several times in the application with different settings. These settings are independent of each other although the driven device is the same.
This means that one printer can run normally in one mode and gathers jobs in another until a sheet is full and then outputs the sheet in one go.
If you have a printer that is set up for scatter proof, in a PageProof sequence you can disable the "Automatic" option in "Automatic Page Positioning" in "Layout Preparation" and enter a "1" in the "Maximum Number of Pages" boxes to output jobs processed with this sequence without a scatter proof.
Points to note:
Jobs on a sheet must have identical output properties. For example, you can output a sheet with just one resolution. Different color spaces must also not be defined for one job even if the output device supports different color spaces such as CMYK and RGB.
"Type" list box
You can select between the following scatter proof modes in "Type".
•Line, first in - first out
In this mode, pages are gathered and positioned on the sheet in the order they come until optimal use is made of the sheet.
The pages are aligned to the upper edge in this positioning option. For that reason, any subsequent pages are aligned to the biggest page of the previous row so that a line can be drawn again.
•Line, optimized
In this option, pages are gathered and the images are swapped to try to make better use of the sheet.
The pages are aligned to the upper edge in this positioning option. For that reason, any subsequent pages are aligned to the biggest page of the previous row so that a line can be drawn again.
•Area, optimized
With this option, jobs are gathered and positioned on the sheet until optimal use is made of the sheet.

Note: An accurate calculation would involve considerable computing time because of the complex mathematical nature of this option. For that reason, a heuristic method is applied with this type of distribution.
"Step and Repeat" operating mode
If you select the "Step and Repeat" mode, a document is distributed several times on the output medium or fills the sheet, depending on what is set.
"Type" list box
The following options are available:
•Fill sheet
This option repeats the page arrangement of a job until the sheet is filled optimally. If "Allow Rotation" is enabled in addition, if necessary the pages of the job are rotated for better utilization of the space.
•Repeat:
This option positions each page of the job optimally several times on the sheet. If "Allow Rotation" is enabled in addition, the job is positioned optimally several times on the sheet and, if necessary, rotated for better utilization of the space.
"Repeats per Image" boxes
•Horizontal
Define how many times the job will be output horizontally on the sheet (a value of "1" means no repeat, the job appears once).
•Vertical
Define how many times the job will be output vertically on the sheet (a value of "1" means no repeat, the job appears once).

Note: These two functions are not required and cannot be selected if you select "Fill sheet". The system determines the maximum number of components if you enter too great a number for "Repeats".
"Allow Rotation" option
The following is valid for all types listed below: When this option is checked, pages may be rotated to utilize the sheet better. Rotation is not used in the case of an asymmetric resolution of the output device.
"Same Rotation for Same Page Sizes" option

Note: This option only affects the "Step and Repeat" mode and is enabled only in this mode.
Pages of the same size are rotated only the same way (direction of rotation, angle of rotation) when you enable this option. As a result, pages of the same size have a more homogeneous layout on a gang run form (scatter sheet), making it easier to cut up the sheets.
"Automatic output" option

Note: This option only affects the "Scatter Proof" mode and is enabled only in this mode.
If "Automatic output" is enabled, printing starts automatically when maximum utilization of the sheet or the set time is reached.
If "Automatic output" is disabled, the pages are gathered until you manually start the output.

Note: Pages that are already gathered are always output immediately if a new page and these gathered pages do not match (e.g. because the resolution has changed).
"Max. paper coverage" box
This is where you set by what percentage a sheet must be full for printing to start automatically.
"Output after" box
This is where you set how much time (in minutes) must elapse before printing starts automatically if maximum utilization was not reached. The oldest job in the buffer is used as the reference time.
In this group, you set specific functions that affect the entire output sheet.
When you enable "Title Sheet", in the box you can enter text that will appear as a title on the sheet. This is positioned, where possible, horizontally along the top edge of the sheet.
You can also place the title vertically along the left sheet edge if you cannot place the title on the top edge because of the sheet structure.
The "Title Sheet" is not printed if the sheet structure prevents it from being placed along the side as well.
"Paper white simulation" option
This setting allows colors to be rendered taking into account the light source and the medium illuminant (e.g. the color of the unprinted paper). For example, the illuminant of a newsprint paper which is shifted from illustration printing paper towards yellow compared to the illuminant of paper is rendered with a yellowish cast. For this reason, output with paper white simulation should be the default setting for proofing. All colors that lie outside of the proofer output color space are displayed on the margin of the output color space. The advantage of this rendering intent is that the exact color values are retained when switching from one output medium to another. The disadvantage is that any colors that lie outside of the output color space cannot be distinguished. This rendering intent is especially suitable for logos or monochrome objects which must be reproduced exactly the same way on different output media.

Note: Paper white simulation is applied only if it is also set (in Rendering Intent: Absolute colorimetric) and enabled in the Color Conversion options of the output sequence used.
For paper white simulation in scatter proof, the system uses the appropriate setting of the oldest job in the buffer to be positioned on the sheet.

Note: Paper white simulation also affects, for example, the gaps of the user-defined spacing between images. As a result, the homogeneous impression of the printing material hue may be disturbed in certain cases: If the placed elements have a slugline, this area is knocked out because sluglines are marks.
For that reason, you should not place elements with a slugline in the case of scatter proof with media white simulation.
"Copies" box
This box lets you set how many copies of a sheet you want output. To get one original and one copy, you must enter "2".
The default is "1".
This is where you define the area on the press sheet on which you will place the single pages.
"Output width" box
This is where you enter the maximum output width that will be permitted (or is possible) for this device. The output width you set in this box must never be greater than the material width set in "Rendering" in the PageProof or ImpositionProof sequence.
"Output length" box
This is where you enter the maximum output length that will be permitted (or is possible) for this device. The output length you set in this box must never be greater than the material length set in "Rendering" in the PageProof or ImpositionProof sequence.

Note: This limitation also affects new jobs if the "Scatter Proof" and "Step and Repeat" operating modes are used. This limitation is not removed even if you disable the "Scatter Proof" or "Step and Repeat" operating mode in the PageProof or ImpositionProof sequence.

Note: The entire sheet is used if you do not specify width/length. The length (and width) of the sheet or the output area is used to calculate the percentage of the maximum utilization of the area.
"Horizontal image spacing" box
This is where you set how much spacing there will be horizontally between the pages.
"Vertical image spacing" box
This is where you set how much spacing there will be vertically between the pages.

Note: Orientation of the image spacing always refers to the printed sheet and not to the top/side edge of the rotated page. The spaces are also added to each page when sheet utilization is calculated.

Prerequisite: The "Scatter Monitor" button and the "Tools > Scatter Monitor" command are operable if "Scatter Proof" is set as the operating mode for an output device and if a device of this kind is marked in the device list. See "Scatter Proof" operating mode.
The "Scatter Monitor" window opens when you click "Scatter Monitor" or select "Tools > Scatter Monitor":
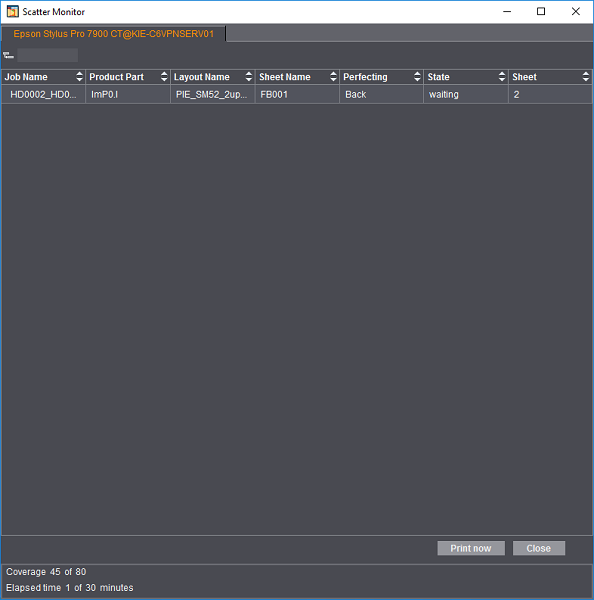
While a job is being processed by the selected output device, you can follow details about the scatter proof in this window. The following details are listed in the table:
•Job Name: Name of the current print job
•Product Part: Current product part (e.g. cover or content if these are defined as product parts in the job).
•Layout Name: Name of the sheet layout used if a sheet layout is used for the scatter proof.
•Sheet Name: Name of the current sheet as defined in the print job.
•Perfecting: Indicates whether it is the front or back of the sheet.
•State: At firs, "waiting" displays until the sheet concerned is filled. Then the sheet is printed and the status is "printed". While a sheet is being printed, you can gather other pages in a new sheet.

Note: If the pages of a job in Scatter Proof are distributed among the sheets but the last sheet is not filled completely, the status of the last pages of the job remains "waiting" until the sheet is filled with new pages from a subsequent job. If you wish, you can print such a sheet before this happens by clicking "Print now".
•Sheet: Displays the sheet number.
The footer displays the area coverage (in percent) of the current sheet and the current processing time.