In this panel, you select the press or the CTP device that you wish to monitor and control using the Digital Printing Terminal. In addition, you can view important status details about the output device in question.
The details displayed depend on the selected output device. For that reason, the display changes when you select another device.
Selection of a digital press or a DTP device
If more than one digital press, an additional CTP device or a cluster of digital presses is set up on the Prinect Manager, you can select the output device or cluster you wish to control in the Digital Printing Terminal in the device list box.
Note: This setting is valid for the Prinect user logged in to the Cockpit. This means that another user can control a different output device or a different cluster at the same time on another Cockpit.
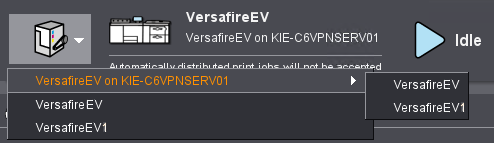
The layout and the contents of the windows of the Digital Printing Terminal are refreshed if you change the output device. This means that the jobs and details of the new output device you set display in them.

Note: By default, the Digital Printing Terminal opens for the output device that was selected in the "Jobs" section of the "Digital Printing Terminal" view. See "Digital Printing Terminal" View.
In addition to the graphic depictions of the output device, information about the current status of the press or CTP device displays. Different details and setting parameters are available depending on the type of output device. For Versafire digital presses, these are as follows:
|
|
Toner levels |
|
|
Machine messages |
|
|
Tray details |
|
|
Engine manager |
|
|
Print history |
|
|
Device configuration |
|
|
Cluster setup |
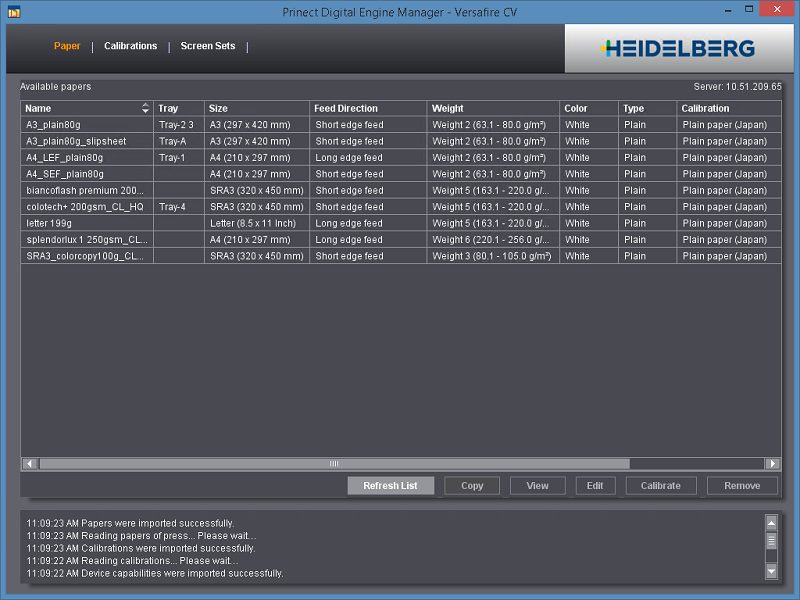
Prinect Digital Engine Manager
The Engine Manager shows the list of available papers, provides various options for editing the paper parameters and for paper calibration, and the available screening sets (depending on the device type).
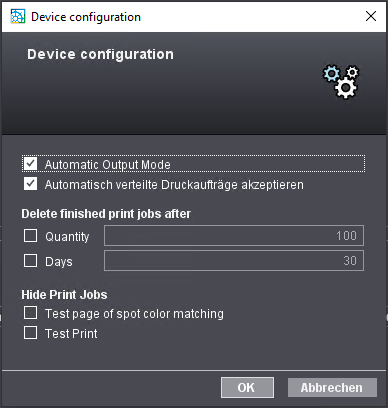
You can make the following settings in this dialog:
Automatic Output Mode
The automatic output mode is enabled when you enable this option, i.e. incoming digital print jobs are submitted immediately to the digital press. See Automatic output mode.
Accept automatically distributed print jobs
When you select this option, the digital press concerned is made available for automatic distribution of print jobs in a cluster if "Machine-specific" is selected in the "Automatic Distribution Mode" list box in the "Cluster Setup" dialog. See "Automatic Distribution Mode" list box.
Delete finished print jobs after
In order to avoid an accumulation of too many processed print jobs, this option lets you set that finished print jobs will be deleted automatically after a number of jobs or a period (days) that can be set.
Hide Print Jobs
This is where you can set that certain types of print jobs that are not intended for productive output will be hidden from the Digital Printing Terminal administration.
For Versafire machines the following job types can be hidden:
•Test page of spot color matching
•Test print
Labelfire machines the following job types can be hidden:
•Test page of spot color matching
•Test page of Color Center
•Calculation of ink consumption
•Proof job
If a single digital press or a generic plate device is selected in the device list box, only the jobs of the selected device always display. You can also group several digital presses to a cluster. Then the cluster of these digital presses is offered in the device list box. See also Clusters.
If a cluster is selected as an "output device", the print jobs can be distributed among the single machines of the cluster by different criteria. In this way, the machines of a cluster can be used more efficiently than individual machines. You configure the distribution details in the "Cluster setup" dialog.
When you select a cluster, the Digital Printing Terminal view changes to the effect that only the "Print History" and "Cluster Setup" buttons display in the global status panel. In the cluster view, you can use the "Machine" column in each table for sorting or grouping.
When you click one of the machine icons of the cluster, the cluster view changes to the view of that machine.
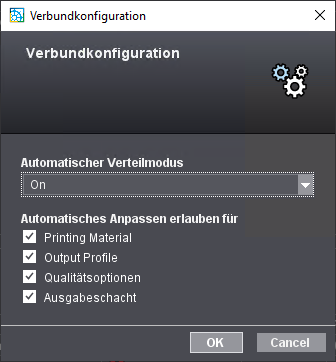
"Automatic Distribution Mode" list box
In this list box, you specify how new incoming print jobs are to be distributed automatically in a cluster in order to have the best possible utilization of all the digital presses in the cluster. There are the following options:
•Off
The print jobs are not distributed automatically. The press that is currently available is driven.
•On
The print jobs are distributed based on their setup, ensuring optimal utilization of the presses.
•Machine-specific
The print jobs are distributed automatically only to the machines that are parameterized with activated Accept automatically distributed print jobs option in the "Device Configuration" dialog.
"Allow Automatic Match for" options
You can use these options to confine automatic distribution of print jobs
•Printing material
The printing material parameters like size, grammage, paper grade, grain direction etc. are taken into account when selecting a press, i.e. the press whose printing material settings best match the respective job will be driven.
•Output Profile
When this option is enabled, output is matched to the default ICC profile of the selected paper on the press. However, this matching is done only if the machine type automatically assigned differs from the machine type originally assigned or if there was a change in paper.
•Quality Options
When you enable this option, print jobs are also submitted to machines in a cluster that do not have quality options like "Edge Enhancement" or "Maximum Inking", even if these parameters were enabled for the submit process. In this case, these quality options are ignored.
•Output Tray
When you enable this option, printing is automatically matched to the existing output tray parameters of the press in the cluster. Finishing options like stitching, punching or folding are always taken into account. This means that if a machine in the cluster does not have the finishing options configured in the job, it is not automatically selected.