
Submit print job to the printing press
When you have made and checked all the settings that are required for printing, you can send the print job to the digital press by submitting it to a "PagePrint" sequence.
Note: If you made changes to the setup of the "Digital Printing" step and want to use this setup for other print jobs, you should save all the output parameters that you made in this step as a new "PagePrint" sequence (see Save the setup of the step as a new template).
Click "Submit..." at the bottom right of the "Digital Printing" window to trigger the print process. The "Submit" dialog opens:
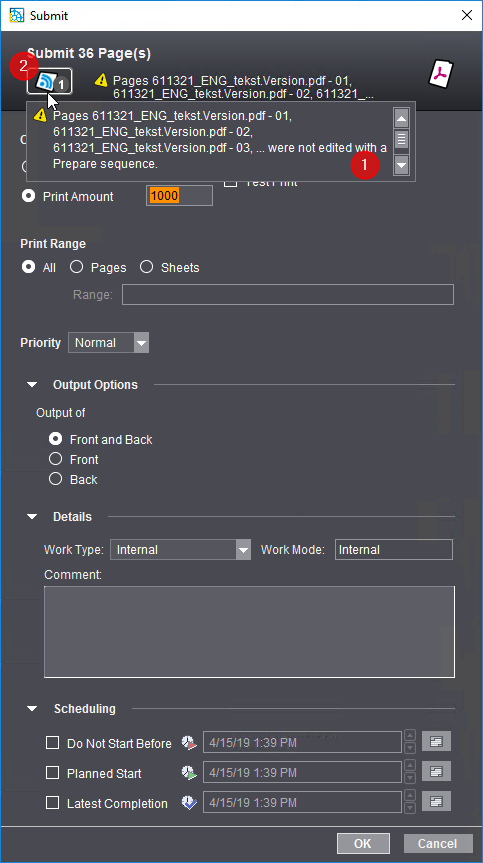
The header of this dialog shows you details about the number of pages and the names of the documents that are to be printed. Additional warnings may also appear. You can find more details about these warnings as a tooltip (1) or by clicking the message icon (2).
You can make the following settings in this dialog:
"Output" Group
This is where you can select between a normal print run and proofing.
Number of 1ups
Select "Number of 1ups" if you wish to output a certain number of pages or 1ups. The number of pages/1ups set are output.
Print Amount
This is where you can set the print quantity. The print quantity depends on the type of product to be printed:
•If a product with multiple 1ups is output, such as two A4 pages on A3+ paper, the print quantity refers to each (multiple) occurrence of each page of the PDF document.
•If a product with single 1ups is output, such as a booklet, the print quantity refers to the number of copies output.
"Test Print" option

Prerequisite: This option is available only for toner-based Heidelberg digital presses, e.g. Heidelberg Versafire.
Enable this option if you wish to output the job as a test print to check the quality of the color, for example. Activation of this option has the following impacts:
•The delivery quantity is automatically set to "1" because usually you need only one copy as a test print. You can increase the delivery quantity manually, if required.
•The work type is set to "Internal".
•The parameters in the "Scheduling" section are disabled.
•After output, a test print is not tagged as "finished".
If the job is to be output normally after the test print, all you have to do is submit it again and disable "Test Print". The parameters set beforehand in the "Submit Elements" dialog are enabled again.
Proof

Prerequisite: This option is available only for inkjet-based Heidelberg digital presses, e.g. Heidelberg Primefire or Gallus Labelfire. In addition, "Inkjet Proof" must be enabled and set up in the active PagePrint sequence or ImposedPrint sequence. See Separate Proofing for Heidelberg / Gallus Inkjet Digital Presses with PagePrint Sequences.
Enable this option if you wish to output the job as a proof to a connected proofer to check the quality of the color, for example. You can specify a delivery quantity separately for proofs. Activation of this option has the following impacts:
The delivery quantity is automatically set to "1" within the system because usually you need only one copy as a proof.
•The parameters in the "Scheduling" section are disabled.
•After output, a proof is not tagged as "finished".
If the job is to be output normally after the proof, all you have to do is submit it again and disable "Test Print". The parameters set beforehand in the "Submit Elements" dialog are enabled again.

Note: "File Output" can also be enabled in addition to "Inkjet Proof" in a PagePrint sequence or ImposedPrint sequence for an inkjet digital press. Then the proof is filed as a soft proof, i.e. as a file in the file system of the Prinect server. See "File Output" Option.
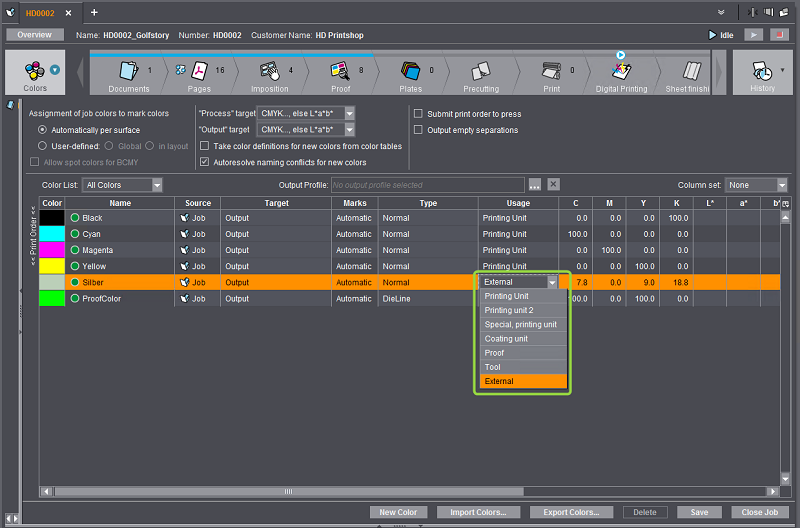
Output external separations or separations of "DieLine" proof colors

Prerequisite: This option is available only for inkjet-based Heidelberg digital presses, e.g. Gallus Labelfire or Heidelberg Primefire.
This option lets you save "external separations" or separations of "DieLine" as PDF files in the Prinect system environment. You can use this option, for example, to generate flexographic plates from the print job. Colors in the print job tagged by "Usage > External" in "Colors" are used as "external separations".
Likewise you can output separations with "DieLine" colors. "DieLine" colors are used frequently for proofing in sheet layouts, for example, to display the trim box or media box.
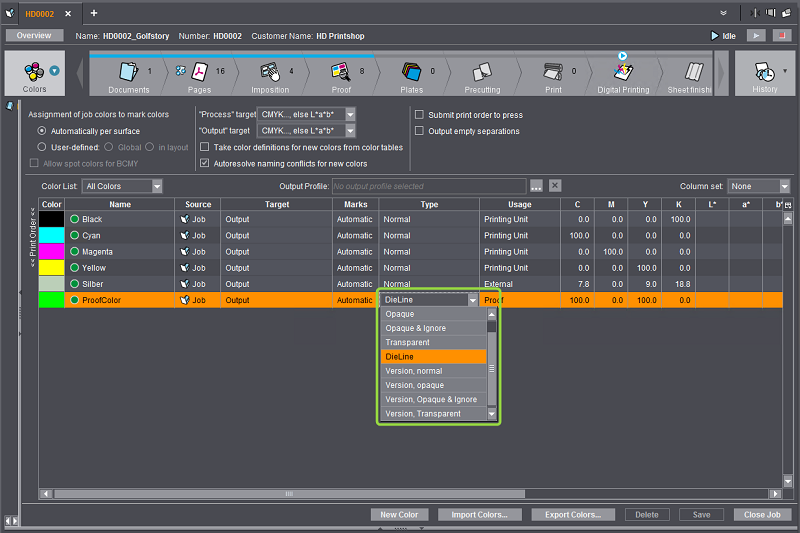
If external or DieLine colors are defined in the print job, you can use the browse button in "Output External Separations" in the "Submit" dialog to select a folder in the Prinect system environment where the separation PDF files will be stored (a PDF file is generated for each color separation). If necessary, you can also create a new folder.

Note: The selected folder is saved internally. The next time you invoke the "Submit" dialog, this output folder is suggested by default. This information filed is user-specific. If the user selects a different folder, the new folder will be set by default in future.
"Print Range" group
This is where you can define whether you want to output all the pages or sheets or just a range of them.

Note: For an ImposedPrint output to Versafire EP/EV digital presses or as a generic PDF, you can specify a page or sheet range if the layout is to be printed as a single-page or double-page booklet(Booklet). For example, in a 32-page booklet, you can print just the page range 3 - 30 (body). "Split into Double Pages" must be enabled in the ImposedPrint sequence for this.
In the "Priority" list box, you can set the priority with which the job will be processed in the Digital Printing Terminal or on the press.
"Output Options" group
In "Output Options" (this group can be expanded when needed), you can select whether only the front or the back or the front and the back will be output.

Note: Although Primefire digital presses can only print on one side, you can still select between front and back for outputs with an ImposedPrint sequence for Primefire as well. This gives you the option of printing surfaces defined as a back as a "front" on the printable side in the Primefire press.
In "Details" (this group can be expanded when needed), you can assign a work type. You only have to select a "work type" if the Prinect Manager is connected to an MIS (Management Information System) and work types are defined accordingly.
You can enter a comment about this print job in the "Comment" box. The comment is entered as a job note (see "Job Notes" View).
"Scheduling" Group
In "Scheduling" (this group can be expanded when needed), you can define a time range in which the print job is to be output. Clicking on one of the buttons to the right of the date boxes allows you to easily select the desired date from a calendar display.
Start printing
When you click "OK", the print job is submitted to the Digital Printing Terminal (see Digital Printing Terminal) or directly to the press or CTP device. If no other scheduling settings were enabled, the job is submitted immediately.