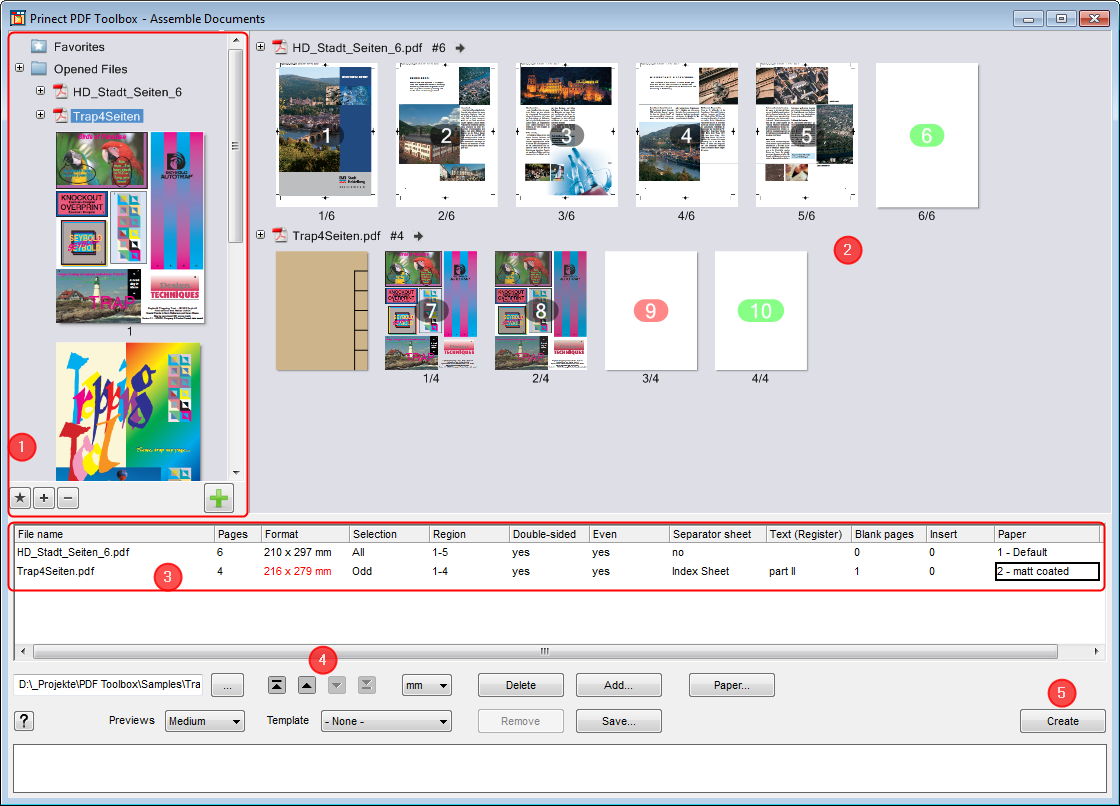
Assemble Documents lets you link up PDF files, separate them by index sheets and add blank pages to them.
1.Drag-and-drop the files that are to be linked together to the table [3] or use the "Add" button to do this.
Alternatively, you can also select the files in the Favorites pane [1]:
·Select single pages or the whole file and click the green plus button to move the files to the preview pane [2]. This is where you can view all the pages that will be in the file to be created.
2.The properties of all the PDF files display in the table [3]. This is where you can change the page selection and add separator sheets and inserts.
(3).You can customize the order of the documents with the arrow buttons [4].
(4).If required, you can save the current settings with the "Save" button.
5.Click the "Create" button [5] to create the new PDF file.
6.Close Assemble Documents and save the new file.

|
Note: All the parameters of Assemble Documents are also saved in the new PDF file when it is created. When you reopen the file with Assemble Documents, you will have the same view as shortly before saving it. Chapters that are no longer in their file location are tagged by a white page with a red question mark. |
Description of the various controls
Favorites pane [1]
This is where you will find all the documents that were open in Acrobat when Assemble Documents started. To add more files, open the folder where they are located and drag-and-drop the files to this pane. If you wish to use a file more often, place it in the Favorites folder.
Mark the document and click the green plus button to add it to the table [3] and at the same time also to the preview pane [2]. You can also select single pages. Hold down the Ctrl key to select several pages.
|
|
Use this to add documents to the Favorites. |
|
|
Use this to add documents or delete selected documents (with the exception of the files in the "Opened Files" folder). |
|
|
Use this to add documents to the preview pane [2]. |
Preview pane [2]
This pane shows all the pages that will be found in the new PDF. Each document represents a separate "chapter". Using the context menu of the single pages, you can define various settings:
•Select
All other pages are removed and only the marked page is left in the preview pane.
•Remove
The marked page is removed from the preview pane.
•Split
Splits the chapter at this position. The page becomes the first page of the new chapter. All the settings done in the table (except for the page range) are copied to the new chapter.
•Rotation +90° / 180° / -90°
Rotates the page by the set angle.
•Paper
This lets you set different paper grades for each page.
•Blank Page After [only for the last page of a chapter]
A blank page is inserted at the end of the chapter so that you can write notes, for example.
You can undo all the changes that you made to a chapter by right-clicking the file name and selecting "Reset". This also gives you the option of reversing the page order and rotating all the pages of the chapter at one go.
Details table [3]
This table shows the details of each chapter. This is where you can define settings for page selection, separator sheets and blank pages.
You can hide the "Text (Register)" and "Paper" columns by right-clicking the header of the table and removing the checkmark in the context menu.
•File name [not editable]
Name of the original PDF. To replace the file, click the button with the three dots.
•Pages [not editable]
Number of pages in the entire original PDF.
•Format [not editable]
Size of the PDF. You can set the unit of measure in the list box below the table. The font is red if the format is not uniform in the file.
•Selection
This is where you can confine the selection of pages to "Even" or "Odd".
•Region
This is where you can set the page range. You can enter single pages (e.g. "8, 12") or a range (e.g. "2-5").
•Double-sided
This is where you set whether the pages in this chapter are to be printed on both sides. If you select "no", a blank page will be inserted automatically after every page.
•Even
This is where you set whether the chapter is to be made up of an even number of pages. If you select "yes", then a blank page is inserted at the end of chapters with an odd number of pages.
•Separator sheet
This is where you can insert an index sheet or an insert before the first page of the chapter. This works only in Prinect Digital Printing.
When you insert an index sheet, you can define a text for it in the next column.
•Text (Register)
After you inserted an index sheet, you can enter a text for it in this column (works only in Prinect Digital Printing).
In Assemble Documents, the text displays as a tooltip for the separator sheet. The text is filed in the Result document and is submitted later to digital printing.
•Blank pages
This is where you can specify the number of blank pages to be appended to the chapter.
•Insert
This is where you can enter the number of inserts to be appended to the chapter. In contrast to blank pages, inserts and index sheets do not have a page number.
•Paper
This is where you can edit the paper grade for the whole document. See Papers.

Note: The inserts and comments are understood only by Heidelberg Prinect Digital Printing. These do not exist as pages in the generated output document but only as internal data that are read out again in the workflow.
Control panel
|
|
|
Use this button to replace a chapter by another PDF. The settings in the table apply also to the new PDF. If the new PDF has more pages than the original, not all of the pages are used (if necessary, customize the settings in "Region"). |
|
|
|
Use these four buttons to change the order of the various chapters. |
|
|
|
This is where you set the unit of measure for Format. The following units are available: mm, cm, pt, inch |
|
|
|
You go to the Online Help with this button. |
Buttons:
•Delete
Use this to delete a chapter.
•Add...
This lets you add a new chapter. This is an alternative to using the green plus button in the file selection group.
Opens a dialog where you can customize the papers. You can define a total of 12 papers.
To set the color, double-click the color box in front of the paper name. A dialog displays where you can set any color desired.
Double-click the name of the paper to be able to edit it.

Note: The quality/description assigned in Assemble Documents is automatically compared with the related paper qualities in the Prinect system to select the correct paper for digital printing.
•Previews
This is where you can set the size of the previews. The following options are available: "Small", "Medium" and "Large"
•Template
This is where you can select a stored template from a list box.
Attention: Any previous settings will be lost.
•Remove
Use this to remove the current template from the list box.
•Save...
This lets you save a template. All files, chapters and settings will be saved and you can invoke them again with the "Template" list box.
•Create
This lets you create the new PDF file.
HD Privacy Statement | Imprint | Prinect Know How