
Included in Label Pro
|
|
Included in Label Pro |
|
|
"Nesting Wizard" |
This wizard lets you create a layout where all the 1ups are being nested automatically. This is particularly feasible for irregularly shaped labels. Compared with the standard Layout Wizard, using the Nesting Wizard with shapes significantly differing from a rectangle produces less waste.
You define the sheet, the number of 1ups to produce, and the nesting method the program is to apply. When filling the sheet, the program processes each of the 1ups separately by adhering to the set conditions.

|
Note: Make sure all drawings have a bleed margin before the Nesting Wizard starts. The bleed lines should be of the "Bleed" style. To generate bleed, see: Mode "Generate Bleed by Levels of Importance". |
Click the button "Nesting Wizard" in the toolbar to start the Nesting Wizard.
The wizard guides you to the new layout in two steps:
In the first step, you select the sheet and set up all parameters for each of the 1ups.
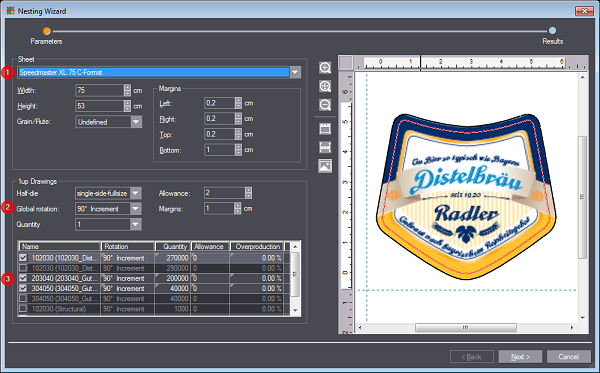
1.Select the sheet in the list box [1] or enter the sheet dimensions manually.
2.Select all the 1ups [3] you want to place on the sheet.
3.Specify if the 1ups may be rotated. To do so, click the "Global rotation" list box [2] above the table to apply the setting to all 1ups or a specific table cell in the "Rotation" columns to rotate 1ups individually. See Global rotation.
4.Type the needed number of 1ups in the "Quantity" column. The value you type here will be multiplied with the factor specified in "Quantity".
5.If applicable, also specify the desired overproduction in percent in the "Overproduction" column, and the "Allowance" additionally required for production.
6.In "Margins", specify a desired spacing between two 1ups if applicable.
7.Click "Next". The program will calculate the optimized layout nesting.
|
Controls in the "Parameters" step of the Nesting Wizard |
||
|---|---|---|
|
Sheet |
||
|
Settings defining the sheet used for the layout. |
||
|
List of sheet choices[1] |
The list box contains all available sheets. Selecting a particular sheet in the list box will lock the values for width and height; editing the values will change the sheet list box item to "User-defined". |
|
|
Width/Height |
Specifies the width/height of the sheet. |
|
|
This is where you specify the grain/flute direction of the material. •Undefined •fdX •fdY |
||
|
Margins |
These settings define the sheet margins. |
|
|
1up Drawings |
||
|
Settings that define how the 1ups are nested on the sheet. |
||
|
Half-die |
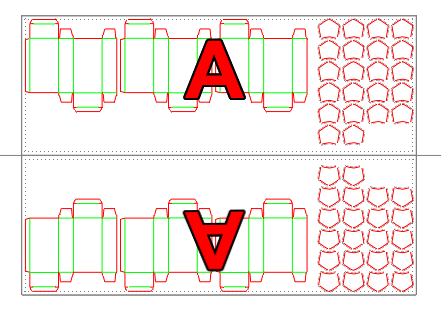
This is where you can define details about the printing and cutting process. Nesting of 1ups on the sheet performed in the next step is based on these settings. This is feasible if the sheet is twice as large as your cutting die, for example. In this case, select "single-side-halfsize" in the list box to have the 1ups nested alike on both sheet halves. |
|
|
|
•"work-and-tumble" |
|
|
|
|
|
|
|
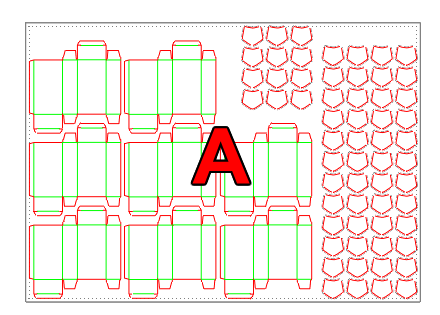
•"single-side-fullsize" |
|
|
|
|
|
|
|
•"single-side-halfsize" |
|
|
|
|
|
|
|
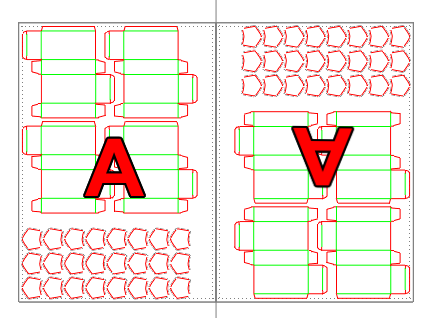
•"single-side-bothsize" |
|
|
This is where you define if all 1ups are to be rotated. You can make individual changes in the "Rotation" column. •Free Rotation •90°/180° Increment •180° Increment •0° Fixed •90°/180°/270° Fixed •With Grain/Flute |
||
|
Quantity |
The number you type in "Quantity" is automatically multiplied with this value. In this way, you need not type so many zeros for very large quantities. |
|
|
Allowance |
This is where you specify the allowance required for production. The value you specify here is used for all 1ups automatically in the "Allowance" column. |
|
|
Margins |
Specify the spacing in centimeters between 1ups. |
|
|
|
||
|
Name |
The name of the 1up as specified in the project. Uncheck the checkmark if you do not wish to include the 1up in the layout. |
|
|
Rotation |
This is where you can specify an individual rotation for the respective 1up. See Global rotation. |
|
|
Quantity |
This is where you enter the number of 1ups to be produced. This number is multiplied with the value in the "Quantity" list box. |
|
|
Allowance |
This is where you specify the allowance required for production. The program will then search for the most efficient layout nesting for a number of 1ups ranging between "quantity + allowance" and "quantity + allowance +overproduction". |
|
|
Overproduction |
This is where you specify the overproduction percentage the customer is willing to accept. |
|
The second step presents various possible layout variants.
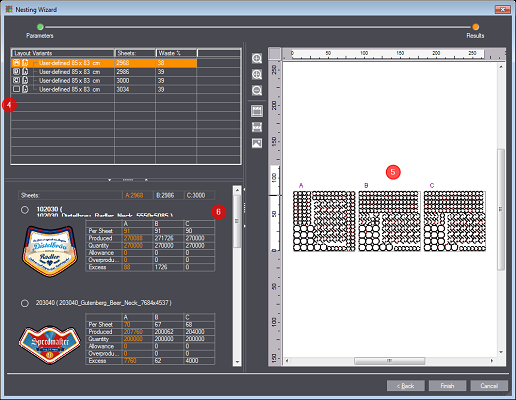
8.Select the layout variants [4] you want to compare. A letter is assigned to each of the variants. On the right, you see a layout preview [5]. The table [6] contains information about the layouts, e.g. the number of 1ups per sheet, and the overproduction.
9.Choose the layout in the list that suits best. You can edit the layout manually later.
10.Click "Finish". This will import the layout into the project.
|
Controls in the "Parameters" step of the Nesting Wizard |
|
|---|---|
|
Layout Variants |
This is where all calculated layout variants are listed. Click the check box to the left of the layout to include it in the comparison. |
|
Sheets |
The number of sheets required to produce the desired quantity of 1ups. |
|
Waste % |
The waste percentage of the total area. |
|
Sheet comparison |
|
|
The following parameters are listed next to the image and below the 1up name for the selected layouts: |
|
|
Per Sheet |
The number of 1ups on a single sheet. |
|
Produced |
The number of 1ups that will be produced. |
|
Quantity |
The number of 1ups as defined in the "Quantity" column of the preceding step. |
|
Allowance |
The number of 1ups to be produced in excess of the original quantity for reasons of production. |
|
Overproduction |
The number of 1ups to be produced in excess of the original quantity. |
|
Excess |
The number of 1ups produced in excess. |