"Optimization"
Step
Sheet
Optimization without Layout Default
The "Optimization" step contains
a great number of possible settings. As a basic principle, we recommend
that you set known cost data once in the Preferences and apart from that
try to find better placements only for a specific job, for example, using
the slider. You can collapse the cost data for a better overview (with
the triangle button).
You always work with sheet optimization when
you are handling gang jobs.
The parameters that you can set differ slightly
according to the type of sheet optimization.
You can type in the sheet optimization parameters
for the job or load them using a selected parameter set ("Sheet
Optimization Setup" button). You can also set certain parameters
in the "Plate Template" and "Papers (Printing Materials)"
resources and then import them from there ("Use Optimization Parameters
from Plate Template" option). This option of combining data does
away with creating great numbers of parameter sets and the cost and conditions
for certain plates and papers are entered directly at the source.
Another benefit is that you can set up several
plate templates in the job that are then all included in optimization.
In this case, you should define the optimization parameters in the plate
template. The plate template with the best optimization results is then
used accordingly and displays in the "Results" step.
In the sections below, you will find a description
of the functions in the "Optimization" step or notes on handling
them.
Input List for Sheet Optimization
(grouping table)
List of the imported gang parts or PDFs with
the option of sorting them.
Double-clicking the box in the "Delivery
Quantity" column lets you specify a different delivery quantity for
every gang part. Clicking the "Optimize" button again causes
the screen contents in the graphic window to change accordingly and also
the "Optimization Result" to be recalculated.
The columns that display in the table depend
on the selected optimization mode (without layout default, with layout
default, packaging).
All the columns whose values can be edited
directly in the input list are tagged by a triangle in the top left corner.
In the "State" column, you can view
the latest details about placement of all gang parts after each optimization
run. As many as three icons per job display:
General Information |
Additional Information |
Special cases |
The first icon
indicates the general status of the job. |
Additional information can
indicate why the job was not placed or that it was edited manually. |
At present, two special cases
display: "Can" articles that were placed and "Must"
articles that were not placed. This displays only if you are working
with an enabled deadline. |
|
|
The gang part is optimized
and placed on one or more press sheets. |
|
The job was edited afterwards.
A part of the placed 1ups
was removed manually in the graphic view. |
|
"Can" article that
was placed nevertheless.
The "Target Date" is further in the future than the
set "Deadline"; the job was placed despite this through
optimization. |
|
|
The gang part was not placed
on one of the press sheets. |
|
The gang part was not placed
because the rating of the press sheet would otherwise be below
the set limit. |
|
"Must" article that
was not placed.
The data for the "Deadline" of the gang job and the
"Target Date" of the gang part showed that the job ought
to have been placed. However, the job was either removed manually
or is no longer placed because of the poor press sheet rating. |
Possible reasons
for non-placed jobs: All placed 1ups removed manually, press sheet
not utilized adequately, target date not reached (see additional
information). |
|
The job was edited afterwards.
All placed 1ups were removed
manually. |
The icons for "Can"
and "Must" articles display also in the "Target
Date" column. |
| |
|
The gang part was not placed
because the target date was not yet reached. |
|
| |
|
The gang part is not placed
on one of the press sheets because it was set to "inactive". |
|

Note: The icons in the "State"
and, if applicable, "Target Date" columns also display in the
optimization report.
You can disable gang parts from optimization
and enable them again through the "Active" column.
"Process Order" column
The gang parts are sorted in the gang job
in the order in which you selected them for import. The process order
defines the order in which each of the gang parts will be submitted to
the Optimizer after you click "Optimize".
In the field, the process order does not influence
the optimization result or only negligibly especially where gang parts
with different sizes and delivery quantities are concerned because other
criteria like optimal utilization of plates and sheets are more important.
In the case of uniform jobs, on the other
hand, the arrangement of the 1ups on the optimized sheets can differ,
depending on the process order.
If the "Process Order" column is
selected, you can move the gang part you just marked using the arrow buttons
and, by doing so, change the process order.
Other functions:
•Using
"Remove Gang Part from Gang Job" in the context menu, you can
move gang parts or folding sheets back to the gang job folder (gang pool)
again. For details, see the description in the header below or in Job
Import from Gang Pool.
Note: The
functions in the context menu like "Edit Delivery Quantity"
or "Set Orientation to..." are available irrespective of the
column in which the cursor is currently located.
•Double-click
the delivery quantity to open a window where you can change the delivery
quantity.
•Drag-and-drop
a gang part to the graphic window in the "Press Sheet" tab.
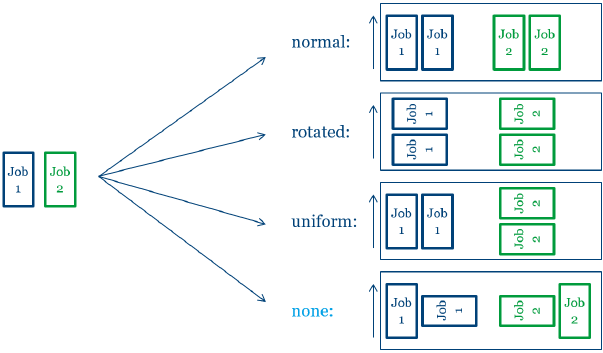
•When
you double-click the "Orientation" column, a dialog opens where
you can set the orientation to the paper grain for selected gang parts.
You can choose between the following settings:
"normal": Folding sheet at 0°
in relation to grain direction
"rotated": Folding sheet at
90° in relation to grain direction
"uniform": Determine direction
as best as possible (this direction is then applicable for all 1up copies)
"none": Determine direction
as best as possible, with 1up copies possibly having different orientations
With "normal" and "rotated",
you specify the orientation related to the paper for all 1up copies of
this article. With "uniform", optimization determines the better
of the two variants for utilization of the sheet. In this process, all
1up copies of the article have the same orientation; this means that either
they are all rotated or none are rotated. If you select "none",
orientation is ignored and only the best possible utilization of the sheet
is considered. In this case, it is possible that some 1up copies of the
article are rotated and some are not. This can be a good idea in the case
of articles where the grain direction of the paper is irrelevant or for
materials without grain direction.
The settings are interpreted as follows:
·For
schemes with a folding rule: Back margin orientation
·For
schemes without a folding rule: Page orientation
·For
Montage: Page orientation
"as per placement": If "FromLayout"
is entered in the gang part XML, this means that orientation is not defined
in the gang part XML but is delegated to the Prinect Signa Station product
part used. In this case, orientation is determined from placement in the
product part. The grain direction of the paper of the product part is
included when determining this value. The result determined is always
"normal" or "rotated".
Procedure:
·The
entry in the gang part XML is first checked to determine the orientation
default: If "Normal", "Rotated", "Unique"
or "None" is set there, this value is used in the input list
for sheet optimization when importing the gang part XML.
·If
none of these items or "FromLayout" is entered in the gang part
XML, the setting of the product part in "Parameters for Ganging Optimization"
is used. If "normal", "rotated", "uniform"
or "none" is set there, this value is used in the input list
for sheet optimization when importing the gang part XML.
See Working
with Grouping Tables for details about sorting a grouping table.
Ganging...
You can use the "Ganging..." button
to import customer jobs at any time from the gang pool.
Gang parts that were removed from the press
sheet in the grouping table (see above) automatically display again in
the gang pool ("Job Import from Gang Pool" dialog).
List of packaging jobs
In packaging jobs, the table also shows the
assigned shape. A preceding "0" indicates that a cutting die
with this shape is not loaded at present. When you press the Optimize
button "General" in such a case, optimization is impossible
with the current settings, and an error message appears.
Prinect Signa Station then
offers the option of looking for a suitable cutting die. To do so, the
folder selected last in the "Open Cutting Die" dialog is searched
for an exactly matching cutting die. If the search is successful, optimization
is run; if not, a note appears in the "Optimization Result"
indicating that shapes are not assigned to all packaging articles.
You can perform the assignment using the context
menu invoked on the table row in question when cutting dies are loaded
but some articles do not have an assignment.
You can change the order of the articles in
the table using the buttons to the right of the table. The order of articles
in the table determines how they are arranged on the press sheet. If you
change the order of articles, you must run optimization after that for
the change to be applied.
Combi
button: Import PDF...
Select this option if you want to import PDF
files to a gang job.
Combi
button: Import CAD...
Select this option if you want to import cutting
dies to a gang job.
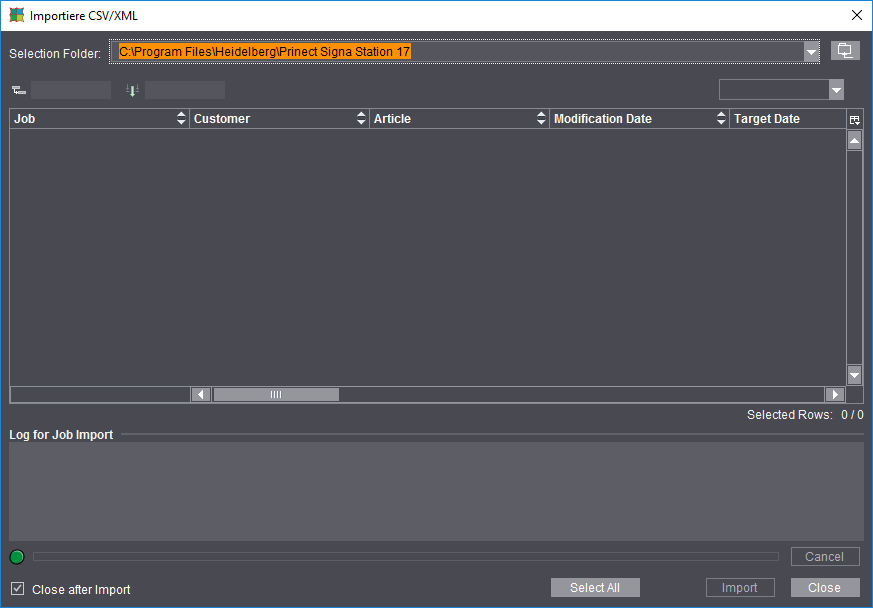
Combi
button: Import CSV/XML...
Job description files as CSV or XML files
and content files (PDF files) in defined structures must be available
in order to work with a hotfolder.
Normally, these data are generated and made available by the "MIS"
or the Prinect Integration Manager.
Combi
button: Create New ...
Define a new assembly block for the PDF import
and import it.
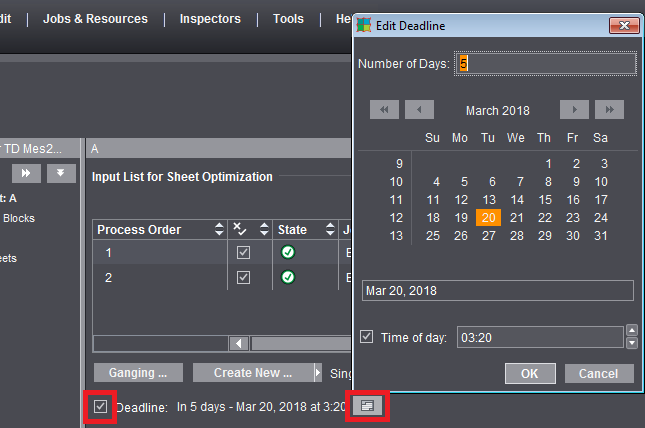
Edit
Deadline
The deadline is included in optimization if
the "Deadline" option is enabled. When the option is enabled,
the currently used deadline is indicated beside it.
When the option is enabled, you can open the
"Edit Deadline" dialog with the "Edit" button. Your
input can be relative or absolute.
•In
the "Number of Days" box, your input is relative to the current
date. Positive values are for days in the future, negative values for
days in the past.
•Use
the calendar to select a specific data for an absolute input.
Both input variants influence each other
mutually, with one variant always matched according to the input of the
other variant.
The greatest value possible for days is 99
days or -99 days.
The set deadline is persistent relative to
the current date. This means that when you enter a deadline of "in
2 days", for example, "2" is saved as the value. As a result,
the deadline is pushed back accordingly if the job is used again at a
later date.
If you enable "Time of day", you
can specify a set time using the arrows or by entering the data directly.
If "Time of day" is disabled, the last possible period in the
selected day is set, this means 23:59:59 hrs.
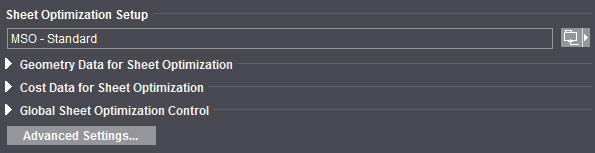
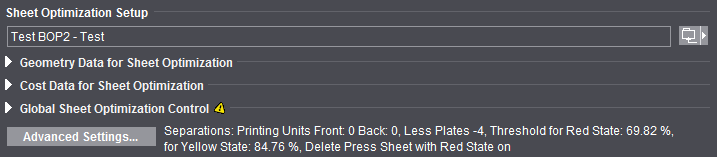
Sheet Optimization Setup
By default, the optimization set in the "Preferences"
in "Default for Sheet Optimization" is used for all jobs. Use
the combi button on the right to display predefined sheet optimization
setups for use specifically on the job currently open.
The name of the selected setup displays in
italics. In this way, you always know which resource is being used for
optimization.
The key data are divided into the following
groups:
•"Geometry
Data" (margins)
•"Cost
Data" (print preparation in general and per separation, cost per
1000 sheets)
•"Global
Control" (slider "less plates" <> "less sheets")
In the "Preferences" in "User
Interface", you can set whether the groups will display either closed
or open by default. This is where you can also set whether one or more
groups will be fully hidden.
When a group is closed, a yellow warning triangle
displays if the setup should deviate from the default.
In addition, all the parameters of the resource
in use that deviate from the default display beside the "Advanced
Settings..." button. The setup in italics becomes obsolete and no
longer displays when you modify one of the boxes or change the position
of the slider. The modified data are used for optimization for the active
job and are retained.
More details about each of the data:
Geometry
Data for Sheet Optimization
Cost
Data for Sheet Optimization
Global
Sheet Optimization Control (less plates/less sheets slider)
Advanced Settings
Usage
of the Optimization Settings
To define settings for ganging optimization
that make sense, you must first decide which priorities you have:
•Option
1: If all jobs imported from the gang pool are definitely to be processed,
both options "General > Only
One Press Sheet" and "Rating > Delete Press Sheet with Red
Rating" must be disabled in the sheet optimization setup (default
setting for a new job).
Optimization then runs essentially on
a cost basis and all gang parts are placed. Although any quality criteria
set are assessed and the results shown, they have only a lower priority
during optimization.
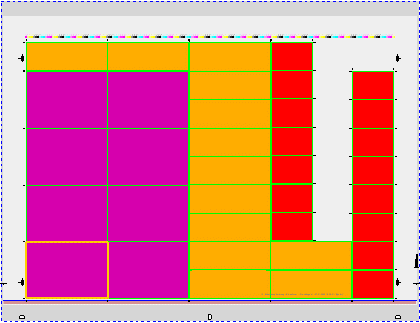
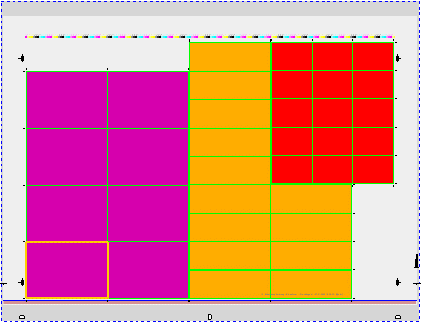
•Option
2: You want to create just one press sheet from the mass of imported gang
parts that will be used optimally based on certain quality criteria. Enable
"Only One Press Sheet" in the "General" tab and define
the quality criteria that are important for you.
During optimization, a press sheet will
be created that selects those gang parts that will give you the best possible
overall rating, matching the enabled quality criteria (costs for
paper and plates are not relevant then). Gang parts not used in this case
are found again in the gang pool and must be processed in another print
job.
You will see a message, informing you
that not all of the jobs were placed and the jobs not used will be tagged
by a red cross in the list.
•Option
3: You want to have the best possible utilization of the press sheets
based on quality criteria and process as many gang parts as possible,
but it is not absolutely necessary that all the gang parts are placed.
Enable "Delete Press Sheet with Red State" in the "Rating"
tab and define the quality criteria that are important for you.
During optimization, several press sheets
may be created based on these criteria. Whenever a sheet has a red rating
in the overall rating or in a criterion defined as "Veto", the
sheet is rejected automatically and the gang parts are returned to the
gang pool.
You will see a message, informing you
that not all of the jobs were placed because of the bad rating and the
jobs not used will be tagged by a red cross in the list.
Costs are included also during optimization
based on quality criteria. However, it is possible that the costs determined
are higher than with a pure cost-based optimization.
If "Use Optimization Parameters from
Plate Template" is enabled, it is still possible to work also with
the rating criteria.
Exactly one press sheet will be created if
you enable both "Only One Press Sheet" and "Delete Press
Sheet with Red Rating". However, if this best possible press sheet
does not meet your quality criteria (= red overall status), this press
sheet will also be rejected. This means that no press sheet will be generated
and you will see a warning.
Geometry Data for Sheet Optimization
Left Margin / Right Margin / Top Margin
/ Bottom Margin
By defining these margins, you create a bounding
box within which the 1ups can be positioned. If you leave the default
values of "0" as they are, the bounding box is the same size
as the paper. By entering values for the margins, you shrink the size
of the bounding box accordingly.
If you set marks at the left, right and top,
you must set a margin for these marks.
Cost Data for Sheet Optimization
When you enter cost values, optimization will
give you the most cost-effective result.
Example:
If the cost for print preparation (with setup of the press) is higher than
comparable paper costs, then optimization provides a result with as few
press sheets as possible but perhaps with more paper waste.
Fixed and variable costs can be taken into
account with these parameters.
The values are to be entered by the user and can also have just material
data. What is entered in this group can vary according to the economic
philosophy of the company.
Note: These
costs are not costs in a specific currency but only relative costs.
Print Preparation (global)
The cost of a complete plate set should include
the plate material, imaging and checking the plate as well as washing,
loading and proof printing for print preparation.
Print Preparation (per separation)
At this point, the colors are not always known,
and, consequently, a finer distinction of the cost is possible only through
the operator.
Printing Material (per 1000 sheets)
The cost for 1000 unprinted sheets that have
run through the press.
Global
Sheet Optimization Control (less plates/less sheets slider)
The slider lets you weight the priority, in
other words whether less plates or less press sheets will be used. The
digits only portray the weighting for the algorithm and are not important
otherwise.
Note: The
slider does not necessarily improve optimization in every job. In some
cases, the result is identical.
Advanced Settings
The "Advanced Settings" button lets
you invoke all additional settings like the ones also available in the
"Sheet Optimization Setup Editor" for creating templates. The
"Sheet Optimization Setup" is divided into the "General",
"Geometry", "Cost" and "Rating" tabs.
Changes in this dialog are implemented directly.
In other words, the values entered are applied immediately without confirmation
through the OK button. The dialog must be exited with "OK" if
the values are to be kept. The changes are discarded if you exit the dialog
with "Cancel" or with the "Close" icon.
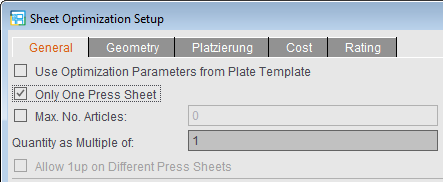
"General" Tab
Use Optimization Parameters from Plate
Template
The optimization parameters from the "Plate
Template" and "Papers (Printing Materials)" resources are
used and display accordingly when you enable this option. If a number
of plate templates or papers are set in your job, proceed as follows:
•Plate
templates
The values in each parameter are checked
for validity in all plate templates defined in the job and compared with
each other. If the values from all the plate templates are valid and identical,
the same value displays in the relevant box.
If a value is invalid or different, the word "various" displays
in the box instead of a value.
The tooltip of the box also shows all different values of the parameter.
You cannot edit the values.
The value from the job data displays if
there are no plate templates.
•Papers
The values in each parameter are checked
in all papers to see that they are available. If a value is set each paper,
one of these values is used during optimization. To make this clear, the
value in the box is blue. However, the value shown is not used for optimization.
If a value is missing in one or more papers, an existing value displays
in the standard color in the box and is used if the paper provides the
best optimization result.
The tooltip of the box also shows all different values of the parameter.
You can edit the values. Edited parameters
are not kept in the paper entered in the plate template but in the job
data.
Note: You
can set the quality criteria in the "Rating" tab for a specific
job even if the optimization parameters from the plate template are used
and use them for optimization.
Only
One Press Sheet
Exactly one good
press sheet is generated during optimization. After you save your data,
gang parts that are not placed are returned automatically to the pool
for gang jobs.
Max.
No. Articles
The "Max. No. Articles" box lets
you restrict the number of articles on the press sheets to take into account
restrictions in finishing (e.g. sorting equipment with a limited number
of trays). When you enable the option, the box first displays '10' by
default. You can then match this value to suit your needs.
When the number of articles to be placed is
greater than the maximum number you defined, the articles are split into
partitions, optimization is calculated separately for each partition and
finally these single results are added together. For example, for 20 articles
and a limitation to five articles, this produces four press sheets each
with five articles instead of one press sheet with 20 articles.
Quantity as Multiple of
The quantity is to be a multiple of the number
entered in this box. The quantity can be less than this value in the case
of an odd number of remaining copies.
Overproduction
You can enter a percentage for overproduction
in this box if the calculated overproduction for a job was not specified.
Allow 1up on Different Press Sheets
A check is run to see whether a better result
can be obtained by placing the same 1up on different press sheets.
Press Sheet Allowance
Allowance for the press sheet quantity, either
as a fixed value (base) and/or as a percentage.
For example, waste allowance for finishing
1up Allowance
Allowance for the 1ups/gang job objects; the
delivery quantity is taken as the basis.
Include Separations
Optimization with "Include Separations"
gives you only press sheets where the placed documents of a press sheet
do not have more colors in total than available printing units. This makes
it possible to avoid multiple runs (for details, see Include
Separations).
Slider for less plates / less sheets
The slider lets you weight the priority, in
other words whether less plates or less press sheets will be used. The
digits only portray the weighting for the algorithm and are not important
otherwise.
Note: The
slider does not necessarily improve optimization in every job. In some
cases, the result is identical.
"Geometry"
tab
Note: The
geometry data are not read from the MDS but you must define them yourself
in this tab.
Left Margin / Right Margin / Top Margin
/ Bottom Margin
By defining these margins, you create a bounding
box within which the 1ups can be positioned. If you leave the default
values of "0" as they are, the bounding box is the same size
as the paper. By entering values for the margins, you shrink the size
of the bounding box accordingly.
If you set marks at the left, right and top,
you must set a margin for these marks.
1up Block Margin
Spacing between the folding sheets/assembly
blocks. You must set the value to "0" for a separating cut.
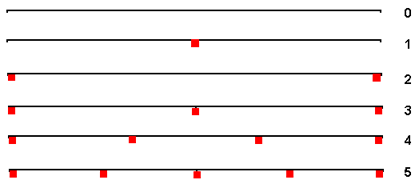
Sheet
Brake Total
In optimization, you can reserve spaces on
the sheet for any sheet brakes that may be required. You can set up to
12 sheet brakes.
The standard width of a sheet brake is 7 mm.
In addition to this value, one or two standard trims are kept free so
that no trim juts into the sheet brake.
In case of 2 or more sheet brakes, one brake
each is expected on the left and right margin respectively; should the
space be insufficient, it will be expanded internally
For single surfaces, sheet brakes do not require
any free space and for that reason are ignored by Prinect Signa Station.
For this reason, you could also use parameter sets with sheet brakes for
single surfaces
There is no horizontal centering for (effective)
sheet brakes because otherwise the positions of the free spaces would
be unpredictable.
Schematic view of assumed positions for 0-5
sheet brakes:
Note: For
"Single-sided work-and-turn", the meanings of left and right
margin apply analogously to the sheet halves. This may also result in
increased margins because of the sheet brakes to consider. A peculiar
situation arises with even sheet counts of 4 and more since a smaller
strip is formed on the sheet half.
Horizontal lanes/width/height
In addition to the number of sheet brakes,
you can also set their width and the number and width of the horizontal
empty areas (lanes).
The sheet brakes and the horizontal lanes
must always cover the entire height and/or entire width of the press sheet.
That is why the number is interdependent. An appropriate lock is integrated
into the graphic user interface and described as a tooltip.
If one or more than 2 sheet brakes are selected,
these are centered on the press sheet. In this case, only the values of
'0' or '2' can be selected for the horizontal lanes. Accordingly,
it is vice versa if the number of horizontal lanes is first entered.
"Placement"
tab
For "Sheet Optimization without Layout
Default", you can also define the placement, that is, the starting
point as of which the gang parts are aligned on the press sheet.
With the first cut opposite the lay edge,
normally as many elements as possible are to be cut. This variable setting
option makes sure that you can match optimization to suit your needs.
During optimization, the assembly blocks are
grouped by size. Assembly blocks of the same size placed side by side
make up what is known as a "ribbon". If possible, the bigger
assembly blocks are always positioned more to the left. Positioning normally
begins at the bottom left. If needed, you can change the starting point
for optimization in horizontal and vertical direction.
Primary placement direction
"Horizontal": Sheet optimization
is in horizontal ribbons. They always fill the entire space between the
margins before a new ribbon begins.
"Vertical": Sheet optimization is
in vertical ribbons. They always fill the entire space between the margins
before a new ribbon begins.
"General": Sheet optimization is
in rectangles (or rectangular ribbons). In other words, assembly blocks
of the same size are grouped together to form rectangles if possible.
In most cases, the rectangular ribbons don't fill the entire space between
the margins.
"Cost"
tab
Is equivalent to the cost data for sheet optimization
(see Cost Data for Sheet Optimization)
with an additional input option for the press for hourly rate and performance
(sheets per hour).
Note: The
cost data are not read from the MDS but you must define them yourself
in this tab.
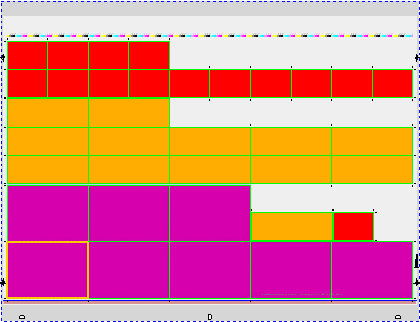
"Rating"
Tab
You can define one or more rating criteria
for the press sheets depending on your individual requirements by clicking
the plus button. The results of these quality criteria display in the
"Results" step in the table in "Optimization Result"
and in the HTML report.
Area Use |
Utilization of the area on
a press sheet
In other words, how much sheet surface is not used and means waste
in production.
"Area Use" is set
by default when you first open the settings and for jobs from
predecessor versions. |
|
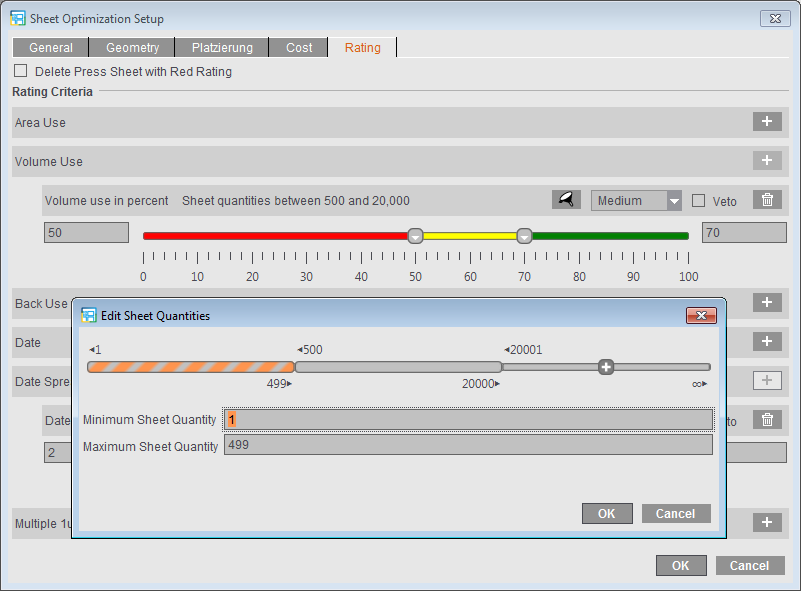
Volume Use |
Volume Use refers to the press
sheet stack
This means: Usage in the stack is also taken into account
besides the area use (see above). In this case, the total number
of press sheets produced is compared with the delivery quantities
of the single articles, in this way calculating the share of unpaid
overproduction that results from articles with a lower production
quantity being placed on the sheet. |
Can be filtered by sheet quantity:
the criterion is applied only to sheet quantities within the set
range.
More details can be found in
Edit Sheet Quantities/Delivery
Quantities |
Back Use |
Percentage of the back in
relation to the front, in other words to the area utilized
This means: If all fronts have a back (or all none), the back use
is 100%, even if the area utilized is only, for example, 70%. |
|
Date |
Assessment of the press sheets
based on a uniform target date. "Oldest Target Date"
refers to the date furthest back in the past or to the next date
in the future. |
You can define a period (Oldest
Target Date + x days) using the button with the three dots. |
Multiple 1ups |
The rating for multiple 1ups
is 100% if each article is placed just once only. |
Can be filtered by delivery
quantity: the criterion is applied only to placed 1ups with a
delivery quantity within the set range.
For example, you might not want
multiple 1ups for small delivery quantities but would like to
allow multiple 1ups for large delivery quantities on the same
press sheet.
More details can be found in
Edit Sheet Quantities/Delivery
Quantities |

Note: With
a sheet optimization setup generated with Prinect Signa Station version
2020, "Date Spreading" (number of days that may lie between
the single jobs at the most) may also be available as a criterion. This
was replaced by "Date" in version 2020.10.
|
|
When you click the plus button,
a rating criterion is enabled and you can customize it. You can
create a number of different criteria. |
|
|
For criteria with a filter
option, you can also create several criteria of the same type,
for example, to define a different action for various sheet quantities
or delivery quantities. |
|
|
When you click the trashcan
button, the rating criterion is disabled and removed. |
|
|
You can weight the criteria
from "Very low" to "Very high". During calculation,
this status decides on how much weighting will be given to the
rating criterion during optimization. In the results, this does
not change the single result shown in each of the columns but
the overall result for the sheet. |
|
|
The "Veto" option
does not change the status of a rating criterion but refers to
the "traffic light" shown. For example, if a veto value
is "red", then the overall result also displayed is
"red". |
|
|
|
Edit
Sheet Quantities/Delivery Quantities
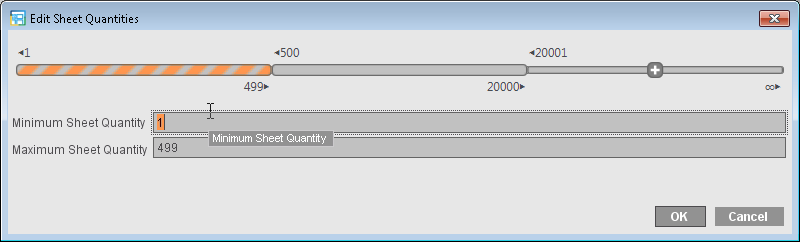
When you add a "Volume
Use" or "Multiple 1ups" rating criterion, the "Edit
Sheet Quantities" or "Edit Delivery Quantities"
dialog opens automatically.
If the minimum value set is
"1" and the box for the maximum value is left empty,
then the criterion is valid for the whole range, irrespective
of the production quantity/delivery quantity. In this case, you
cannot create another criterion of this type.
The set range is hatched.
If only a certain range is set,
e.g. a volume ranging from 500 to 20000, you can specify other
criteria of this type for the remaining ranges by clicking the
plus button again.
When it opens, the dialog then
shows the range with a set criterion and you can no longer link
this with the new criterion.
The ranges not yet linked to
a criterion are indicated by a plus sign. Within the ranges not
yet used, you can select subranges for the new criterion by entering
a minimum and maximum value or for the whole range by clicking
the plus button.
When you click the filter icon
in a criterion, the "Edit Sheet Quantities" or "Edit
Delivery Quantities" dialog also opens and shows the hatched
range set for this criterion. |
In the "Rating" tab, you can set
thresholds for a "yellow" traffic light state and a "red"
traffic light state.
The slider has two handles, only one of which
can be active at a time. The active handle is highlighted by a colored
border. A handle becomes active by moving it, by a click on it or a click
in the relevant text box.
In addition to moving the active handle, you
can change its position by clicking somewhere on the slider.
Use the left handle to change the threshold
for the red state and the right handle to change the threshold for the
yellow state.
The positions of the slider and the values
in the text boxes correspond to each other.
Rating results
Note: For Sheet Optimization without Layout
Default, the percentage for the rating result refers to the whole press
sheet. For Sheet Optimization with
Layout Default and Sheet Optimization for Packaging, the percentage refers
to the default layout or cutting die. In other words, a completely filled
layout produces, for example, an area utilization of 100% even if the
whole press sheet was not used. This rating, varying according to optimization
type, is applicable for all quality criteria except for date spreading.
The traffic light position and the values
display in the press sheet lists of the HTML report and in the "Results"
step. The "Rating" in the report is equivalent to the overall
rating that is calculated from all defined rating criteria according to
the degree of their weighting.
The results for each single quality criterion
defined also display in the press sheet list and in the report. The "Multiple
1ups" column can display several times if the criterion is defined
for different delivery quantities. The "Volume Use" criterion
can also be defined several times (for different sheet quantities), but
it always only displays once (volume use matching the optimized sheet).
Display in the "Results" step in
the press sheet list:
Note: To
view the criteria in the report, you must add the criteria to the table
of the press sheet list with "Select Columns". In this case,
only the columns where criteria are also enabled display.
Display in the HTML report:
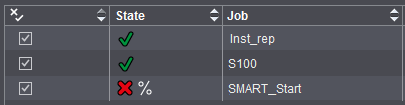
Delete Press Sheet with Red Rating
If "Delete Press Sheet with Red Rating"
is enabled, press sheets that are below the left threshold, i.e. in the
red, are removed automatically from the gang job.
During optimization, a warning message is
issued and the removed jobs are highlighted accordingly in the "Results"
step in the "State" column in the 1up list:
Optimization
Result
The preliminary results of optimization display
without having to go to another step. Go to the "Results" step
if you wish to view the full results.
Optimize
Optimizes the press sheet(s) taking into account
the assigned folding sheets/assembly blocks and the data set in the "Optimization"
step.
Report
(Optimization Result)
Display of the results of optimization The
optimization result is output as text in your default browser when you
click "Report".
HD Privacy
Statement
|
Imprint |
Prinect
Know How