
The step is only enabled in the "Imposition" and "Automatic Imposition" work modes.
This is where you check, modify and create all the folding sheets for the current product part. Besides selecting the folding scheme, you can modify gaps, assign special master pages, use the bottling function, organize your press sheet, edit gang run forms and create folding sheet groups.
Page Assignment & Master Schemes (only for the 'Imposition' mode)
Placeable Pages
This refers to the number of pages specified for the product part that are to be placed on the selected folding sheets. You cannot change the number of pages in this box. You define the page total in the "Product Part " step, "Imposition" mode.
Unplaced pages
This shows the number of pages that still are not placed on the folding sheets created so far. In certain cases, negative values are shown in this box, for example, if the page total was reduced at a later point and there are now more folding sheets than required.
If you increased the number of pages, you can match the number of folding sheets accordingly in "Number" in the table.
The product part is ready when the number of unplaced pages is zero.
This list shows the schemes selected for the product part with the number of placed folding sheets and assigned plates.
Using the buttons on the right, you can load or replace schemes to the product part or remove them from there or single out folding sheets:
Folder button
Click the folder button and select a created scheme in the "Choose scheme" dialog that then appears. It is linked to the plate template selected in "Printing Plate", and the press sheet with folding sheet displays in the graphic window.
To replace a scheme (button)
Click this button and then replace the scheme selected in the list by another one.
Note: The list only shows schemes with the same number of rows and columns as the one you want to replace. You can disable this filter function in the selection dialog.
To single out a folding sheet (button)
You can also trigger this function using the context menu in the scheme list in "Press Sheet". See Printing Plate for a description.
Trashcan (button)
You can delete the scheme selected in the list and all of its folding sheets from the product part by clicking the trashcan icon.
This is where you can check and change the currently displayed folding schemes and their folding sheets.
Scheme Name
Displays the scheme name. You cannot edit the name.
This shows the number of folding sheets that the selected scheme created. You can change this number, for example, to match page numbers that were changed. Double-click the box below "Number" and type in the new value.
Display of the plate template that is linked or will be linked to the selected folding scheme.
Select "Singularize Folding Sheets" (either with the button on the right or in the context-sensitive menu) if a folding scheme is to be placed on a different press sheet (gang run form). A press sheet is then not linked to the folding scheme so that you can place the folding scheme later on the "correct" press sheet.
The selected folding scheme displays when you select this option. You now can:
•Click "Automatic Gaps" to calculate the gaps from the paper and folding sheet size so that the folding sheets and the paper have the same size.
The spacing shown for head, foot and gaps changes automatically.
This takes into account the set binding method:
·Saddlestitching and Mixed Binding: Gaps between two-page spreads are set to 0.
·Loose Binding: Gaps are set evenly.
·Other: Gaps between two-page spreads are set to the maximum routing margin, unless the routing margin is to be ignored during calculation. In this case, the inner gaps are set to 0.
•You can manually edit the spacing shown for head, foot and gaps.
•Use Gripper Fold Values
Only available if a front fold/rear fold was set for the saddlestitcher or for a cover bonding or glue line in the "Binding" step. You can then include or ignore this value depending on the gap that is computed.
You will see the "Special master pages.." button if you created a special master page in the "Master Pages" step. Click this button to open the "Assign master pages from list" dialog. Now select a row in the "Assigned master page" column. A list box displays where you can select the master page and assign it to the page. The page then has a green page number.
You can also assign different special master pages to the front and back in this dialog. This is required, for example, if the contents have different positions. Changes to a master page on the front means that changes are automatically made on the back. You can still modify this change if you wish.
or:
Click a page in the scheme display and assign a master page to this page using the context-sensitive menu. The page then also has a green page number.
This requires that "several" is set in "Types" in the "Master Pages" step.
The selected folding scheme displays as a table and as an animated graphic in this section.
For mixed binding, it is necessary to split the folding sheets into groups that are then put together. This grouping can be done manually (see below). This means, however, that products can be produced fully automatically only with set page counts; if the page count changes, grouping must be done again.
You can automate this grouping based on certain defaults with "AutoGrouping". Subsequent changes to the page count are also taken into account in this process.

Note: Grouping is basically possible only in the "Mixed Binding", "Perfect Binding" and "Sewn" binding methods. Automatic grouping is not possible if ''Sort Folding Sheets for Bookbinding'' is enabled in the "Binding" step.
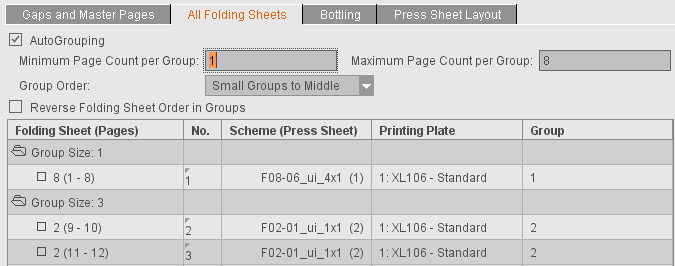
If AutoGrouping is enabled, you can set the following defaults:
•Maximum and minimum size of the groups. The data refer to the sum of pages of all folding sheets in a group.
The groups are formed in such a way that as few groups as possible are created on the whole and if possible no groups with a very small page count are formed.
If "First Folding Sheet is Cover" is active in the "Binding" step, a separate group for a folding sheet of the first scheme defined is created. "First Folding Sheet is Cover" is also possible with "Mixed Binding".
•"Group Order": This is where you set the order in which the single groups will be sorted:
·"Small Groups First": The groups are sorted in ascending order based on their page count.
·"Small Groups to Middle": The small groups are sorted to the middle of the folding sheet groups.
·"Small Groups Last": The groups are sorted in descending order based on their page count.
•"Reverse Folding Sheet Order within Groups"
This changes the order in which folding sheets are placed onto the press sheet. Although the folding sheets of the first group are placed onto the first press sheet, the last folding sheet in this group is however placed first. This function is required for certain binders. It is not possible to reverse the order if "Constant Press Sheet Order" is active in the "Product Part" step.

Note: You can also use "Reverse Folding Sheet Order within Groups" independently of automatic grouping.
•Folding Sheet (Pages)
The number of folding sheets in the product part is shown after "Group Size". All the folding sheets incl. the pages placed on them are shown in a table if you open the "Group Size" folder by clicking the folder icon or with a double click.
Select at least one row to be able to create a new group or move the folding sheets using the respective function in the context-sensitive menu:
·Create Group
You can create a new group only if you selected "Mixed Binding", "Perfect Binding" or "Sewn" in the "Binding" step.
Mixed binding includes perfect binding and saddlestitching. The sheets in a group are saddlestitched and gathered and glued before they are bound together with the other groups, for example, by thread-stitching. The creeping values are calculated separately for each group.
A new group will have as many sheets as you selected, ignoring any group name.
You can use this option to move sheets to the position you want in the book block. (Index is the number in No.)
·Sort Folding Sheet for Bookbinding
Bookbinders generally want that smaller folding sheets (half sheets, quarter sheets or even light-weight sheets) are not at the end of a book block. This function automatically repositions the sheets accordingly.
You will also find this function in Sort Folding Sheet for Bookbinding.
•No.
Shows the new position of the folding sheet, defined by the index (context-sensitive menu: "Move Folding Sheet").
Example:
You have four folding sheets. Folding sheet number 4 is given a new index, 1. Folding sheets 4 and 1 swap accordingly.
•Scheme (Press Sheet)
The folding scheme name of the press sheet is shown in this box.
•Group
Displays which group the sheet is part of.
You can use this function to study binding in a three-dimensional animated graphic.

Note: You can disable the option using the "parameter sets" in the Preferences to relieve memory. You can also use the parameter sets to define whether the display will be collapsed or expanded by default.
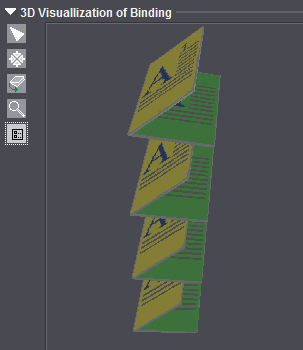
Button functions:

|
Deselects the other tools. |

|
Resets a rotated folding sheet to the way it originally was. |

|
Rotates and moves the animation. Click the animated graphic while holding down the mouse button and move the mouse pointer. To move the animation, hold down the alternative mouse button (PC: right mouse button, Macintosh: command key + mouse button). |

|
Zoom up graphic is set by default. A "+" appears in the magnifying glass. Hold down the "Alt" key to zoom down. A "-" appears in the magnifying glass. |

|
Opens a dialog where you can edit the animation properties such as colors of each of the components, or showing and hiding previews and folding sheet numbers. |
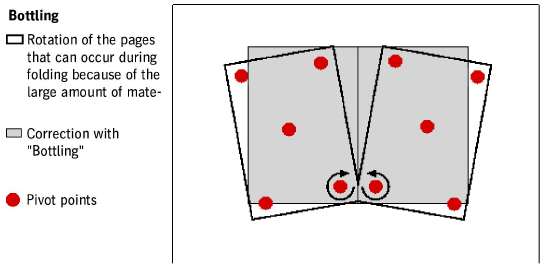
This function is especially interesting for very large sheets that will be folded several times with a cross fold. The "Bottling" function counterbalances a page rotation caused by a cross fold.
This slight rotation prevents wrong orientation of the pages that can occur during folding because of the large amount of material in the back margin.
When several pages of a large signature are folded into each other, the vertical alignment of the pages in the bound publication is no longer exact. The pages look slightly rotated outward or inward. With the "Bottling" function, you can specify a slight rotation in the opposite direction so that the pages are exactly aligned vertically when folded later.
The schematic diagram below illustrates how the angles are determined for "Bottling". The red dots are pivot points that are clicked and from which rotation is calculated.
You will find a description of how to proceed in "Bottling" in the "Schemes" step. Select the "Bottling" tab.
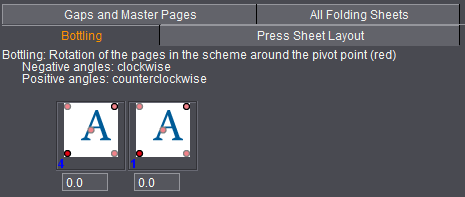
You can see the currently selected plate template with the set turning type (Sheetwise or Perfector) in the list below "Printing Plate" above the bottling editor. See also Printing Plate .
Bottling Editor
At the top of the bottling editor, you will see information about the direction of rotation when you enter a positive or negative angle.
You can enter angles for all the pages in the text box below. The angle you enter is applied directly to the page and the page is shown rotated in the graphic window in the "Press Sheet" tab.
The direction in which a page will be rotated depends on the type of folding and the position of the page in the scheme. In the scheme display, you can therefore determine the pivot point and the angle for each page.
You determine the point around which the page will be rotated by clicking the dot at the corner concerned of the stylized page. The red dot becomes active. You can enter the angle of rotation in the corresponding text box for the page.
The settings are only made for the front signature. If a back signature exists, the settings are automatically transferred to this signature.
The following functions are available for the selected folding scheme when you select this option:
Exception:
You can use the functions marked by "gang run form only" if the "Gang run form" option was enabled in the "Plates" step. The defined gang run form is marked by the sign "#" in Prinect Signa Station in "List of Selected Plates".
Fold Lay Mark Position (related to paper)
Folding sheets are positioned at the fold lay mark you want with this automatic function. The fold lay mark is marked by a bracket in the graphic window.
The folding sheets are positioned so that they are always at the lower paper edge in keeping with the fold lay mark. You can set the fold lay mark to be "Centered" (pointing to the center of the paper), "Left" or "Right" (pointing to the respective corner of the paper).
Position and orientation of folding sheet 1up (gang run form only)
AutoArrange
This function centers the folding sheets on the press sheets if there is enough room. See also the Automatic Rotation option.
Folding Sheet Copies Allowed
This option allows folding sheets to be duplicated automatically on the plate as long as there is enough space.
The option applies to the scheme selected in the scheme list and by default is selected.
No copies of the selected folding sheet are generated if the option is disabled for a scheme. However, you can position a different folding sheet on the plate.
Used together with the "AutoArrange" function, this option allows folding sheets to be rotated for optimal utilization of the press sheet.
This option gives you more flexible handling when generating press sheets. When this option is enabled, you can only place folding sheets with the same number on a press sheet (copies). This is helpful, for example when publishing books where for technical reasons (color, etc) one single sheet in the folding sheet list has to be shifted. See also Move Folding Sheet.
If several folding sheets are on a press sheet, they are all shifted when you insert one because the whole press sheet must not be changed and shifts as well as a result. The "One Folding Sheet per Sheet" option prevents folding sheets with different numbers from being placed on one press sheet. In this way, you have that only one folding sheet is shifted.
Allow Nesting of Folding Sheets
Requested:
2x16 folding sheets (versioned, e.g. GER + FR) will be folded to a press sheet (32 pages) and, after folding, separated with a cutting knife in the folder or on the saddlestitcher with a three-knife trimmer. The twin lay mode does not work because of versioning.
This function gives one 16 folding sheet such a large gap that the other 16 folding sheet can fit into it (nesting).
Prerequisites:
•The scheme must have a perpendicular bisector of the sides (in two columns or in two rows).
•Surfaces Sheetwise (front and back) or Perfecting.
•Exactly two placed folding sheets with the same scheme and gaps.
In the "Ganging Optimization" mode, this function is implemented in "AutoArrange".
If Prinect Signa Station detects during automatic placement in the "Imposition" mode that the number of folding sheets that can be placed with and without rotation is identical, then the rotated variant (90 degrees) is used if this option is enabled.
Number Folding Sheets (gang run form only)
Defines how many folding sheets of the same kind will be placed on the press sheet.
List box (1up, 2up, 4up, 8up) (gang run form only)
The folding sheet 1ups are increased by the number you select. 1up is set by default.
Edit Table (gang run form only)
You can change the positions of the folding sheets manually in X and Y direction. You can change the orientation of the folding sheets clockwise by 90° in a list box. Use the "swapped" option to position folding sheets from the front to the back and back again.
Lets you load a resource from the "Plate Layout" section.
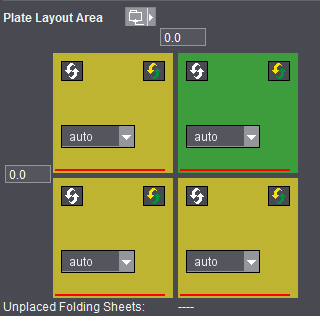
Each colored element marks a folding sheet.
The red line refers to the fold lay mark.
The yellow folding sheet indicates that the front of the folding sheet is on the front of the press sheet.
The green folding sheet indicates that the back of the folding sheet is on the front of the press sheet.
Input box(es)
You can define free spaces between the folding sheets.
Folding sheets rotated (button)
This function is required if you wish to change the orientation between several folding sheets. The fold lay marks are rotated by 180° when you click this button.
Swap front / back (button)
In practice, you generally want to use the separating line as the lay mark for the folder if you have more than one folding sheet. This is only possible if you can place normal folding sheets together with folding sheets with swapped front and back on one press sheet.
Auto (list box)
The "Auto" list box controls the order of the folding sheets on the press sheet.
The first folding sheet is always at the bottom left in an automatic arrangement.
To change the order to suit your needs, you must define all the list boxes correctly (no number twice, no "Auto").
Unplaced Folding Sheets:
All folding sheets must be included if they are not to be placed automatically.
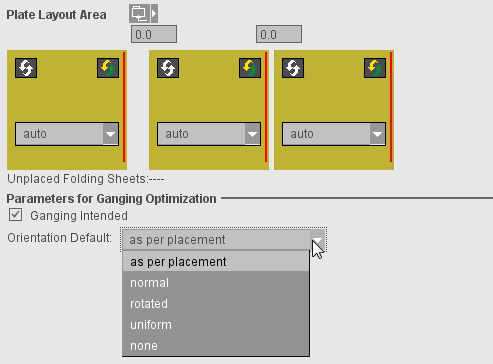
Parameters for Ganging Optimization
You can define which folding sheets are intended for ganging. This requires the "Gang & Sheet Optimizer" license.
For this purpose, enable "Ganging Intended" in the "Press Sheet Layout" tab. Then, during a JDF output, all folding sheets that are derived from this scheme have a special marking. You can then use this marking to submit these folding sheets automatically to ganging. The option is not available for folding sheets on gang run forms ("Ganging Optimization" work mode).
You can define the orientation on the paper with "Orientation Default". With "normal" and "rotated", you specify the orientation related to the paper for all 1up copies of this article. With "uniform", optimization determines the better of the two variants for utilization of the sheet. In this process, all 1up copies of the article have the same orientation; this means that either they are all rotated or none are rotated. If you select "none", orientation is ignored and only the best possible utilization of the sheet is considered. In this case, it is possible that some 1up copies of the article are rotated and some are not. This can be a good idea in the case of articles where the grain direction of the paper is irrelevant or for materials without grain direction.
The "Section Handling" tab is used only for the twin lay option. A 'section' essentially describes a folding sheet with one scheme. In the twin lay mode, however, you can split a scheme into two sections that look like separate folding sheets for the rest of the system.
The table shows the folding sheet placed on each of the press sheets.
For twin lay, you can divide a scheme into an "inner" and an "outer" half. The "Type/Version" column shows this as the section "type".
The "Section Setup Editor" opens when you click "Change Section Order...".
The table shown in the editor is structured like the table in the "Section Handling" tab but shows only a copy of the current state.
•"Double Section": Each scheme is split into two sections. The number of active sections is doubled, the result is reflected in the page count. When automatic collating marks and/or sheet labels are active, they will be set according to the section numbers.
•"Single Section": Every folding sheet contains the complete scheme.
•"Calculate Section List": The values in the "Folding Sheet" column can be edited. To do so, click on a field of the column and enter the desired section number.
After editing, you must press the button "Calculate Section List" because it is quite natural that inconsistent intermediate results occur. The list is then checked for consistency (no numbers must be missing), and the new section list is generated.
To undo sections for certain folding sheets, specify "0" for the "Inner" section of this folding sheet. You can also make double 1ups by assigning the same section number to both sections of the scheme. With this tool, you can collect the sections on a single press sheet, e.g. to print them together because of the color used.
•"OK": The changed data will be imported into the product part
•"Close": The Editor closes without saving the original data
There is another way of resorting sections: you can swap two sections with drag&drop. You can do this here in the Editor table but also in the Inspector table.