How to Work When Using Automarks Sets with Rules
Rules make it possible to have automatically placed print control marks within a job at different positions without needing different product part templates for this.
As a result, manual editing can be cut back in many cases on the one hand and on the other you can also have a high degree of automation in your workflow if automarks sets are matched appropriately to your workflow.
Example 1: Different Positioning of the Folding Sheet Label Depending on the Folding Scheme
Folding sheets of a particular scheme, for example, F04, are always to be folded on a certain machine. This machine A however needs the folding sheet label at a different place on the sheet than the other machines.
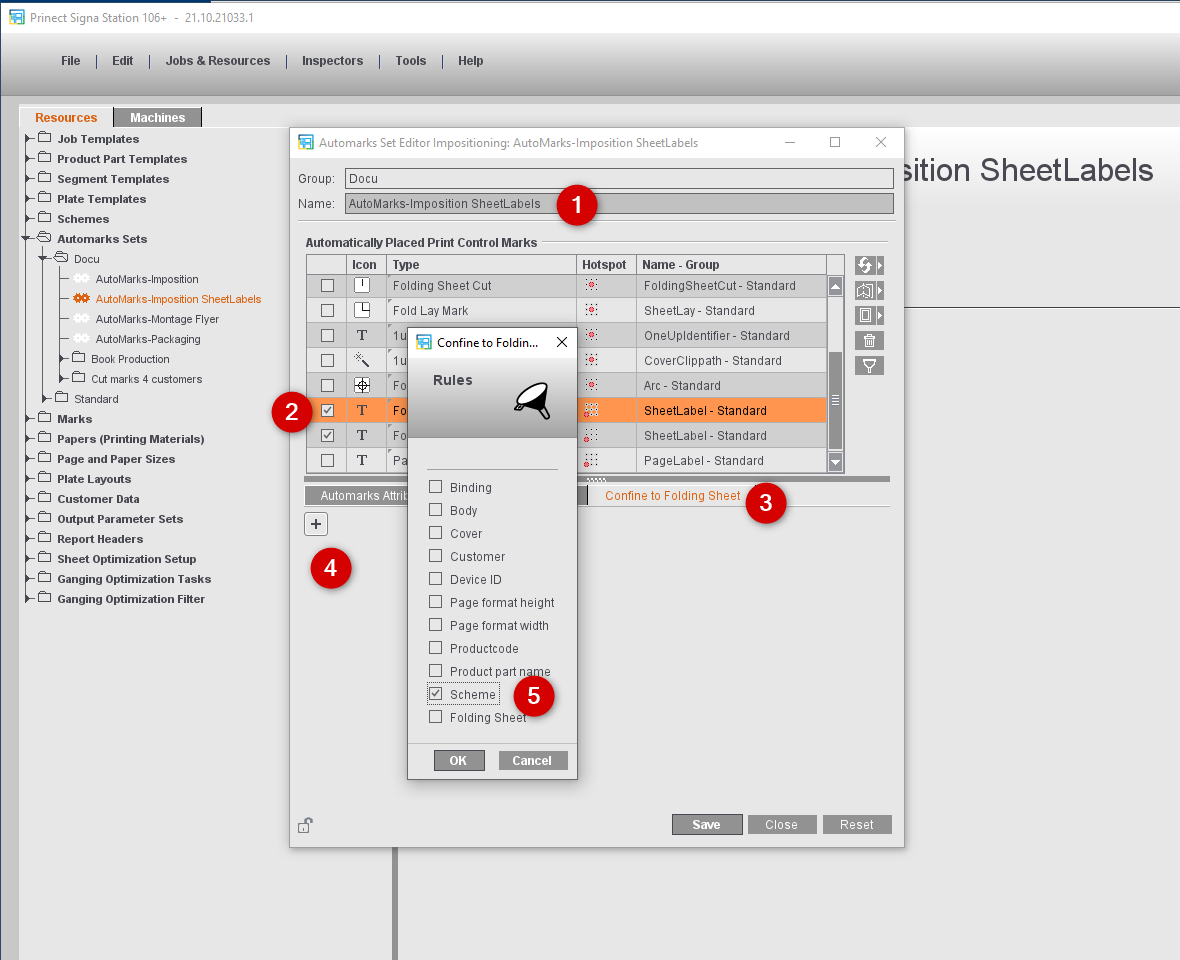
1.For this, you create an automarks set where you first define all the settings for the automatically placed print control marks that are to be valid for all the folding sheets.
2.After that, you enable the folding sheet label and also define the settings for placement, colors and scaling for this.
3.Go to the "Confine to Folding Sheet" tab.
4.Click the plus button.
5.Enable "Scheme" and click "OK".
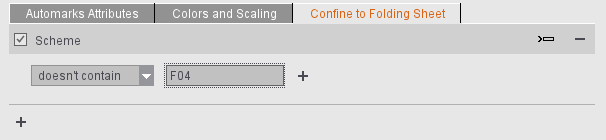
6.Enter the following rule: "doesn't contain" and "F04".
As a result, this folding sheet label is placed for all sheets to be folded by other schemes.
7.Add the folding sheet label a second time to this automarks set.
8.Enter the attributes needed for machine A.
9.Enter the following rule: "contains" and "F04".
10.Save the new automarks set so that you can use it again at any time.
If this automarks set is enabled in a job, the folding sheet labels are automatically switched over as soon as the folding scheme is set.
If a number of folding schemes are used in a job, the rule works for a specific folding sheet, making it possible to place the labels at different positions in a job.
11.If necessary, set the new automarks set in the Preferences as the default for new jobs.
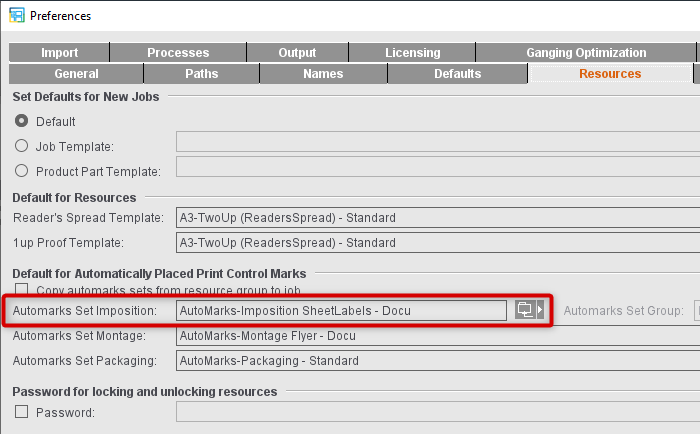
12.If you do not wish to use the new automarks set as the default but only occasionally, click the select button beside the text box with the name of the automarks set in the job concerned and select the automarks set you want.

Tip: Clicking the filter button confines the list to the enabled items, giving it a clearer overview. If you click the marking button, the selected marks have a red border when they display.
Example 2: Placement of the Assembly Block Label Depending on the Product Code
For assembly jobs, a certain assembly block label is to be placed solely for flyers.
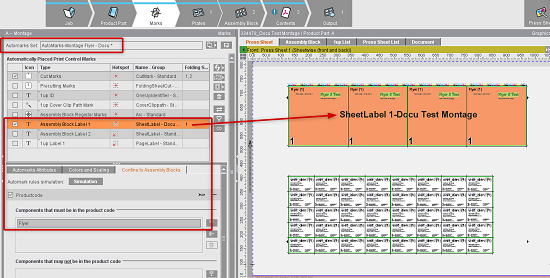
1.The assembly block label is enabled in Automarks Set Montage and the mark desired is assigned:

2.After that, open the rule selection dialog by clicking the plus sign below "Confine to Folding Sheet" and assign a "Product Code" rule to the mark.
3.Set that the rule will always be used if the product code in the JDF contains "Flyer" as the text string.
4.You either define this automarks set in the Preferences as the default for all new assembly jobs or you select it directly in the current job in the "Marks" step.
The assembly block label is automatically placed on all assembly blocks with contents containing "Flyer" in the product code.
Example 3: Use of Multiple Automarks Sets
If you not only define a default automarks set for creating new jobs in the "Preferences" in the "Resources" tab, but also enable the use of automarks sets of a resource group, all automarks sets saved in this group are automatically applied to the job.
This gives you automatic control if different variants of a marks type are to be used, for example, different kinds of cut marks for customer A than for customer B.

Note: The use of multiple automarks sets is presently only possible in the "Imposition" mode.
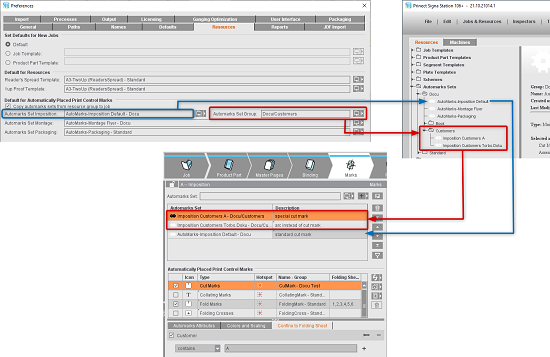
You can see how this works in the example shown:
•In the Resources, default automarks sets are defined for imposition, montage and packaging in the user-defined "Automarks Sets > Docu" folder. Subfolders with special automarks sets are also set up. The automarks sets in the "Customers" subfolder control the placement of single marks on the folding sheets depending on the customer name.
•In the Preferences, the user-defined automarks set "Automarks-Imposition Default" is set as the default for new jobs created.
•In addition, "Copy automarks sets from resource group to job" is enabled and the "Customers" subfolder is set as the automarks set group.
•For the new "Imposition" job, all the automarks sets are first copied from the automarks set group to the job and the default automarks set added to the end of the list.
•This list is processed one by one by Prinect Signa Station. If a mark is found in the first automarks set (= mark is enabled in the automarks set and is not excluded by a rule for this job/folding sheet), the mark is placed accordingly and the other automarks sets in the list related to this mark are ignored.

Note: Labels are an exception: These are always taken from all the automarks sets if they were not explicitly excluded by a rule.
No collating marks are defined in the first automarks set. The collating marks defined in the second automarks set, if any, are used. The collating mark setting from the last automarks set in the list, the default automarks set, is used only if no collating marks were enabled in all previous automarks sets of the list.
In the "Description" column, you can see that different types of cut marks were defined for all the automarks sets. These were assigned different placement rules in the "Confine to Folding Sheet" tab.
The special cut marks of the first automarks set are placed only if the customer name contains "A". If the customer name does not have any "A", the second automarks set is checked. This special cut mark is placed if the rule from this automarks set is applicable. If the rule of the second automarks set is also not applicable, the default cut mark from the default automarks set will be used.
IMPORTANT: If the job is created with a product part template where an automarks set is defined, this automarks set is always used and the Preferences are ignored, and the automarks sets there are not copied to the job.