
Note: The available attributes depend on which editor was started and which mark type is selected.
"Fixed position for front and back":
•The mark position in relation to the origin is generally different for front and back. For work-and-turn, for example, it is mirrored so that the mark is in the right position for the pages.
There are cases where the mark position has to be the same for the front and back. You must set this option in such cases. Barcode marks for plate identification is such a case.
"Output Mark on Paper Only"
If a mark is positioned on "paper", it is also output. If it is not, it will be suppressed.
This prevents that a mark is inadvertently scaled. When the option is set, you cannot resize the mark set in the job, neither by entering a scaling factor in the text boxes in the Marks Inspector nor by using the "Scaling" tool in the graphic window. Marks that are selected in the marks table of the Marks Inspector and assigned the "Mark Not Scalable" attribute are excluded from the set scaling and remain unchanged.

Note: You will find more details about marks for color control bars (e.g. "with AutoClip" and "with AutoPositioning") in: Color Control Bar Editor
Mirrored positioning of marks is necessary, for example, when creating plate templates for flexo plate production (coating plate).
Note: In conjunction with "Mirror mark on back", you can logically select only one or no option.
A mark is copied only to the front when it is copied to other plates.
"Clip Mark Horizontally/Vertically to Subject"

Note: At present, "Clip Mark Horizontally to Subject" and "Clip Mark Vertically to Subject" only work on non-rotated marks.
There is the option of clipping color control bars placed in relation to a press sheet to fit the subject (mark type: color control bar with AutoClip) When clipping to the subject, any color patches that would be clipped are included completely, and the color control bar is centered on the plate.
Undesired side effects can occur when this function is applied to marks not complying with the usual color control bars. On one hand, such marks are submitted to the connected measuring instruments in the CIP/PPF workflow, and on the other hand, positioning errors can occur during transfer to the back of the sheet.
This problem can be avoided with the "Clip mark to fit subject" option for easy clipping to fit the subject. This attribute is effective only for marks placed in relation to the press sheet.
The mark is clipped on the left and on the right to fit the subject when the "Clip Mark Horizontally to Subject" option is enabled. There will be no clipping at the top and at the bottom. This is necessary in order to clip ink pickup bars usually placed outside the subject to fit the subject.
When the mark contains a manually edited clip path, the path is preserved and is offset with the trim against the subject.
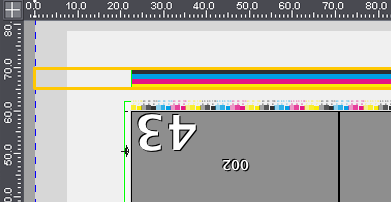
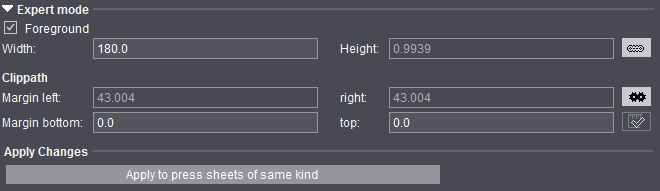
The screenshot shows an ink pickup bar with the attribute "Clip Mark Horizontally to Subject" placed on the press sheet. You can see that the mark was clipped to fit the subject. The trim is reflected in the specification for the margins in "Expert Mode / Clippath" of the Marks Inspector:

Note: If the marks are clipped only in horizontal direction, but not in vertical direction, this can make color control bars unusable because they project too far beyond the upper or lower edge of the paper. A warning where you can choose whether to cancel the output or to continue with the color control mark clipped is issued in such cases.
The mark is clipped on the top and bottom of the subject so that it does not protrude beyond the subject when "Clip Mark Vertically to Subject" is enabled.
Example: The Sensortec mark that is needed for control of the analog printing units of the Labelfire (web press with analog printing units and one digital printing unit) and must be clipped vertically so that it does not protrude into the following subject.
The mark content generally will not be mirrored if the mark position is mirrored on the back (see above).
You must only set this option if the mark content is to be mirrored on the back.

Note: In conjunction with "Mirror Mark", logically you can select only one or no option.
The background of the mark is covered the size of the clip path of the mark and as a result is not transparent.
The "Inspection Control Mark" property is set when this option is enabled.
You can use all existing marks for Inspection Control.
The "Inspection Layer" specifies the areas to be checked on the sheet, and generally, four marks are required (one at each corner of the sheet) for the "Inspection Layer" to fit the sheet exactly.
This functionality is applicable only for sending data to the Prinect workflow.
No provision is made for a direct output from Prinect Signa Station.
Automatic folding crosses are trimmed so that they do not jut into the content.
"Do Not Check Mark During Output"
During output, a check is run to see whether a mark is within the gripper margin or out of the paper. If this is the case, a warning is issued. Some special types of marks are excluded from this warning:
•Plate Control Mark
•Pull Lay
•Print Quality Control Mark
•Scavenger Mark
Enable "Do Not Check Mark During Output" if marks that are not part of these exceptions are also not to be checked during output.
For compatibility reasons, the following marks are also excluded from the check:
•Marks with the name "PullLay"
•Marks with the name "RegisterLine"
•The "Text" mark from the "Standard" group