The Version Cluster Inspector is the basis for editing versioned jobs that were changed to a version cluster using the "Make Product Part Version Cluster" function. The product parts in the version cluster display. In addition, the "Versioning" step is set up. See Versioning for details.
You can go directly from the Version Cluster Inspector to the related product parts, load a new product part and duplicate an existing one.
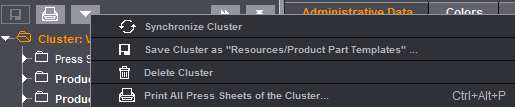
You can invoke the Version Cluster Inspector only if the cluster is enabled in the Browser window with a double click. You can synchronize the cluster by selecting this function in the context-sensitive menu.
"Delete Version Cluster": This function decomposes the version cluster and all the product parts except for the original product part are removed. In other words, the job returns to "simple" versioning.
Besides the "Product Part" step, basic settings and plate definition, the Version Cluster Inspector provides you with a wide range of options for assigning and distributing folding sheets to the press sheets.
You will find a detailed description of how to create a job with a version cluster based on an example in the chapter Versioning.
In the "Name" box you can edit the name of the version cluster that displays, for example, in the Browser window or in the caption bar. In the Comment box you can record details about this version cluster, for example, about the number of product parts and versions. This is a good idea especially with version cluster jobs because these jobs often contain a great number of elements and accordingly can be confusing.
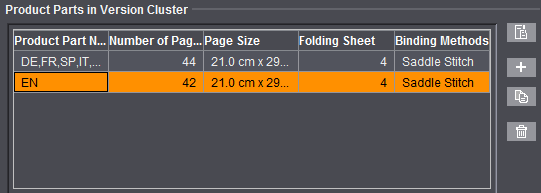
Product Parts in Version Cluster
The table shows all the product parts in the version cluster. You can go directly to the step of a particular product part by clicking this product part. Do this, for example, to edit the active versions assigned or the page total.
Button functions (from top to bottom)
•Show product part: The "Product Part" step for the product part selected in the table opens (alternatively: double-click the product part).

Note: You can go back to the Version Cluster Inspector from the product part using the button to the right of the list of active versions.
•Create new product part from template: The selection dialog with the available product part templates opens. After you select a product part template and click "OK", a new product part is added to the version cluster and opens in the "Product Part" step.
•Duplicate: A copy of the selected product part is created but initially has no versions assigned to it.
•Delete: The product part you selected is removed from the version cluster. Deletion is not possible if there is only one product part. Versions that were assigned to the deleted product part are automatically assigned to the first product part in the list.
In this case, editing of the plates refers to the version cluster and not to single product parts. All plate templates defined in this tab are available in the whole cluster, e.g. in "Versioning > Press Sheets > Template". The initial setup in the "Plates" step is equivalent to the setting of the product part from which the version cluster was created.
You control which folding sheets are assigned to the press sheets in the "Versioning" step.
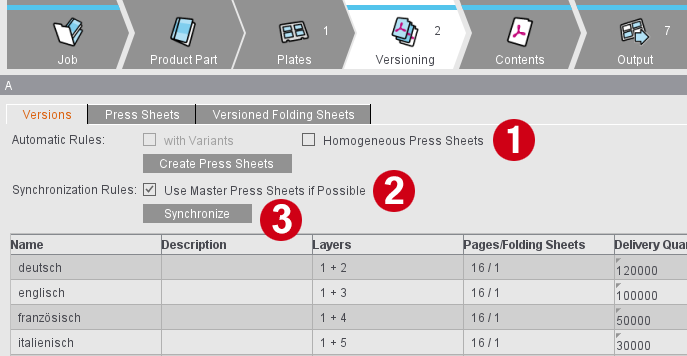
You can edit the required quantity ("Delivery Quantity") directly in the list. (3)
When you click "Create press sheets", Prinect Signa Station creates all the press sheets that are needed and assigns the versions.
In earlier versions, assignment of different versions to "one" press sheet was possible only through variants. In other words, several variants of the same size containing the related versions were created from one press sheet. Prinect then considered this one press sheet. As of Version 2021, it is possible to assign these versions also to separate press sheets (in the press sheet list, the press sheets then appear one below the other instead of side by side like in the variant control). If you wish to continue working with variants, enable the "with Variants" automatic rule before "Create press sheets".
•"Homogeneous Press Sheets" (1): If two or more folding sheets fit on a press sheet, only folding sheets of the same version are placed on the press sheet if the option is set (e.g. 2DE instead of DE EN).
•"Synchronize" (3): When you make changes to one of the product parts, you must apply this modified state to the version cluster. The name of the version cluster displays in red type. This means that you must first synchronize the version cluster with the product parts.
•If changes are made to one press sheet in the version cluster (e.g. marks moved), synchronization can result in a loss of these single changes. This is always the case if all press sheets in the cluster match the folding sheets of the master press sheets. Then the master press sheets are used directly.
•"Use Master Press Sheets if Possible" (2): Disable this option if changes leading to a synchronization (e.g. changes in the Version Editor) are not to overwrite specific changes on the press sheets of the cluster. In this case, the master press sheets are not used even if it would be possible. As a result, changes to the marks, for example, are kept.
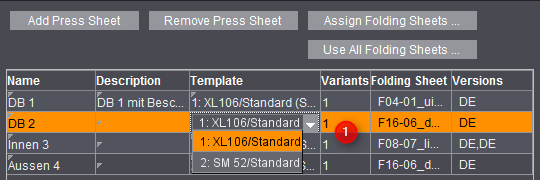
You can edit the name of the press sheet, enter a description, select a different template (1) and edit the variant number directly in the list.
Normally, "Create Press Sheets" automatically generates the correct press sheets. If you are not satisfied with the results of the automatic mechanism, you can compile the sheets manually in the "Press Sheets" tab.
•Add Press Sheet: The press sheet highlighted in the list is duplicated and added to the end of the list with a number appended to the name. No folding sheets are assigned.
•Remove Press Sheet: The selected press sheet is removed from the list without any alert message. Important: To add press sheets, there must always be at least one press sheet that you can duplicate.

The "Assign Folding Sheets" dialog opens when you click "Assign Folding Sheets" in the Version Cluster Inspector, showing "Folding Sheet Setup for" for the currently selected press sheet. You will see all the folding sheets placed by Prinect Signa Station on this press sheet on the right.
All available folding sheets are listed on the left. In other words, all combinations of the different folding schemes of the job with the cluster elements, exactly as was set in the product part versions.
You can place folding sheets on the press sheet with "Add" or remove single folding sheets from the press sheet with "Remove". By doing this, you edit specific placement of the folding sheets on each press sheet. You can also select several folding sheets at the same time for "Remove".
To simplify sorting when you have a large number of press sheets and folding sheets, you can clear the opened press sheet at one go with the "Remove All" button. "Add All" lets you add all the folding sheets of the sample sheet to the target press sheet at the click of a button.
Use All Folding Sheets
You open the "Take All Folding Sheets from a Master Sheet" dialog when you click this button. The function lets you apply the folding sheet layout of a selected sample sheet to several press sheets selected in the list.
1.In the "Press Sheets" tab in the list, mark all the press sheets to which the folding sheet setup will be assigned. All the selected press sheets must have been created from the same plate template and the paper data must match.
2.Click "Use All Folding Sheets".
In the "Take All Folding Sheets from a Master Sheet" dialog, the selected press sheets display in the "Folding Sheet Setup for" box so that you can check the data. The list displays all the master sheets whose plate template and paper data match the selected press sheet. In addition to the name of the master press sheet, the table also contains details about the folding scheme used and how often it was placed as well as the cluster element (product part) from which the sample sheet originates.
3.Mark the sample sheet you want and click "OK". All selected press sheets are then allocated the folding sheets of the sample sheet. The versions are varied in this process, but have to be checked for plausibility afterwards.
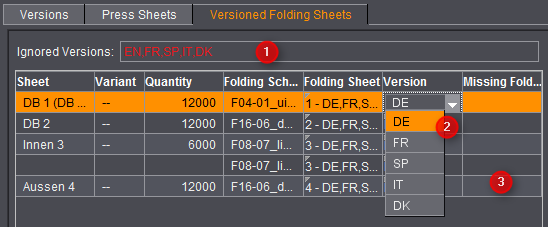
This is where you can check whether all the folding sheets of a version are placed on a press sheet. If a version of the version cluster is not assigned at all, the version name is red in the "Ignored Versions" box (1). You can recognize whether or not single folding sheets are missing in a version in the "Missing Folding Sheets" column beside the version: The numbers of the missing folding sheets display there (3).
The "Version" column lets you assign other versions to single press sheets directly in the table (2). You can edit assignment of the folding sheets in the "Folding Sheet" column.