
When you are happy with the preferences you defined, you can start on your job.
We can skip creating resources for the moment as ready resources are shipped with Prinect Signa Station.
•You will create your first job, a Heidelberg manual, in the "Automatic Imposition" mode.
•The book will be 32 pages long, will have perfect binding and be printed in A5 format. The book describes the "SuperColor" application.
•A Prosetter imagesetter will be used for output and an SM102 as the press.
Note: The PDF file "SuperColor.pdf" used in this example is located in the "Samples" folder of your local Signa Station folder (e.g. ...Heidelberg\Prinect Signa Station 17\Samples).
1.Click the "New" button or select "File > New".
A new job is created. The first step in the workflow bar is enabled.
The workflow bar defines the logical order in printing in which you can set all the data you need for your job.
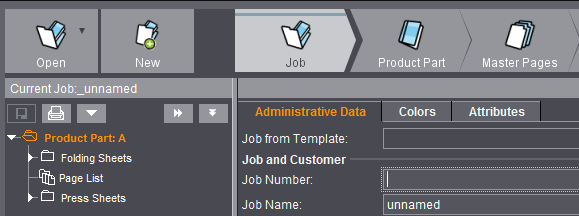
2.You define general data for your job in the "Job" step. Enter the following data for your first job:
(3).Job Number = 0001
(4).Job Name = Heidelberg manual
(5).Click the "Folder" button in the "Customer Name" row.
(6).Select "Heidelberger Druckmaschinen AG" from the "Standard" folder and confirm with "OK". Select any customer you want if you are working with an enabled MDS (Master Data Store).
(7).The customer name and the customer number are used automatically.
(8).In "Job Details", enter the "Target Date" and the "Quantity" you want for the job. Other inputs in the "Job Data" window are not necessary.
9.Go to the "Product Part" step. You can use the shortcut "Ctrl + space bar".
10.In the "Product Part" step, you give the product part a name and select the work mode you want:
(11).For example, enter "Supercolor" as the product part name in "Main Features > Name".
(12).Check "Enabled" in "Job Details in Product Part" and enter your data.
(13).Select "Automatic Imposition" as your work mode. Other inputs in the "Product Part" step are not necessary.
14.Go to the "Master Pages" step.
15.You define the trimmed size in the "Master Pages" step:
(16).Click the folder button after "Width" and "Height".
(17).Select the "A5" page format from the "Standard" folder. The A5 values are automatically applied.
(18).As we don't need any bleed for our documentation, set "Page-related bleed" to "0". Other inputs in the "Master Pages" window are not necessary.
19.Go to the "Binding" step.
20.Select "Perfect Binding in "Binding Methods". Other inputs in the "Binding" step are not necessary.
21.Go to the "Marks" step.
(22).Select the check boxes for "Cut Marks", "Fold Marks" and "Collating Marks" in "Automatically Placed Print Control Marks".
(23).You can leave all other settings as they are.
24.Go to the "Plates" step.
25.You select the plate template and paper definition you want in "Plates":
(26).Click the folder button after "List of Selected Plate Templates".
(27).For example, select the "SM102" plate template from the "Standard" folder. The values of the plate template are displayed in the window and automatically applied after you confirm with "OK".
(28).Select "Sheetwise (front and back)" in the "Placement rule for perfecting" list box.
(29).Click the folder button after "Paper Definition for Production".
(30).Select the "Profisilk_90_100x70" paper from the "Standard" folder. The values of the paper are displayed in the window and automatically applied after you confirm with "OK".
31.Go to the "Schemes" step.
32.In the "Schemes" step, you select the folding scheme and set the head, foot and back margins (if necessary, automatic setting):
(33).Click the folder button after "Scheme Name".

Note: When you select a scheme, only those schemes that can be arranged best on the sheet using the settings you defined so far (selected trimmed size, plate template and paper size) will be displayed.
You can disable this filter function, if necessary, in the lower part of the window.
(34).Select the "F32-05_li_4x4" scheme from the "Standard" folder. The scheme displays in the graphic window on the right and is automatically applied after you confirm with "OK".
(35).Click "Automatic Gaps" to apply the gaps from the preferences. The scheme changes accordingly in the graphic window and displays as follows:

36.Import of the PDF files can now start.
37.Go to the "Contents" step. Right-click (PC, Mac: Ctrl key and click) "Documents" to display the context-sensitive menu and select "Documents...".
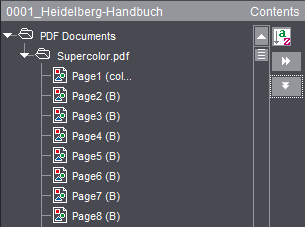
38.The window that opens displays automatically in the "Documents" folder. Go to the folder "Samples", highlight the file "Supercolor.pdf", and click "Open". The PDF file displays in the Contents window.

39.Right-click (PC, Mac: ctrl key and click) the PDF file to display the context-sensitive menu and select "Add Pages". The pages are positioned automatically in the scheme in the graphic window.
40.When all the pages are imported, save your job with the imported pages ("File > Save", "0001_Supercolor").
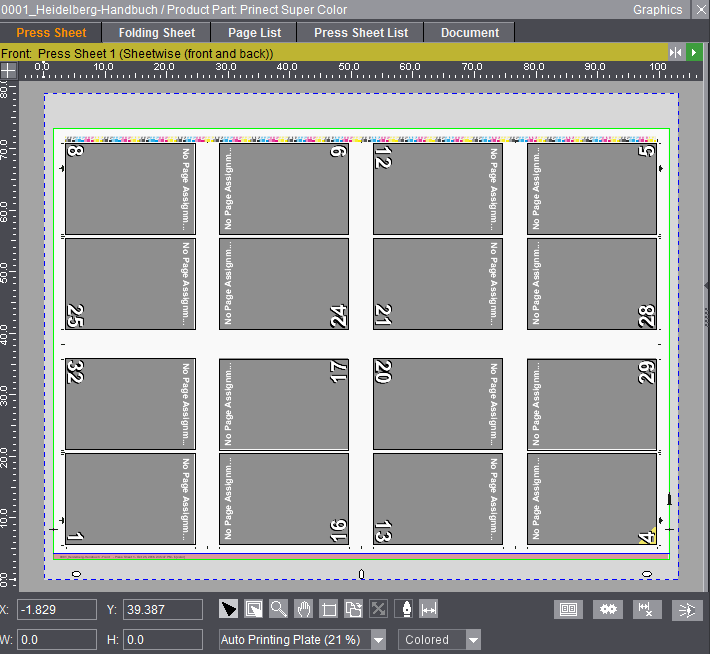
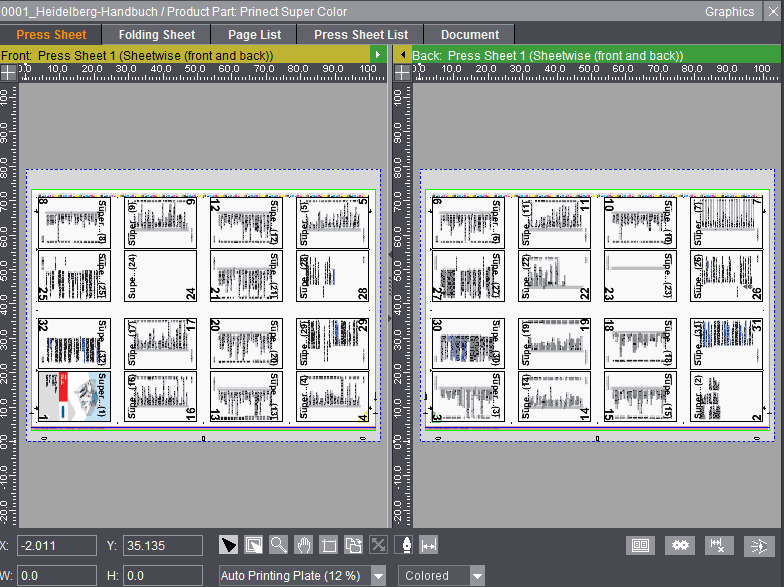
41.Now check whether all the pages were positioned correctly and all the press sheets required created. Double-click the "yellow" caption bar in the "Press Sheet" tab in the graphic window. You now see front and back and they should be something like this:

42.Change to the "Press Sheet List" tab. The press sheet list shows you all the press sheets that were created and that you need:


43.After a check, you can now print your job. Go to the "Output" step.
44.Click the folder button after "Output Parameter Set" and select "Prosetter (PDF)" from the "Standard" folder. The press sheet you wish to print is already selected.


45.Click the "Edit" button after "Output Parameter Set", then click the folder button after "Output folder for PDF, JDF, JT" in the "General" tab and select the suggested folder "Output" if it is not yet entered.
46.Click "Save" and "Close" the window.
47.Now click the "Output" button. A progress bar appears in the lower area of the window while Prinect Signa Station is busy printing.
48.You will be notified if your output was successful.
49.At the PC, the file is saved to the following folder: "C:\...\Heidelberg\PrinectSignaStation_x\Output".