
You can save the job data as a template. Do this in the Browser window by displaying the context-sensitive menu and selecting "Save job as 'Resources/Job Templates'". You can then display this job again with "Job from Template" or list it in "Resources > Job Templates". The job template contains all the Prinect Signa Station job data, except for the job number, job name, customer name and customer ID.
The job name is based on the "Job Number" and "Job Name" boxes.
Job Number
The job number is used in finishing, among other things in the JDF workflow with the Prepress Manager, and by default is part of the full job name. It can be made up of alphanumeric characters, e.g. "49rs".
Job name
Is used to spot a job easily and by default is part of the full job name, e.g. "labelsSM102".
Customer Name
Is also used to spot a job and can be a default part of the full job name.
Details about the customer. You can save customer data as a template and call them up again when required.
•Folder button
You can save a customer as a template in the resources and use this button to display it again.
Customer ID
Additional customer code (e.g. customer ID). The customer ID can be a default part of the full job name.
•Info box
Details about the customer.
The full job name is made up of default placeholders and the general file extension ".sdf". In "File > Preferences > Names > Job File Name", the default is generally:
job number_job name
The following full job name is generated automatically if you enter "01" in "Job Number" and "Smith" in "Job Name":
"01_Smith.sdf"
Note: To change the default, select the placeholder you want. Go to "File > Preferences > Names", in "Job File Name" select the placeholders you want. See Job File Name.
Details about the target date, number of copies, number of layers and planned colors.
There is also an enhanced versioning option: If you select more than one layer, you can use the many enhanced options in "Versions". More details can be found below in Basics of the Workflow Bar and in Working with Versions.
You can set the "target date" using a calendar that you display by clicking the arrow on the right. Click the arrow again to quit the calendar without changing the date.
In certain cases, PDF documents must be placed on different layers so that they can be printed one on top of the other in a job, for example, if it has several languages. The list box to the right will be enabled and the layers displayed if you enter more than one layer.
You can now change a layer name in this box, e.g. by entering the language. You can output this name on the press sheet using a text mark. A maximum of 201 layers can be used.
You can assign the layers certain names in "Preferences > Names" that can then be used as default layer names when you enter several layers in the "Job" step. You can, however, change them at any time. You will find more details about working with several layers in Default Layer Names .
Use the button to invoke the "Layer Name Editor" where you can customize the layer and level names for a specific job.
Example for a bilingual document (= 3 layers, 2 versions):
|
Layers |
Level |
|---|---|
|
Images |
Base |
|
German |
Text |
|
English |
Text |
"Level" is an additional identifier (e.g. color, black-and-white or base, text) of the content of a layer. However, it is not mandatory to enter it.
Layers with the same content must have a unique (identical) level name.
The "Level" parameter is submitted in the JDF workflow and, for example, allows proofing of the level in question.
The following description should help you decide whether you will work with the new versioning or whether you will use the "old" layer versioning.
•Layers = 1, versions = 0: Work is without versions and layers
•Layers >1, versions = 0: Work is with layers but without versions (= old versioning)
•Layers >1, versions = 1: Single version
One version containing all the configured layers is set up. The version name is automatically derived from the existing layer names. Version name and assigned layers cannot be changed.
•Layers >1, versions >1 (one less than layers): Version names and assigned layers can be edited.
•A single version is created automatically for jobs with segmented folding sheets ("Master Pages" step > "Segmented Folding Sheets").
The number you enter for versions depends on the "Number of Layers" box. You can enter versions only if more than one layer is set. The maximum number of versions is equal to the number of layers minus 1. The upper limit for layers is 201, and 200 for versions with 201 layers. If you enter a higher value, Prinect Signa Station automatically replaces the value by the maximum value possible.

Note: You can specify "Press sheet variants" in the "Plates" step if "Number of Layers" is greater than '1' and "Versions" is at least '1'.
New versioning:
The combination of "layers" and "versions" gives you a wide range of options. Click the button on the right beside the option chooser. The "Version Editor" opens.
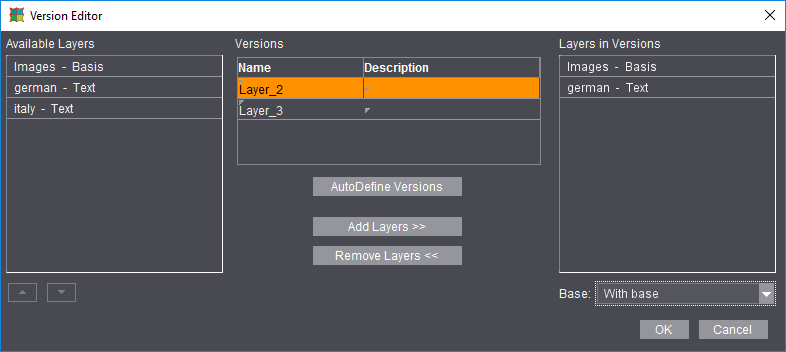
You will see the defined "layers" in the left column. The middle column shows the defined versions (it does not have to be a language version). The right column shows the selected combination of layers in a version.
After you mark a version, you can then assign the layers you want to the version or you can let them be assigned automatically.
If you set "Without Base" in the "Base" list box function, the base layer is removed from all existing versions, "AutoDefine Versions" creates versions with a base layer. In "Defaults" in the Prinect Signa Station Preferences, you define whether the versions are by default created with or without a base layer (see Create Versions with Base Layer).
You can also create additional base layers by defining, for example, 6 layers with 4 versions and by then renaming a layer to a base layer. This lets you assign other base layers specifically to certain versions. Make sure that these additionally defined base layers are in the left list in the editor above the assigned (text) layers because the list determines the order of printing. If required, you can change the order in the list using the arrow buttons or with drag-and-drop. Only the first base layer cannot be moved.

Note: You can also set a "Description" of the version in the middle column beside the version "Name". This description is sent to the Prinect Cockpit.
When this check box is enabled, the active job is saved and its current, implemented resources are frozen.
When you open the job later, the obligatory question of "Update resources..." would not appear and there is no update.
This setting can be useful for repeat jobs in order to base your work on the original resources.
Default for JDF and job ticket (third-party workflow)
This option lets you define how many colors will be used in printing when you create layouts in "JT" or "JDF". For a PDF marks layer, the combi mark that matches the colors set here is then used.
It only makes sense to define colors if no content pages were positioned. If they were, the colors set for the content pages are used during output.
This box allows you to enter additional information about a job. You can define the note as a text mark placeholder. This allows you to position and print it out. See Creating a Text Mark.
As an option, you can view the notes each time the file opens.
Created on/Modified on
Prinect Signa Station shows the dates in these boxes. You cannot change them.
•Info box
Displays all the details about the job history.
Created by/Modified by
The name of the user logged in to Prinect Signa Station appears automatically in this box. You cannot change the name afterwards.