The handling of color control bars has been enhanced. It is now possible to map spot colors to the "BCMY" process color code when this option is enabled. By doing this, you can avoid gaps in the color control bar.
Default: The option is set by default for new jobs, it is disabled by default for existing jobs (older than version 4.5).
Issues arose in the Heidelberg workflow due to a rigid order of colors if a job did not have all the process colors but spot colors as substitutes or even only had spot colors.
Now it is possible that color mapping is done automatically by Prinect Signa Station. In this process, the spot colors are mapped to the BCMY placeholders.
Use Global Mark Color Mappings
"Global Mark Color Mappings" is disabled by default when you create a new job.
When this option is disabled, color mapping of all the press sheets with the relevant surfaces (front and back) is done in the Press Sheet Inspector.
When the option is enabled, color mapping can be done for the entire job, either automatically or manually. In this case, you cannot use the function in the Press Sheet Inspector.
Automatic Color Mapping
"Automatic Color Mapping" is the default setting. The system automatically tries to avoid gaps in the color control bar.
The "User-defined Color Mapping" window displays. You can now set all separation colors manually to marks color placeholders of the HD alphabet. Click the "In mark" code and select the link you want.
We recommend that you use "Automatic Color Mapping" in the workflow.
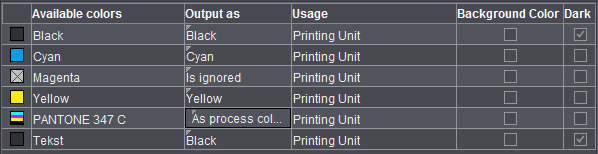
Display of the available colors in tables
Display the colors available in the product part as color boxes.
Colors that are in the PDF pages assigned to the product part.
Click an element in this column to display the output options for spot colors. This parameter lets you replace spot colors by C, M, Y or K or by another spot color in the PDF document and print them. In this way, for example, you can replace similar looking spot colors by another color, thus saving ink/inking units. Other options:
As a visual aid, the new color box inserted at the beginning of the row changes according to what you select.
•as process colors
The spot color is converted to the process colors C, M, Y and/or K that are written and printed to the plates.
•is ignored
The spot color or process color is removed from the list and not printed.
•To color
You can map the spot color to a process color.
Only if "Column for Usage" is enabled in "File > Preferences > User Interface".
You can disable spot colors in marks manually. The spot color is ignored in color control bars in combi marks and also in the workflow with "Allow Spot Colors to BCMY".
The table below shows you the handling options:
|
Cases |
Rule |
Description |
Usage |
Ink Code / Order |
|---|---|---|---|---|
|
1 |
Color code from |
Color is assigned a code from "HD alphabet", included in the color bar |
Printing Unit |
Yes/Yes |
|
2 |
Color code from |
Color is assigned a code from "HD alphabet", ignored in the color bar |
Printing unit, no color control |
Yes/No |
|
3 |
Color code L1-L4, not in color control bar |
Color is assigned a code from L1 - L4, ignored in the color bar |
Coating Unit |
Yes/No |
|
4 |
No color code |
No color code is assigned |
Proofing, tool, other |
No/No |
Dark
Only if "Column for Darkest Color" is enabled in "File > Preferences > User Interface". See Column for Background Colors.
Background colors
Only if "Column for Background Colors" is enabled in "File > Preferences > User Interface". This is where you can define which colors will be the background colors.
"Background colors" are evaluated in the "Prinect Cockpit 17 (via JDF)" output variant. The maximum number of background colors wanted in the Prinect Prepress Manager are entered. You must enable this number also in the color marks used.
Details can also be found in the Marks Editor in "Background Colors".
Default Screen Angles for RIPs
Settings in this group do not affect the Heidelberg workflow. The values are used only when you output to third-party RIPs.
You can define the screen angle manually for each single color in the color table that then appears (may be necessary for some third-party workflows).
To change a color, click the "Angle" column and key in the value you want.
The modified screen angle is taken into account during output.