
What's New?
In this chapter, we would like to highlight to you briefly the main enhancements and changes in the current Prinect Signa Station. The blue links will lead you directly to more details on the topics.
The following item is relevant only if you are working with the Prinect Production Manager.
Billing-relevant usage with the Production Manager
The use of the Prinect Production Manager workflow is based on a subscription model for use of the software for a monthly user fee. The monthly user fee consists of a basic fee and a variable share. The variable share depends on the total TIFFB area produced in the workflow, in square meters.
The following link leads you to a document, describing the actions in the software that generate chargeable TIFFB area and, consequently, influence the user fee:
Billing-relevant usage with the Production Manager
When the software starts, a window with the current licensing agreement displays. Read through this carefully and then click "Accept". Enable "Do not show this message again." if this message is not to display again.
Important: You must be logged in to the system with your customer account for this process. The option may not be enabled by the Heidelberg technician.
What's New in Prinect Signa Station 2021
Sheet optimization with segments for gang jobs
Segments are rectangular sections that can also be set up as strips along the entire paper height. They describe finishing steps, e.g. cutting, finishing (lamination, embossing, varnish) or folding.
This means that areas are defined on the press sheet where all the elements that will have a joint type of finishing are grouped together.
See Sheet Optimization with Segments, Segment Templates, Segment Template Editor and Segment Inspector and Overview of Procedure.
This requires the additional "Ganging with Segments for Finishing" license option for the "Gang & Sheet Optimizer" license (see Licensing ).
For an introduction to this, see also the video tutorial Optimization with Segments.
Enhancement for placeholder $[SegmentName]
Up to now, the $[SegmentName] placeholder was used only for segmented folding sheets.
To place the name of the used segment template as a mark on the press sheet, the placeholder now also replaces the name of the used segment template if it is not a segmented folding sheet.
A mark with this placeholder can be placed on a segment (as a segment label), on a folding sheet/assembly block or on a page. If the mark is placed onto the paper, subject or press sheet, all segments on these items separated by commas are replaced by the placeholder. The names of the initial segments do not display.
Enhancement of "Create Prinect Job" (makes it possible to create a Prinect job during creation of a gang run form)
Note: Only in the "Ganging Optimization" work mode.
You can enable automatic creation of a Prinect job in the product part or product part template and in the gang tasks. In this process, the job name and number and the product codes for rating are defined. In the gang task, you can decide whether these job data are to be created like in the gang task or defined like in the product part template used.
A new feature is that you can select whether the resulting job will be created either in the Prinect Integration Manager or in the Prinect Business Manager. Background: In the predecessor version, the system could be set up to transmit the job data to the Prinect Business Manager, but a (redundant) job was always still created in the Prinect Integration Manager.
In the gang task, this selection is possible only if the job data are not taken from the product part template but defined in the gang task.
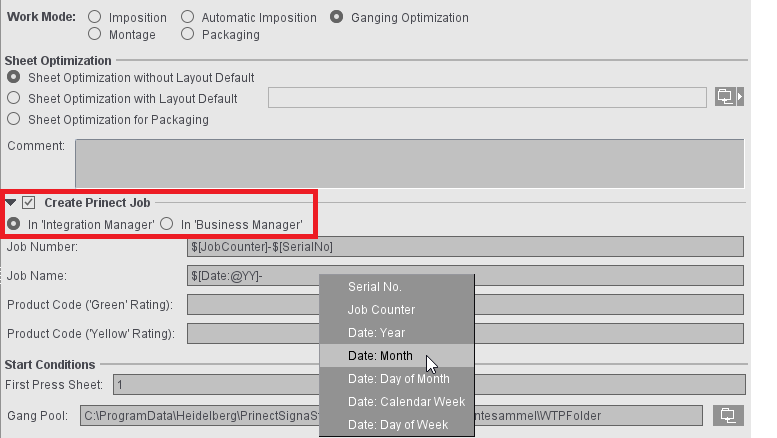
If the job is to be created in the Prinect Business Manager, the job number is always defined in the Business Manager. As a result, the "Job Number" box is dimmed here in the settings in Prinect Signa Station.
Up to now, the filter setting of "1 day" was interpreted to the effect that this day as of the current time up to the next day with the same time was meant. The settings "Within 1 day" and "Within 24 hours" also had the same filter effect.
The filter behavior was changed to use the current day from 0-24 hours as a filter criterion, irrespective of when the filter is set:
•For "Hours", time is calculated as before as of the present second.
•For "Days/Weeks/Months/Years", time is calculated as of 00:00 of the current day.
So far in the Preferences, you could only define which automarks are to be used when creating a new job. It was not possible to set anything else. As of version 2021, automarks are saved as resources. This has the following benefits:
•The specific settings that were possible so far only in the job for the single marks can now be filed as a predefined resource using the automarks set.
•In the job, you only have to select the automarks set resource you want in "Automarks Set". Job-specific changes still continue to be possible.
•Such changes to the automarks set can be saved as a resource directly from the job and reused in later jobs.
•Because the automarks set is now a separate resource, you do not have to create additional product part templates to save these sets like you used to do.
•In the Preferences, the three possible configurations for the "Imposition", "Montage" and "Packaging" work modes are now no longer set by default in the "Resources" tab but only the resource you want, making changes easy to make. The "Marks" tab was dropped from the Preferences.
•By adding rules to the single automarks, you can automate the placement of automarks and control their placement on specific folding sheets.
At present, three different kinds of automarks sets are available:
•Automarks Set Imposition
•Automarks Set Packaging
•Automarks Set Montage
Conversion of old configurations
When the new Prinect Signa Station first starts, the old automarks configurations from the Preferences are converted to automarks sets. These are filed in the "Converted" subgroup in the resources. In this process, a resource is created for each of the three work modes, beginning with "Converted-".
If the converted resource matches a standard automarks set, then the standard automarks set used and no "Converted-" version is created.
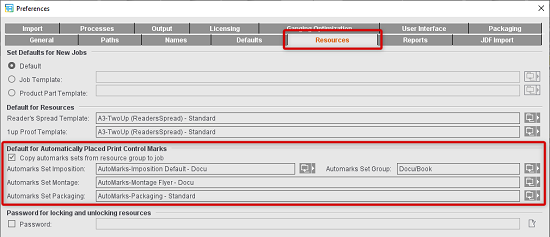
Defaults
In the Preferences, the automarks sets to be used by default when creating new jobs are selected in the "Resources" tab in "Default for Automatically Placed Print Control Marks". The "Marks" tab in the Preferences was dropped, likewise the related table in the "Packaging" tab.
Use in the job
For a job, there are three ways to use automarks:
•Use of the configuration set as the default for the work mode concerned in the Preferences (automatically with new jobs created)
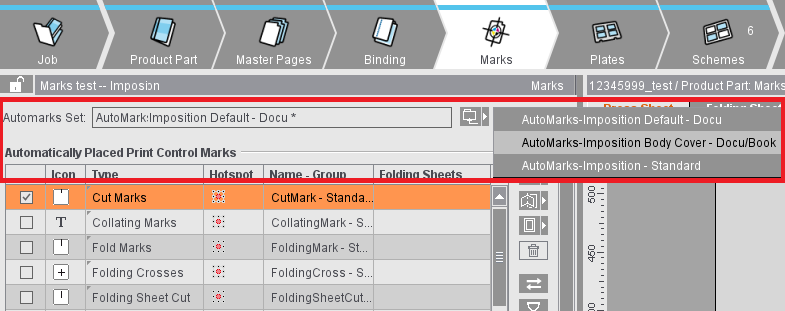
•Selection of a predefined automarks set using the folder button beside the "Automarks Set" box in the "Marks" step.
•Job-specific setup of each of the print control marks in the table in the "Marks" step (is saved as an internal resource)
Create automarks sets as a resource
The Automarks Set Editor is used when creating and editing automarks sets in the Resources (see Automarks Set Editor).
As an alternative, you can also save automarks sets that were created within a job to the general Resources using the Save button and, by doing so, make them able to be reused:
Rule-based application of different automarks sets within a job
Up to now, it was not possible within a product part to use different automarks configurations (e.g. for cover and body or for different customers). To make this possible, rules were added to the automarks sets.
You can create and edit rules in the automarks set resource and also in the job.
Benefit: This makes it possible to create automarks sets that take into account all possible cases. When you select this automarks set as a default for new jobs, the set you want is selected automatically during job processing, making manual intervention no longer necessary.
You can use an automarks set as before or you can add all automarks sets of a resource folder to the product part and assign them rules. In the "Marks" step, you can also manually assign automarks sets of other resource folders to the job.

Note: Setting a resource folder is presently only possible for automarks sets for the "Imposition" work mode.
Details about automarks sets and working with rules:
•Automarks Sets (Resources)
Modifications in marks handing
Because automarks sets are now available as resources, different settings can be used for marks handling, depending on the automarks set. That is why these settings were removed from the Preferences ("Defaults" tab > "Switches for Marks Handling"). In the Preferences, you can only set the defaults for "Subject-Clipped Marks Centered on Plate" and "Invert Print Order of Marks".
During migration of the automarks sets from the Preferences to the Resources, the original setting of the attributes is taken into account, existing jobs open with the old settings.
The following settings are now defined in the automarks sets in the Resources:
•Use Rotated Collating Marks
Now in: "Data for Collating Mark > Orientation"
•Collating Marks in Background, Cut and Fold Marks in Background
Now in "Colors and scaling for automatic marks > Marks Layer"
•Cut Marks on All Corners, Fixed Cut Marks in Creeping
Now in "Advanced settings for cut marks"
New setting options in "Colors and scaling for automatic marks":
•Scaling of the mark can now also be unproportional, for example, to compress text marks ("Scale > Width/Height").
•"Marks Layer": You can select whether the mark will be printed in the foreground or background or whether the setting will be as in the resource.

For marks placed in the job, up to now it was not possible to add a description. A description is a good idea especially if the marks were created within the job.
Now the "Description" column can be added to the table of placed marks in all Marks Inspectors and edited for each mark. The text entered is saved for the placed mark and is available also after the job is reloaded.
Placeholder for specifying the program version
By entering the "$[ProductVersion]" placeholder, you can place a mark on the press sheet that displays the program version of Prinect Signa Station. You cannot select the placeholder from the list of placeholders but must enter it manually.
Comparison of Internal Resources for Optimization Parameters and Automarks Configurations
The comparison of internal resources was enhanced by "Optimization Parameters" and "Automarks Configurations".
When a saved job is being loaded, not only the plate templates and marks but now also the internal "Optimization Parameters" and "Automarks Configurations" are compared with those in the resources.
Because you can edit both resource types within a job, their comparison is enhanced compared to the other internal resource types. A check is run to see whether this resource was edited in the job. In this way, customized settings within the job are not overwritten by those from the Resources. The message whether the more recent version in the resource is to be used is issued only if the internal resource was not changed. An edited internal resource is highlighted by a "*" after the name.
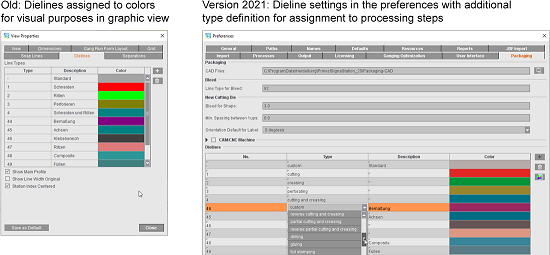
CFF2 Cutting Data for Digital Punches (only with "PackagingPro" license)
Assignment of line types to colors was for purely visual purposes up to now. As of version 2021, you can assign processing steps for finishing to the line types. These are assessed in the Prinect Cockpit and display in the generated PDF as layers in the set colors. Positioning of the laser is possible using the cutting die register marks.
The line types are assigned in the Preferences in the "Packaging" tab. As a result, there is no assignment in the "Dielines" tab in the settings for the graphic view.
For more details, see Dielines (only with the "Label Pro" license)
What's New in Prinect Signa Station 2020
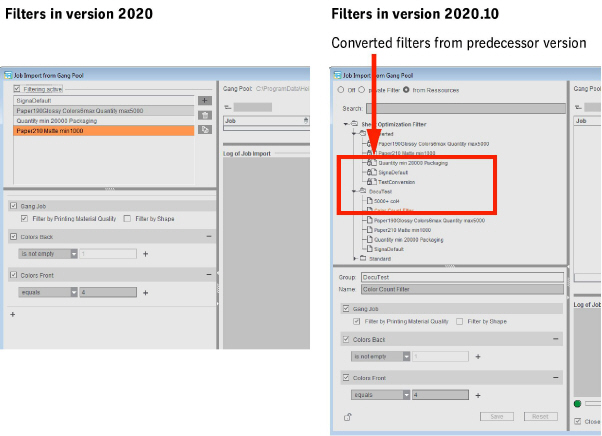
Gang tasks and filters as resources
The tasks for the automated processing of gang jobs and the filters for job import from the gang pool are now both managed in the resources. If you have a large number of gang tasks and filters, this makes it possible to display them in a clearer overview because these can then be sorted in different groups. In this way, administration is made simpler and errors as a result of a wrong selection are reduced.
Two new editors are available for creating gang tasks and filter rules:
See Task Setup Editor and Filter Editor for details.
After the update to version 2020.10, any existing gang tasks and filter rules are converted automatically only once to resources when Prinect Signa Station first starts and are sorted to the relevant resource group. The gang task group generated in this way is set automatically as the "Current Task Parameter Group" in the "Planned Gang Jobs" dialog (see Planned Gang Jobs for details).
Filters in "Job Import from Gang Pool":
Modified rating criteria for optimization
The rating criterion "Date Spreading" introduced in version 2020 was replaced by the rating criterion "Date":
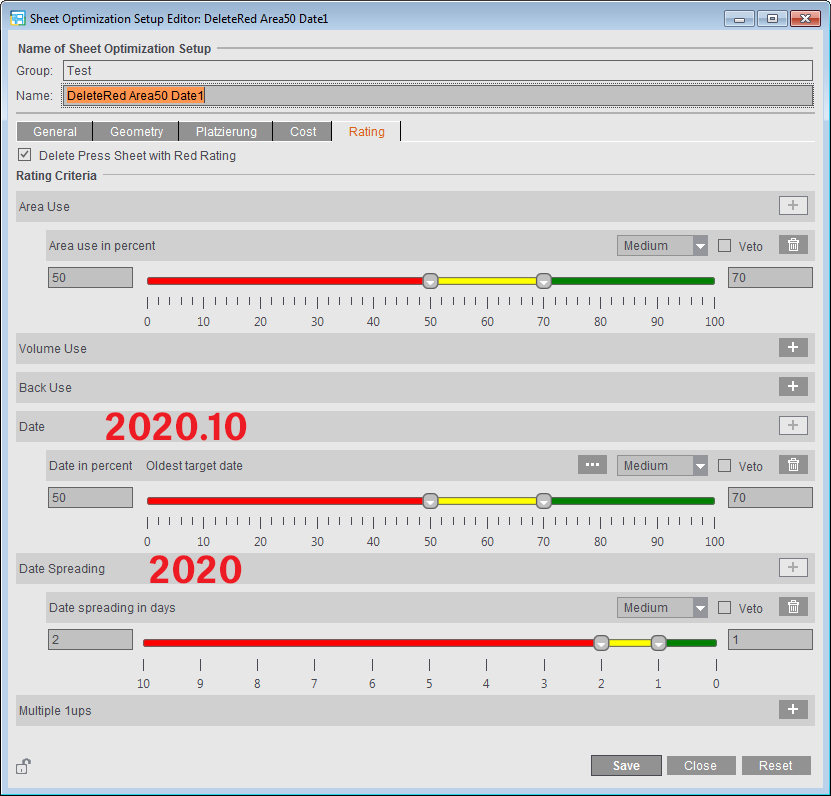
"Date Spreading" continues to be shown and assessed in the case of existing sheet optimization setups where "Date Spreading" is enabled as a rating criterion. It cannot be enabled in new parameter sets or if the rating criterion was removed from an existing parameter set.
The "Date" rating criterion lets you assess the press sheets based on a uniform target date of the jobs. If required, you can define a period, "target date + x days", using the button with the three dots.
You can find more details in: "Rating" Tab.
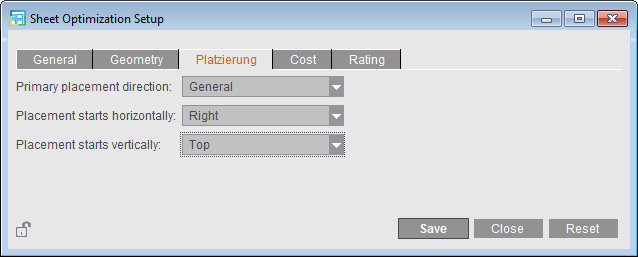
Variable setting for placement
Up to now, the bottom left corner of the press sheet was always used as the starting point during optimization. Only for orientation could you make a difference between "General", "Horizontal" and "Vertical". This setting is now set in the new tab, "Placement", as the "Primary placement direction". This is where you can now also set the sheet corner that is to be used as the starting point of optimization.
You can set this either for a specific job in the Sheet Optimization Setup or as a default in the optimization data resources or the plate template resources.
Simpler editing of gang parts in the input list
In the "Input List for Sheet Optimization", you can now edit gang parts using the context menu ("Edit Delivery Quantity", "Set Orientation to ...", etc.) irrespective of the column in which the cursor is currently located.
Enhancement of the geometry data for sheet brakes
The width of the sheet brakes (vertical lanes) and the number and width of the horizontal lanes have been added to the "Geometry" group in the Sheet Optimization Setup.
At present, sheet optimization without a layout does not support horizontal lanes.
See "Geometry" tab for details
New option, "Use for JDF Import". If this option is enabled in a product part template, then during a JDF import with a product part template the setting for automatic gap computation from the Preferences is no longer used but instead the setting from the product part template. In this way, for a specific job you can switch between the Preferences and the product part template as the source.
In the case of new product part templates, the option is first disabled in order not to change the old behavior.
If automatic gap computation is enabled, it is no longer possible to specify the gaps manually in the "Schemes" step. The gaps are calculated automatically when a new scheme is added. If automatic gap computation is not to be done for a scheme, you can disable it for the selected scheme with "No Automatic Gap Computation" in the "Schemes" step.
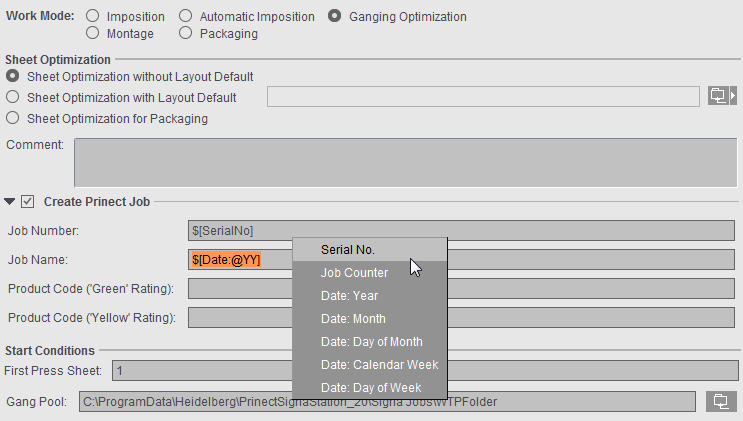
New function, "Create Prinect Job" (makes it possible to create a Prinect job during manual creation of a gang run form)

Note: Only in the "Ganging Optimization" work mode.
When gang run forms are created via the Prinect Signa Station Gang Server, it is possible to use product codes. As a result, various functions are triggered in the workflow:
•Job creation with matching process network via Smart Automation
•Automatic start of processing
•Definition of the procedure instructions for the matching gang run form based on placed gang parts
As of version 2020.10, you can also enter product codes when creating a gang run form manually in Prinect Signa Station and output the gang run form through the same way. In other words, a layout is generated directly in a Prinect job based on the same pattern as in automated processing by the Prinect Signa Station Gang Server.
For that reason, you can fill out the "Job Number", "Job Name" and "Product Code ('Green'/'Yellow' rating)" boxes either in the product part template or, like in version 2019, in the gang task.
When defining a gang task, select whether the data will be taken from the assigned product part template ("Job Data from Template") or whether you wish to define the data independently of the template and directly in the task ("Job Data from Task"). It is necessary to define the data in the task if, for example, different gang tasks are to use the same product part template. In this case, separate product part templates that only differ in the job data do not have to be created for various gang tasks.
More details can be found in Create Prinect Job.
"Job Data from Template" is the default setting when creating new gang tasks. When older gang tasks are opened, "Job Data from Task" is set because no definition was then possible in the product part for these tasks.
When you create Prinect jobs, you must remember the defaults for the required output parameter sets: Create Prinect Job
Password protection for preferences and resources
To prevent unwanted changes to the resources, you can lock single resources or whole resource groups. In earlier versions, however, these locks could be removed again by each user without restriction. You can now assign a password in the Preferences for locking and unlocking resources.
See Password for locking and unlocking resources
Like in the resources, you can also assign a password for all of the Preferences to prevent unwanted changes. If the correct password is not entered when opening the Preferences, the buttons for saving and resetting are disabled.
See Password for editing the Preferences
When shifting folding sheets in the graphic view, the snap behavior has been fully revised. Up to now, the folding sheet to be moved snapped into place only if it abutted a corner of an adjacent folding sheet. It did not snap into place if it was moved to the edge of another folding sheet.
Now it is possible to snap into place on the edges of all folding sheets and snap lines placed on the press sheet. That is why it is also possible to align objects to each other even if they do not lie directly side by side on the press sheet.
In addition, a "magnetic line" in X and/or Y direction is drawn across the whole paper while moving the object during the snap process.
In the "Packaging" work mode, the settings for positioning cutting dies have been revised substantially.
The settings for the positioning of cutting dies are now kept permanently. This allows the positions of the cutting dies to be restored automatically after changes to the job (e.g. change in paper size).
See Cutting Die File and Main Settings for details
You can choose between three different designs for the user interface. You can select the one you want in the Preferences in the "General" tab. You must restart Prinect Signa Station after you make your changes.
See Concept of the User Interface and Color Scheme for details.
The detailed user administration has been dropped in Prinect Signa Station because importing the user data can take a great deal of time and generally only "PrePressAdministrator" users work in Prinect Signa Station. Accordingly, it is no longer necessary to log in and out of Prinect Signa Station.
Enhanced rating criteria for optimization
The rating criteria introduced in version 2019 were enhanced. In addition to Area Use, you can now also set the following criteria:
·Volume Use
·Back Use
·Date Spreading
·Multiple 1ups
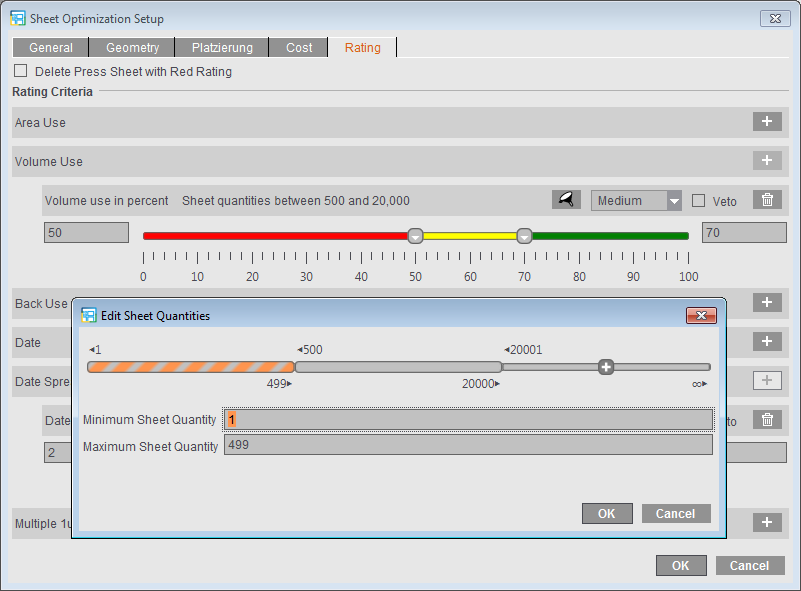
In the "Rating" tab in Sheet Optimization Setup, you can set the various rating criteria that can be weighted in 5 grades and combined with each other. Volume Use and Multiple 1ups can also be differentiated by sheet quantity or delivery quantity.
If you have a combination of several criteria, the "Veto" option makes sure that the status for the overall result (traffic light color) cannot be better than the status of a single result.
These settings are included during optimization. The results of the rating criteria display in "Results" and in the HTML report. In the list view of the press sheet, you can add the ratings as additional columns to the table.
You can find more details about the quality criteria in: "Rating" Tab.

Note: For Sheet Optimization without Layout Default, the percentage for the rating result refers to the whole press sheet. For Sheet Optimization with Layout Default and Sheet Optimization for Packaging, the percentage refers to the default layout or cutting die. In other words, a completely filled layout produces, for example, an area utilization of 100% even if the whole press sheet was not used. This rating, varying according to optimization type, is applicable for all quality criteria except for date spreading.
Optimization settings: Cost-based or quality-based optimization
There are basically three different ways for controlling optimization, depending on the priorities that you have:
•"General > Only One Press Sheet": off
"Rating > Delete Press Sheet with Red Rating": off
·Optimization runs essentially on a cost basis.
·All gang parts are placed.
·Set quality criteria are assessed and the results shown, but they have only a lower priority during optimization.
•"General > Only One Press Sheet": on
"Rating > Delete Press Sheet with Red Rating": off
·One press sheet is generated.
·Of the available gang parts, those gang parts are selected that will give you the best possible overall rating, matching the enabled quality criteria and taking the cost into account.
·Gang parts that are not used are subsequently located again in the gang pool.
•"General > Only One Press Sheet": off
"Rating > Delete Press Sheet with Red Rating": on
·Based on the quality criteria and taking the cost into account, several press sheets may be generated because you try to process all the imported gang parts if possible.
·If a sheet has a red rating in the overall rating or in a criterion defined as "Veto", the sheet is rejected automatically and the gang parts are returned to the gang pool.
Costs are included also during optimization based on quality criteria. However, it is possible that the costs determined are higher than with a pure cost-based optimization.
If "Use Optimization Parameters from Plate Template" is enabled, it is still possible to work also with the rating criteria.
You can find a detailed explanation in: Using the Optimization Settings
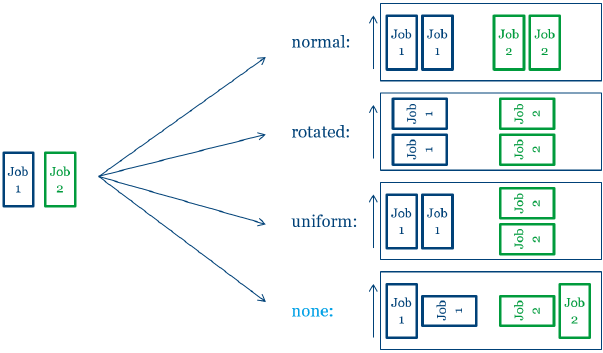
Orientation (orientation of the articles on the sheet)
New setting, "none", for "Orientation"
In addition to "normal", "rotated" and "uniform" you can now also select "none" for "Orientation" (orientation of articles to paper grain direction) in the input list for sheet optimization. This means that the best possible placement for the articles is selected during optimization, making it possible for the 1up copies of an article to have different orientations (normal or rotated) in the process for better utilization of the sheet. For example, this can be used for materials without grain direction.
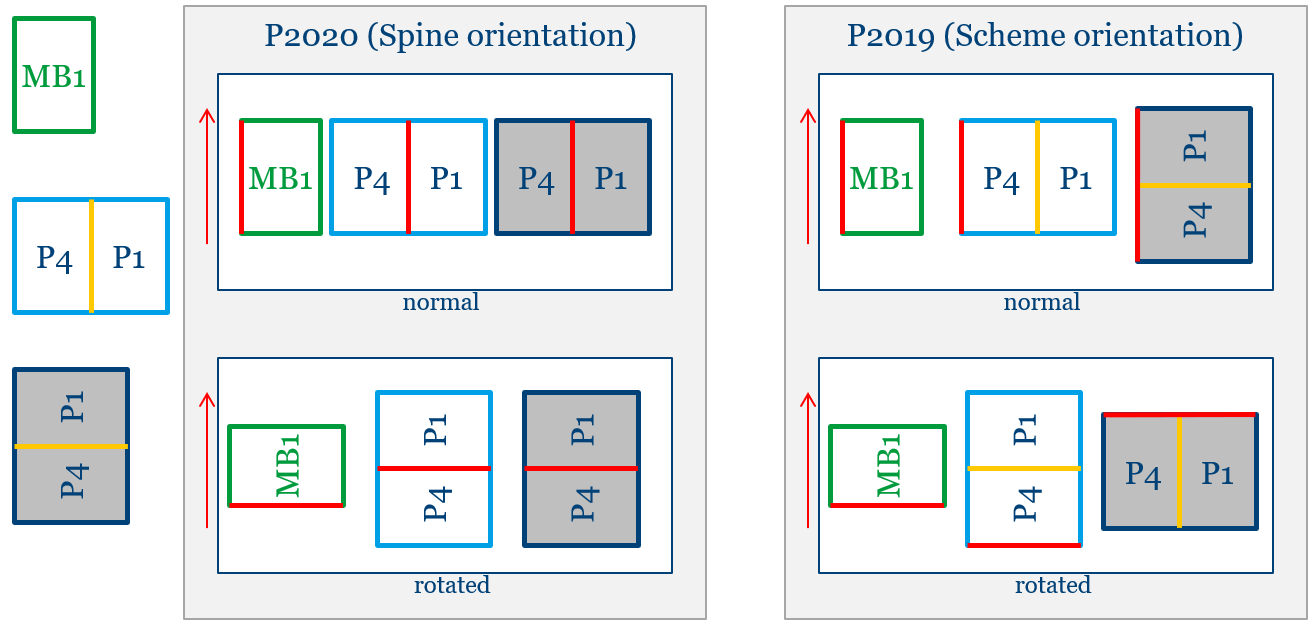
Modified procedure with reference to orientation
Up to version 2019, the "normal" and "rotated" settings for orientation were always interpreted related to the scheme and accordingly set in the gang run form.
As of version 2020 the settings are interpreted as follows:
·For schemes with a folding rule: Back margin orientation
·For schemes without a folding rule: Page orientation
·For Montage: Page orientation
Example: Comparison of the arrangement of an assembly block (MB1), of a vertical and a horizontal fold job in versions 2019 and 2020
New option, "as per placement"
•If "FromLayout" is entered in the gang part XML, orientation is determined from placement in the product part. The grain direction of the paper of the product part is included when determining this value. The result determined is always "normal" or "rotated". As of version 2020, placement can be set by default in Prinect Signa Station as an alternative to determining it from the product part.
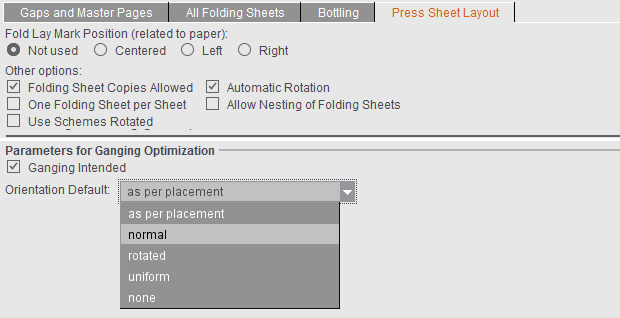
For details about these topics, see Input List for Sheet Optimization (grouping table).
Prinect Signa Station Gang Server("Auto Ganging")
More information about processed gang jobs
The view with information for "Planned Gang Jobs" was enhanced.
In the table of the last runs, you can see fast from icons in the result column whether a gang job was run smoothly or whether there were issues, whether the gang pool was empty or the result was rejected because of bad rating. By clicking an icon, you can open either the PDF report or the related error message.
See Planned Gang Jobs .
Enhanced setting options for automated processing
The tasks for planning the automated processing of gang jobs with the Prinect Signa Station Server were enhanced by two setting options:
·Automatic Repeat
New jobs will be created by this gang task until gang jobs can no longer be created from the available gang parts. Only after this is the gang task said to be completed. This is especially important if you are working with the "Only One Press Sheet" option because otherwise all gang parts not placed on this press sheet during the first run would be included only when the gang task next starts.
·Event
In addition to the setting options for the timing of the gang task, you will now also find an event-related start option in "Trigger". This means that this task always starts whenever another task is completed. In this way, you can combine different tasks with each other, for example, to gather the remaining gang parts that were not processed in the predecessor task.
You can combine timing and events with each other.
•In the "Job Import from Gang Pool" dialog, you can customize the size of each of the four main sections individually.
See Job Import from Gang Pool
Creation of blank press sheets
•In the "Imposition" work mode, you can create blank press sheets in the "Plates" step using the "More" button (for example, for front/back end sheets in book production).
See Plates .
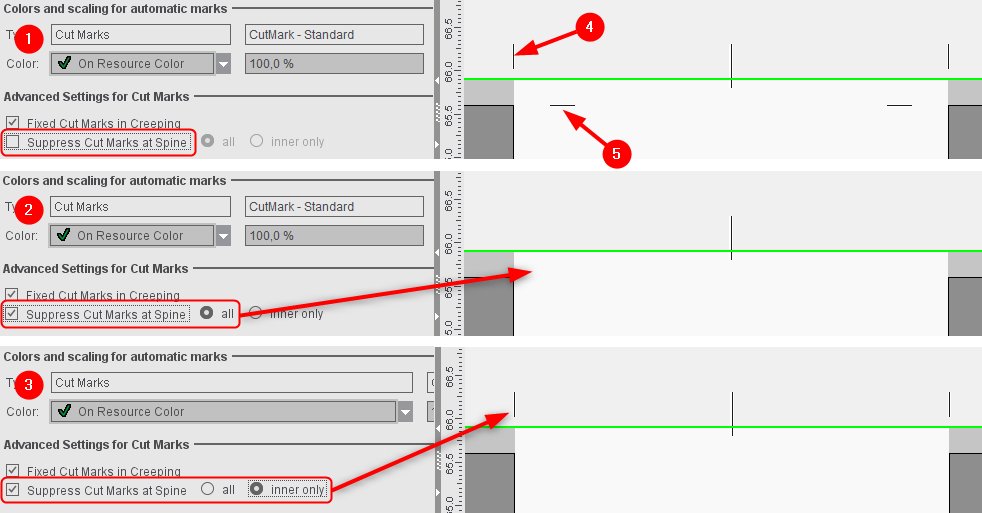
Advanced options when suppressing cut marks at the spine
Cut marks at the spine can be suppressed by default or for a specific job if they are a hindrance in finishing. A new feature as of version 2020 lets you select whether outer and inner cut marks will be suppressed or only the inner cut marks, for example, if the outer cut marks are needed, because there is the risk of "flashes" through the inner cut marks.
For the production of a cover, it can be a good idea to set the cut marks on all corners, for example, when the spine of the cover is not created as an extra page but using the gaps. In this case, the cut marks above the page are wanted but not the cut marks between the pages because these can cause flashes when cutting. For such a case, in the job in "Marks" you can enable "Suppress Cut Marks at Spine" selected with "inner only" (see example no. 3).
Example:
(1): Outer (4) and inner (5) cut marks are output.
(2): All cut marks in the back margin are suppressed.
(3): Only the inner cut marks in the back margin are suppressed to avoid flashes. The outer cut marks are kept.
Automatic grouping of the folding sheets
For mixed binding, it is necessary to split the folding sheets into groups that are then put together. Up to now, this grouping had to be done manually and, as a result, products could be produced fully automatically only with set page counts; if the page count changed, grouping had to be done again.
The "AutoGrouping" function now makes it possible to automate this grouping based on certain defaults. Subsequent changes to the page count are also taken into account in this process.

Note: Grouping is possible only in certain binding methods. You can also use "Reverse Folding Sheet Order within Groups" independently of automatic grouping.
"First Folding Sheet is Cover" is now also possible with "Mixed Binding".
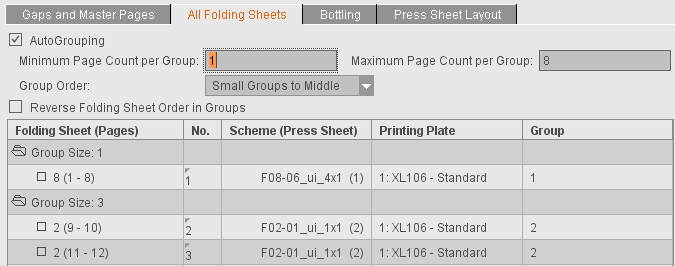
More details can be found in All Folding Sheets.
Ignore cover setting during JDF import without cover
In an automated workflow, product part templates are used to define the layout that will be generated. One of the things that the product part templates offer is the option of defining a folding sheet for the cover. If products are to be created that only differ in whether they have a cover or not, you then do not have to create two separate product part templates for this.
If this setting is enabled, the first scheme will be ignored if no cover is specified in the JDF when you are processing a JDF with a product part template where "First Folding Sheet is Cover" is enabled.
This setting affects only product part templates where "Match Folding Sheet Count to Page Total" is enabled.
Include Non-Printable Areas (Graphic View/Press Parameters)
•The press parameters for digital presses like Primefire, for example, were enhanced to be able to enter areas for the lead edge and tail edge of print as well as for margins on the side.
In the graphic view, you can now also display these non-printable areas of the paper in addition to the gripper margins.
See Digital Press Editor and View Properties and Enable/Disable Layers .
You can set inclusion of the gripper margin and the non-printable margins by default when placing 1ups in "Preferences > Defaults > Subject Settings". This is where you will now also find the "Center subject" option (previously in "Several Switches").
You will find the "With Gripper Margin" option that you could select in the "Schemes" step in "Press Sheet Layout" now in the "Plates" step as "Include Gripper Margins and Non-Printable Margins". As a result, the setting no longer generally affects the whole product part but can be set for specific plates, for example, enabled for the cover and disabled for the body.
When the option is enabled, a warning will be issued if subject, folding sheet, bleeds or marks are found in one of the critical areas during output.
For more details, see Subject Settings in the Preferences and Subject Settings in the "Plates" step.
•The "Show Press Template" function now shows details about the positions of grippers and suction cups for the following machines: CD74, CS92, SM52, SM74, SM102, XL75F, XL75C, XL106
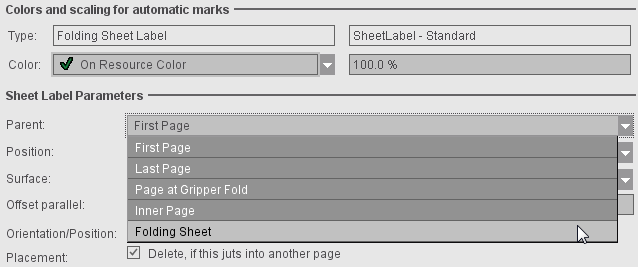
•Set folding sheet label related to folding sheet
Up to now, the folding sheet labels related always to the pages because they were read out only after folding. Newer folding machines are now equipped with barcode readers already at the feeder, making it necessary to assign a related mark to the still unfolded sheet.
See Folding Sheet Label 1 and 2.
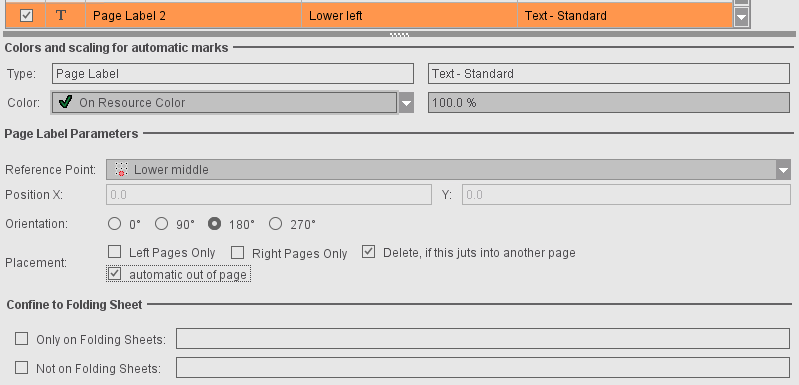
•Position page label automatically off the page
If page labels that jutted into another page were not to be deleted, you could only work around this so far by manually entering a position for the page label. In this case, you had to enter the position in X and/or Y direction related to the reference point. In "Placement", there is now the "AutoPosition off Page" option that sets the mark off the page taking "Orientation" into account. The input boxes for manual positioning are then disabled.
•Fold Lay Mark: Offset to page can be set
Up to now, the automatic fold lay mark was set at a fixed and non-changeable offset of 3 mm to the trimmed page. In certain cases, as a result, the mark could be off the paper. You can now set "Offset to Page" individually. By default, the offset is set to "0.3" = 3 mm. When you change the offset to the page, it is now possible to set the fold lay mark closer to the trimmed page and, consequently, generally into the bleed.

•New attribute, "Do Not Check Mark During Output"
During output, a check is run to see whether a mark is within the gripper margin or out of the paper. If this is the case, a warning is issued. Some special types of marks are excluded from this warning.
Enable "Do Not Check Mark During Output" if marks that are not part of these exceptions are also not to be checked during output.
See "Do Not Check Mark During Output"
•New placeholders: $[SheetRegionGroupIndex], $[MaxSheetRegionGroupIndex], $[SheetRegionInGroup] und $[MaxSheetRegionInGroup]
For finishing, barcode marks are generally used that help to identify a folding sheet. In mixed binding, the folding sheet groups and the relation of the folding sheets are also interesting in this case. The following data are used in finishing:
·Folding sheet group in which the folding sheet is located
·Total number of folding sheet groups
·Folding sheet index in the folding sheet group
·Max. folding sheet index in the folding sheet group
The new placeholders Folding Sheet Group ($[SheetRegionGroupIndex]), Max. Folding Sheet Group ($[MaxSheetRegionGroupIndex]), Folding Sheet Index in Folding Sheet Group ($[SheetRegionInGroup]) and Max. Folding Sheet Index in Folding Sheet Group ($[MaxSheetRegionInGroup]) were introduced to make the data available for marks.
These are found in the group of placeholders that are always replaced by Prinect Signa Station. The placeholders are replaced in the "Imposition" mode and in the "Ganging Optimization" mode. In ganging optimization, the data are read from the gang part analog to the folding sheet number if the folding sheet concerned was sent for ganging from the Cockpit.
•New placeholder "$[GrainDirection]" for paper grain direction
The paper grain direction is defined in the paper resource that is assigned to the press sheet. The new placeholder for paper grain direction is set related to the press sheet and is replaced by the localized text of the paper grain direction.

Note: The arrow for viewing the grain direction has dashed lines in the graphic view if "undefined" is set in the related paper resource or if no paper resource is assigned to the press sheet.
•Multi-digit formats for placeholders
Formatting is available for placeholders that are used within marks and it can be used to output only parts of the replaced text. Up to now, only single-digit numbers were allowed in formatting, in other words the digits 0 thru 9. For placeholders that are replaced by long texts, this constraint resulted in the text not being able to be shortened as desired.
As of version 2020, it is possible to specify any number of natural digits in formats. See also Formats for placeholders
•Multiple selection is now also possible when locking resources and resource groups. If your selection only has resource groups, all resources in them will be locked or unlocked. If your selection is mixed, in other words, you selected resources and resource groups, then only the marked resources will be locked or unlocked.
Locking or unlocking resources makes it necessary to save the resources again and, as a result, saving the resources for job and product part templates can take more time. In this case or if more than 50 resources are locked or unlocked, a progress bar appears, showing you the currently handled resource.