Privacy Policy | Imprint | Prinect Know How | Prinect Release Notes
![]()
What's New and Enhanced in Version 7.30?
The Prinect Business Manager supports new languages!
5. Spanish (South America) - 36
Custom JDF implementation to make outside services schedulable
In order to schedule the “Outside services” in the Prinect scheduler, the total duration can now be sent to the Prinect Scheduler via a “Custom JDF”. Additionally, the start and end dates are written in the comment of the JDF.
The Prinect Scheduler reads this data and schedules the outside services on the corresponding device for this period (e.g. "external laminating").
Secondly, when the “Outside services” have been completely received by the print shop again, this status can be sent to the Prinect Scheduler via “Custom JDF” , that operation will be completed and finally deleted from Prinect Scheduler.
For that purpose the “Outside Service ID” (Job Part ID) has been implemented in the module “Outside Services” from the Prinect Business Manager to have a direct link to the related job part.
Remark: Be aware – this is not a standard feature but a custom feature. For more information please get in touch with our Prinect Business Manager support.
![]() Video-Tutorial:
Video-Tutorial:
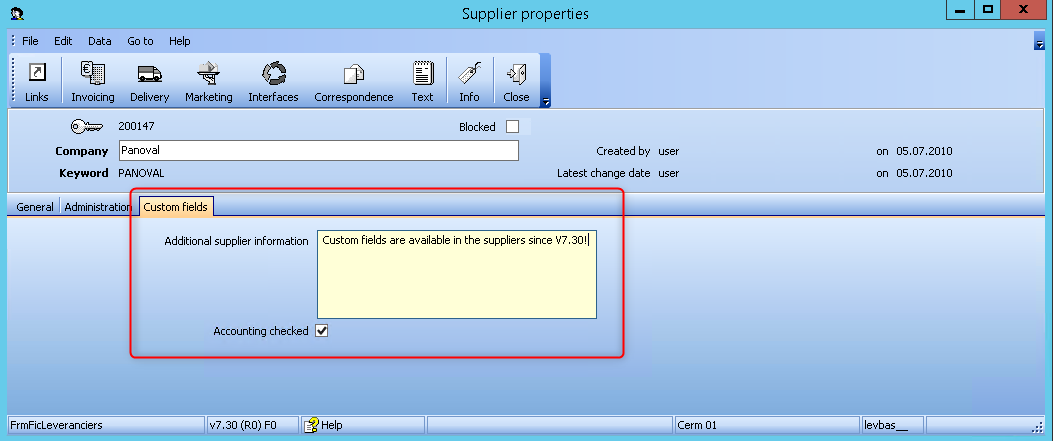
It is now possible to configure custom fields for suppliers. These newly configured custom fields are then also available in the search screen and reports and can be modified through the properties.
PBM explorer > Parameters > General parameters > Site data >

If custom fields are defined, a new tab "Custom fields" is shown and it contains the values for the custom fields depending on the configuration.
Custom field "Other adresses" available in the sales order grid
![]() Video-Tutorial:
Video-Tutorial:
Custom field "Other adresses" available in the sales order grid
In the sales order grid, the custom field for "Other addresses" is available.

Change ganging for gang jobs created from a sales order
![]() Video-Tutorial:
Video-Tutorial:
Change ganging for gang jobs created from sales order
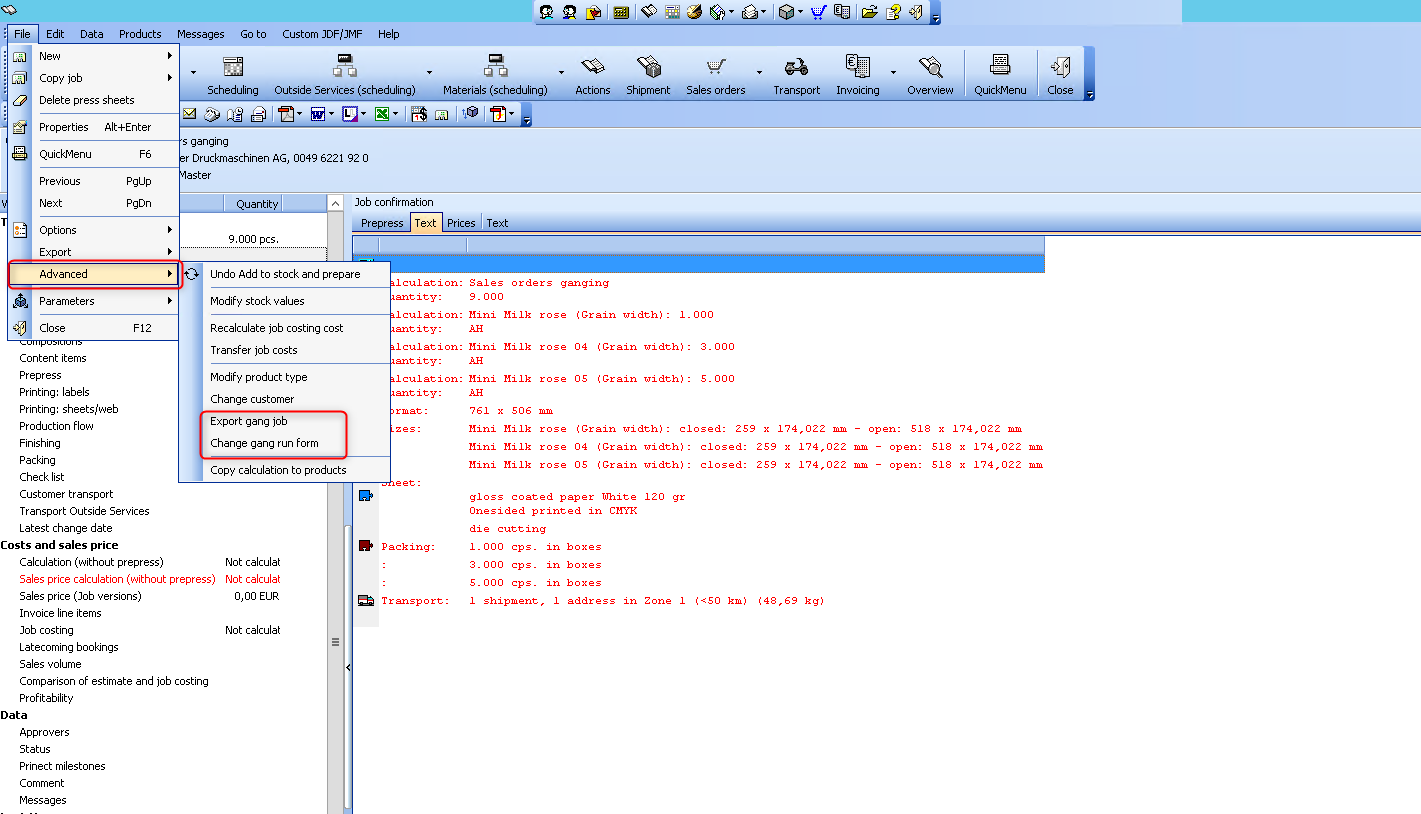
If a gang job is the result of ganging sales orders, products are always used.
The correct wizard for changing the layout of the print sheets is the "Export gang job" wizard.
There is also another wizard "Change gang run form". However, this wizard cannot process products and is therefore not suitable for this application.
In this case, a warning is displayed by the Prinect Business Manager.
If products are used in the gang parts and the user tries to change this gang parts with "Change gang run form", the Prinect Business Manager displays a warning.

Improvements in digital printing
![]() Video-Tutorial:
Video-Tutorial:
Improvements in digital printing
If a brochure is produced on a digital press in a very short run, the time required to produce each printed sheet can be less than one minute. Prinect Business Manager cannot process times of less than one minute. The total time is calculated and entered as the production time in the first print sheet. The condition is, that all print sheets on the digital press have no production time.
Example: A brochure with a cover and 20 printed sheets is printed on a digital press. All inside pages have a production time of less than 1 minute. Only the cover has 3 minutes.
Previously, the total production time for the inside pages was 0 because the cover had production time. Now the Prinect Business Manager adds up the production times for the 20 inside signatures that have less than 1 minute. The total is inserted in the first inside signature.
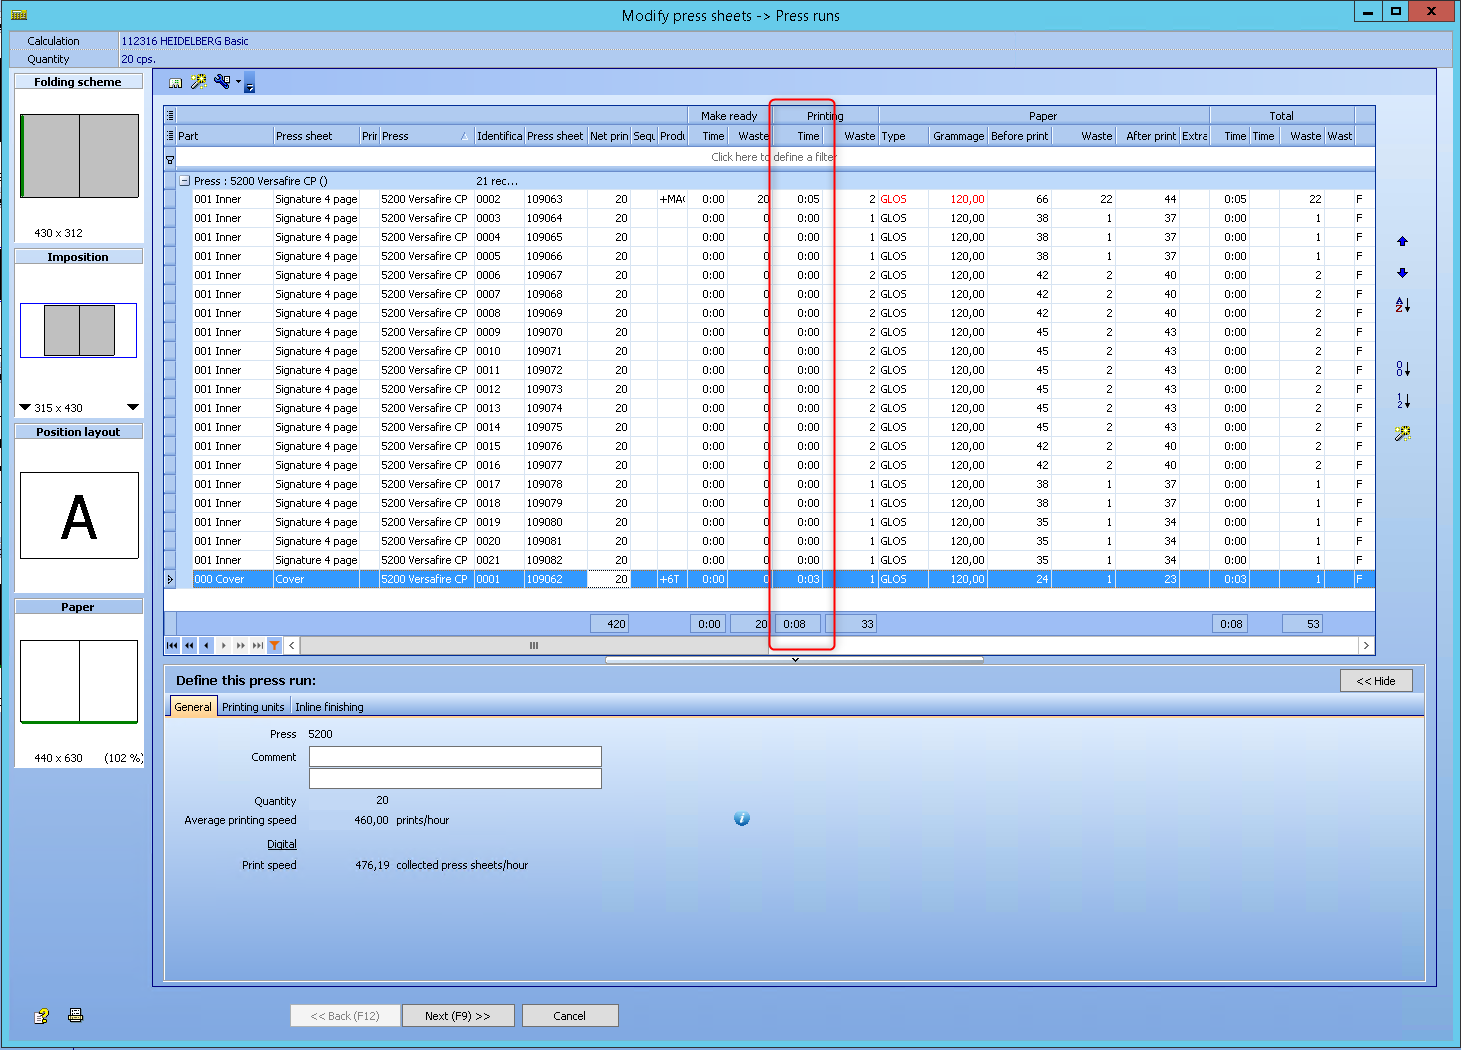
The first print sheet, which has less than 1 minute, receives the entire production time.

The calculated production time is still zero. But there is an indication that this is the first of a series of further print sheets, all of which have a production time of less than one minute.
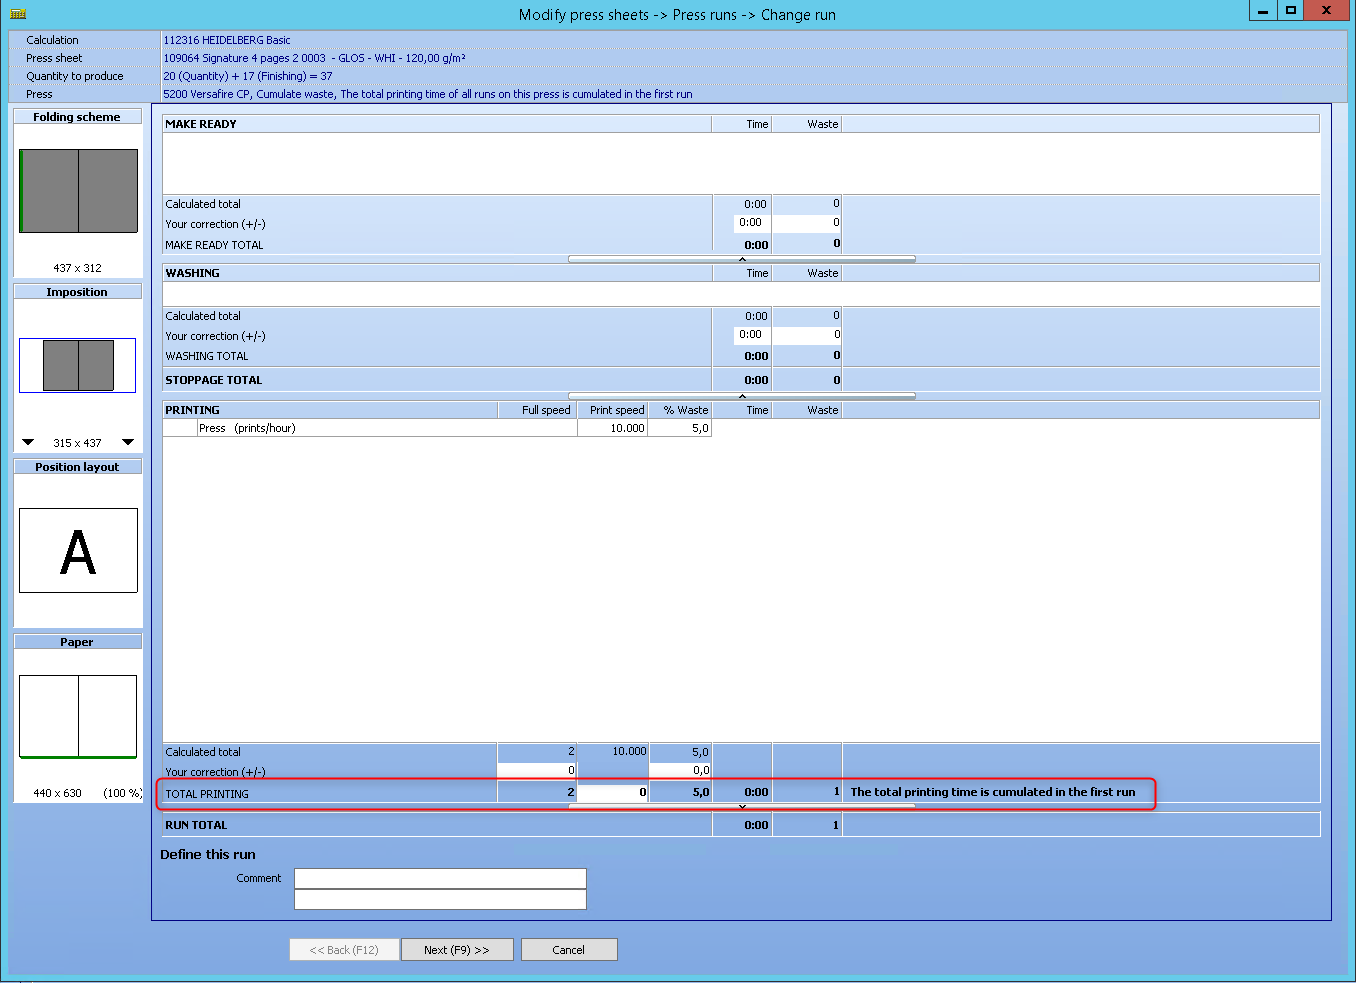
All other print sheets that have a print time of less than one minute also have an indication that the print time is accumulated in the first print sheet, which also has a print time of less than one minute.
Additional parameter in the special runs - Gap - available in the Internal finishing
![]() Video-Tutorial:
Video-Tutorial:
Additonal parameter in the special runs
If the speed of a process in general finishing is specified in m/min, the user can specify a gap and a gripper. The user can configure special runs for each process in order to specify different settings depending on the size of the box. The gap was still missing for these special runs.
The "Gap" parameter describes the distance between one box and the next box as they pass through the gluer. This parameter is required to calculate the total run length, for example.
The "Gripper" parameter describes the side on which the box is placed. This parameter was already in previous versions available.
PBM explorer > Parameters > Calculation parameters > Finishing parameters > Internal finishing processes
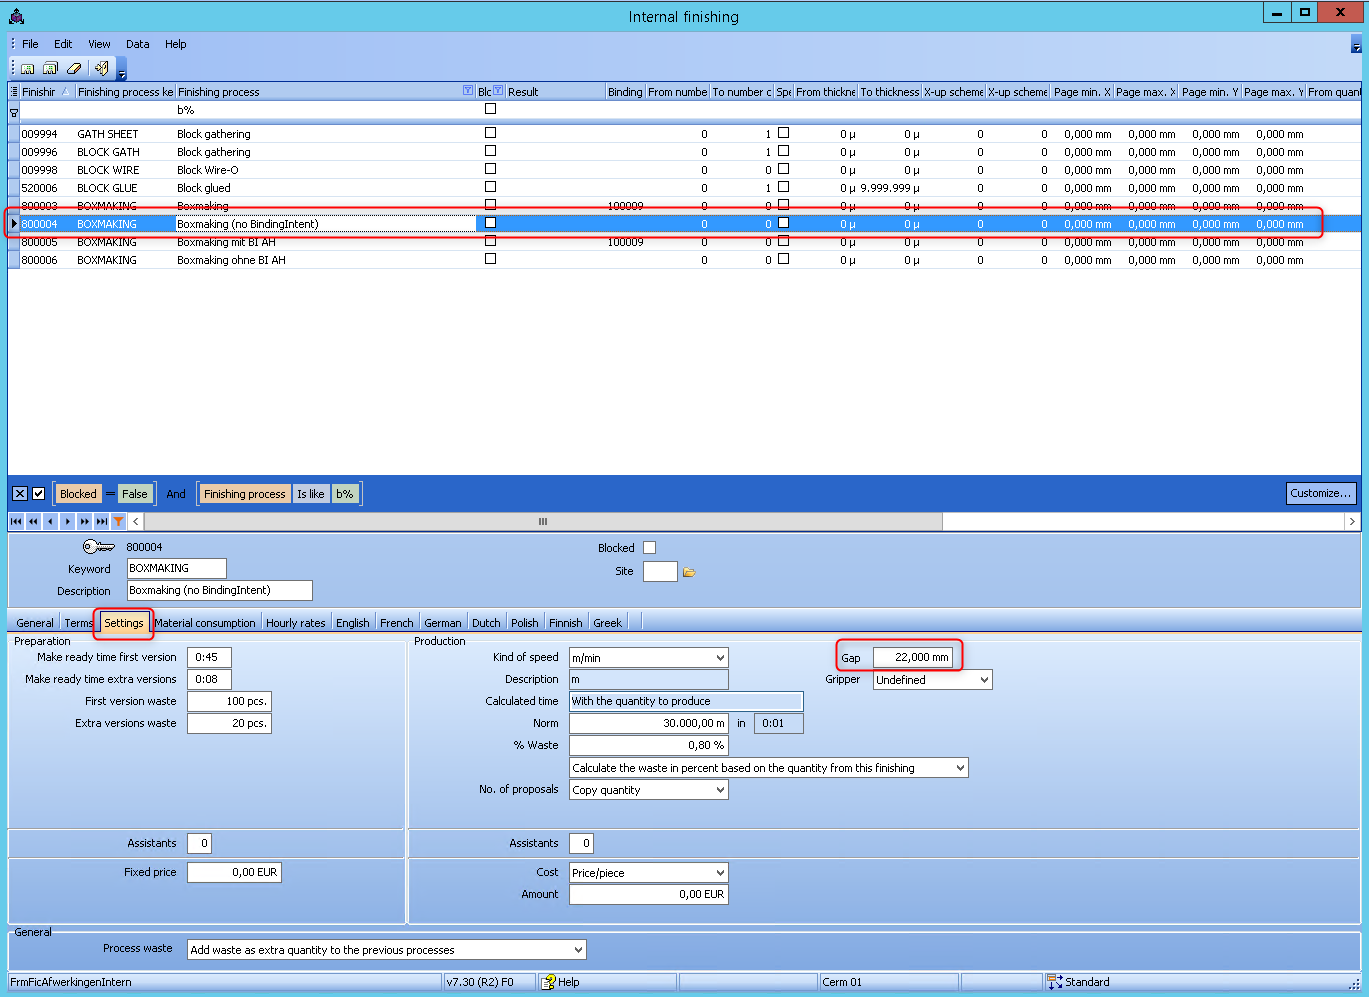
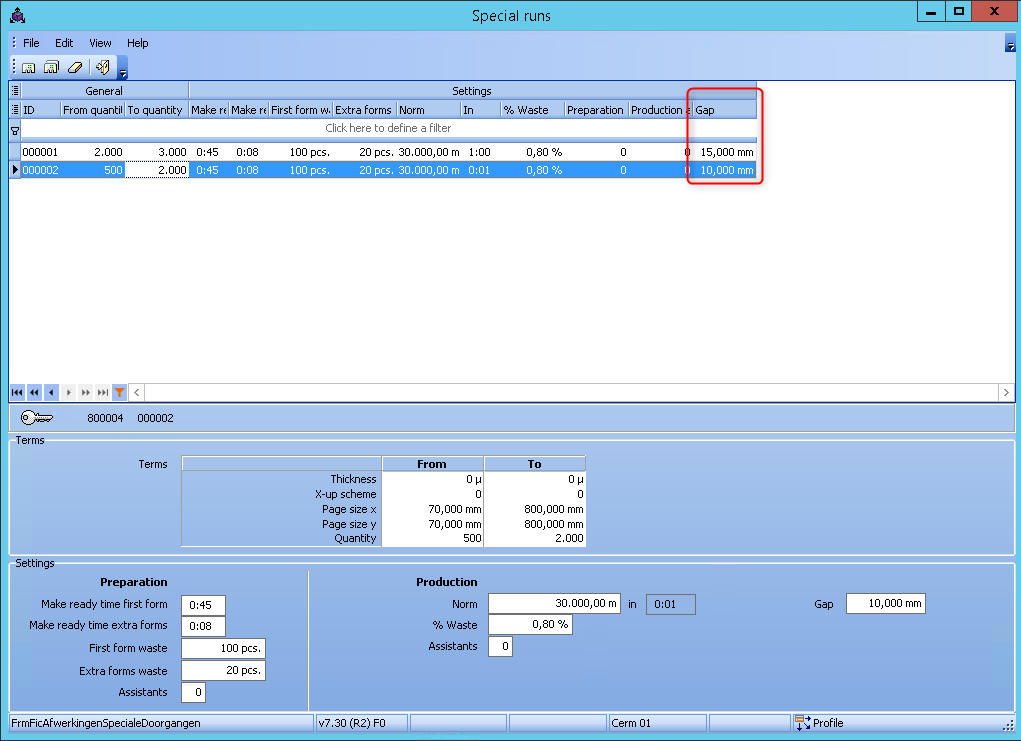
The special runs for this process now also have the option of specifying a gap. The "Kind of speed" has to be set to "m/min". However, the default value for this new field is 0.
In the estimation, there is now in the wizard of the general finshing the option to change the gap.
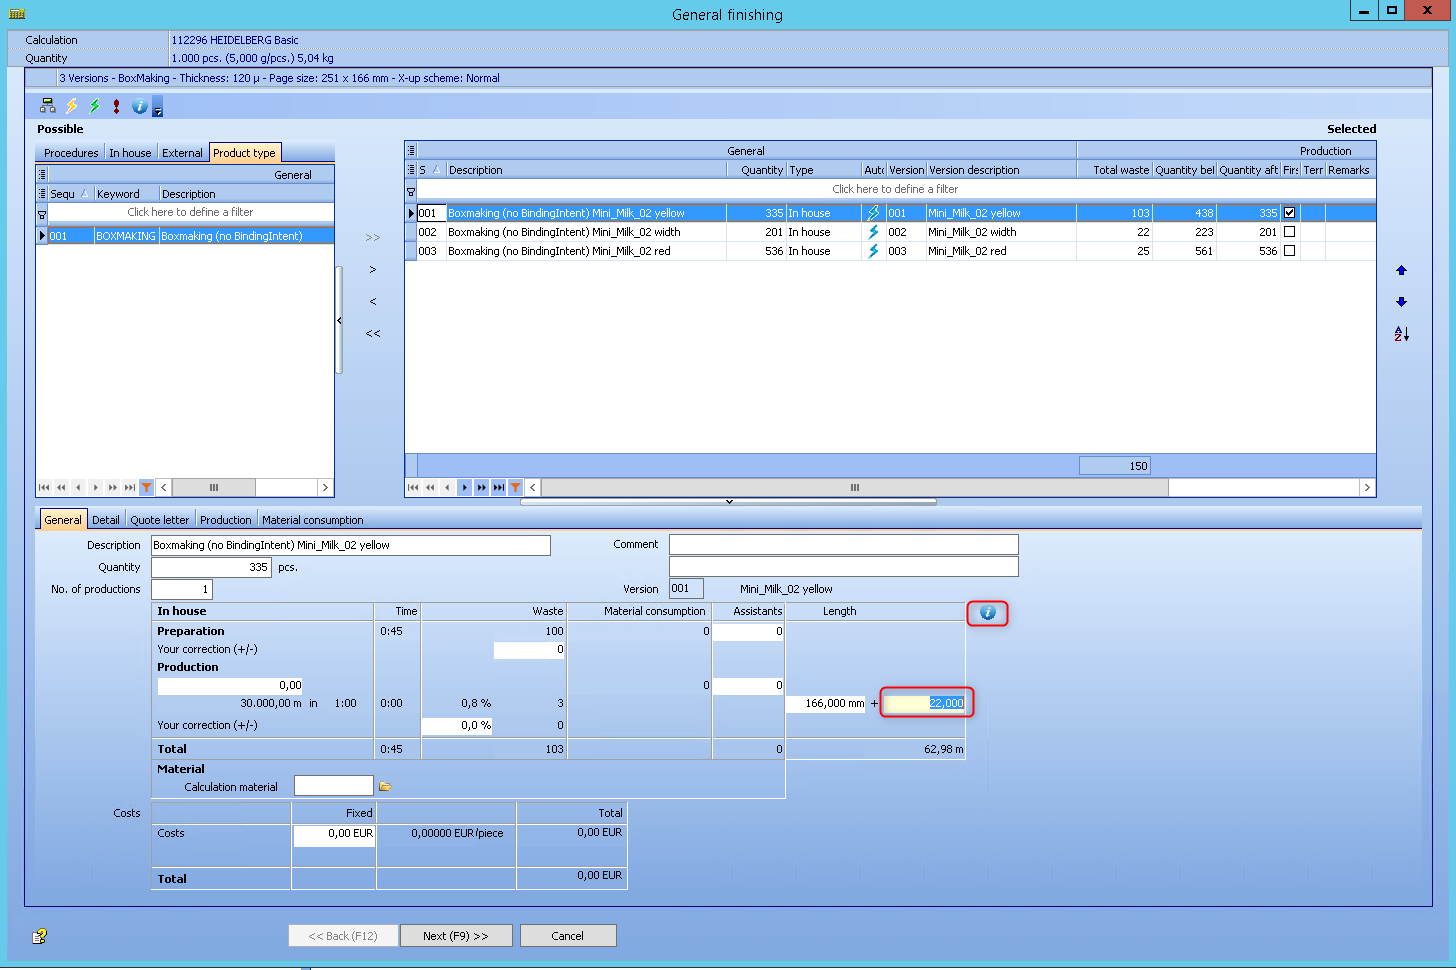
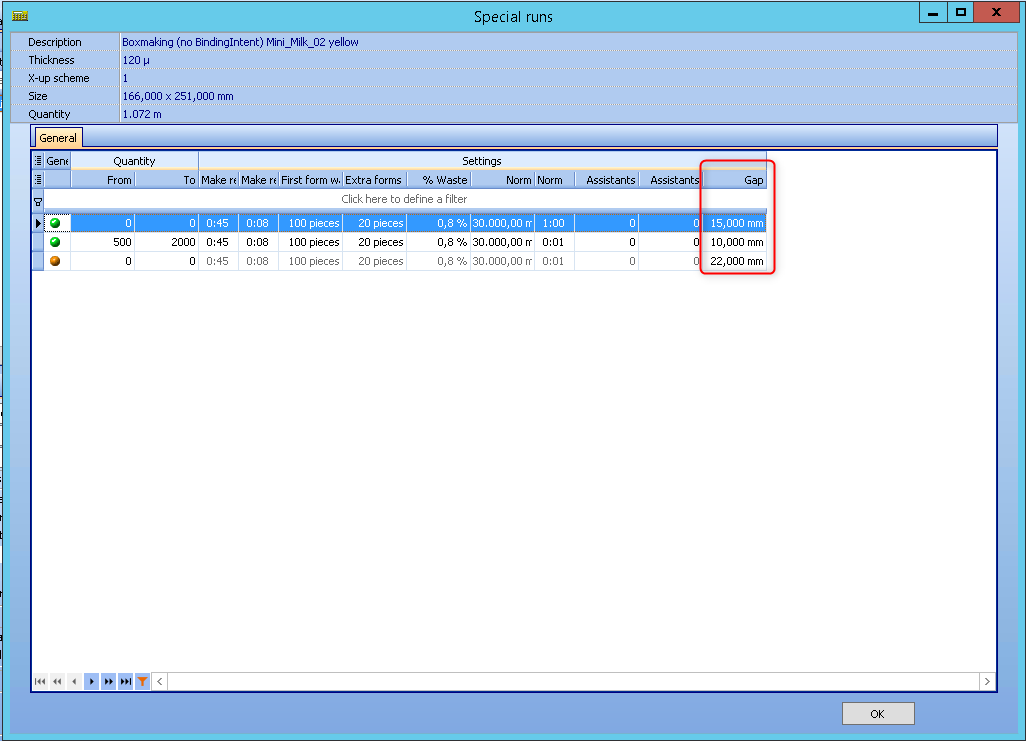
If the information button is pressed, the user can verify if the correct value of the gap is taken from the selected special run. The gap is added here as a new column.
![]() Video-Tutorial:
Video-Tutorial:
This documentation will show different use cases and their solution for automatic cutting. The product types are all configured with a binding intent that needs "final trim". The "automatic cutting" is switched on for all the used folding schemes.
Product type that requires a folding process. For example a 6 pages flyer:
1. One up on the print sheet
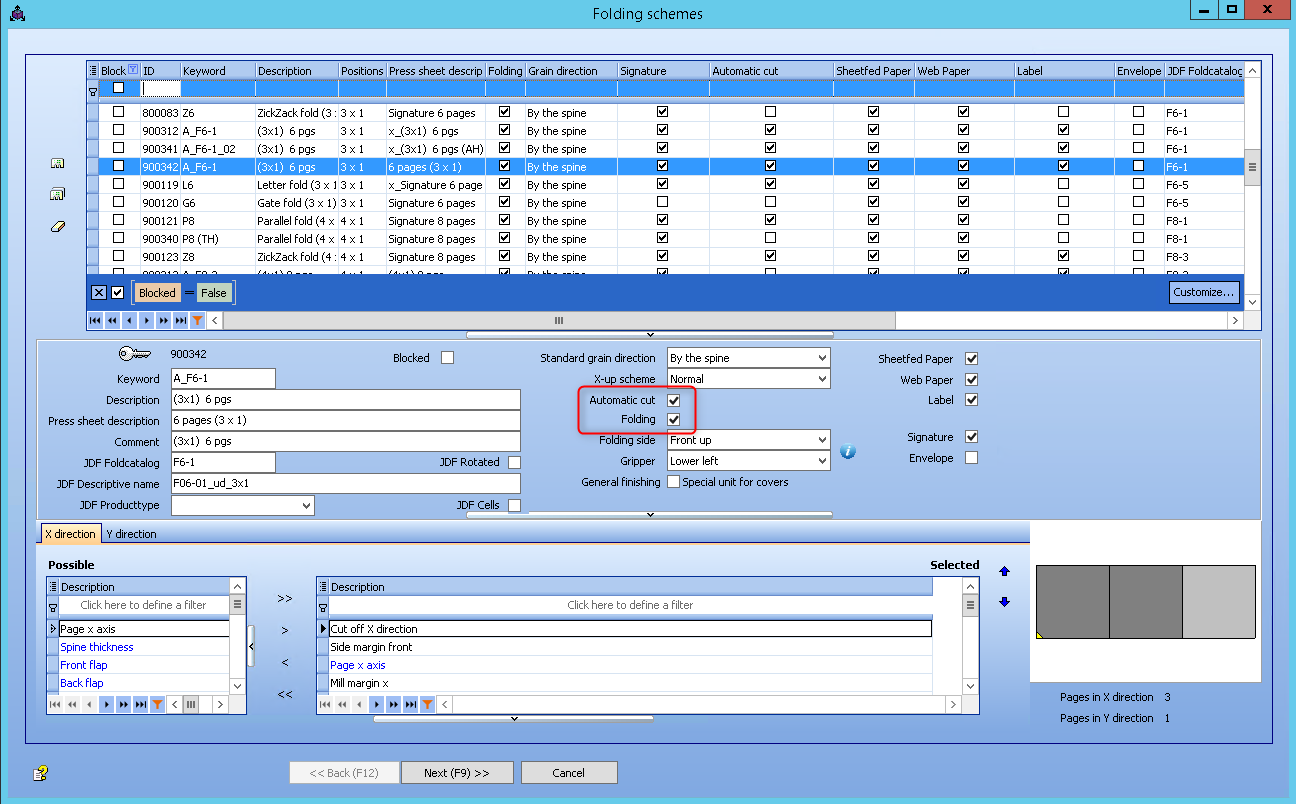
The cutting process will cout off the outer edges, in fact this is doing the trimming. Four cuts are made. And this is done before folding.
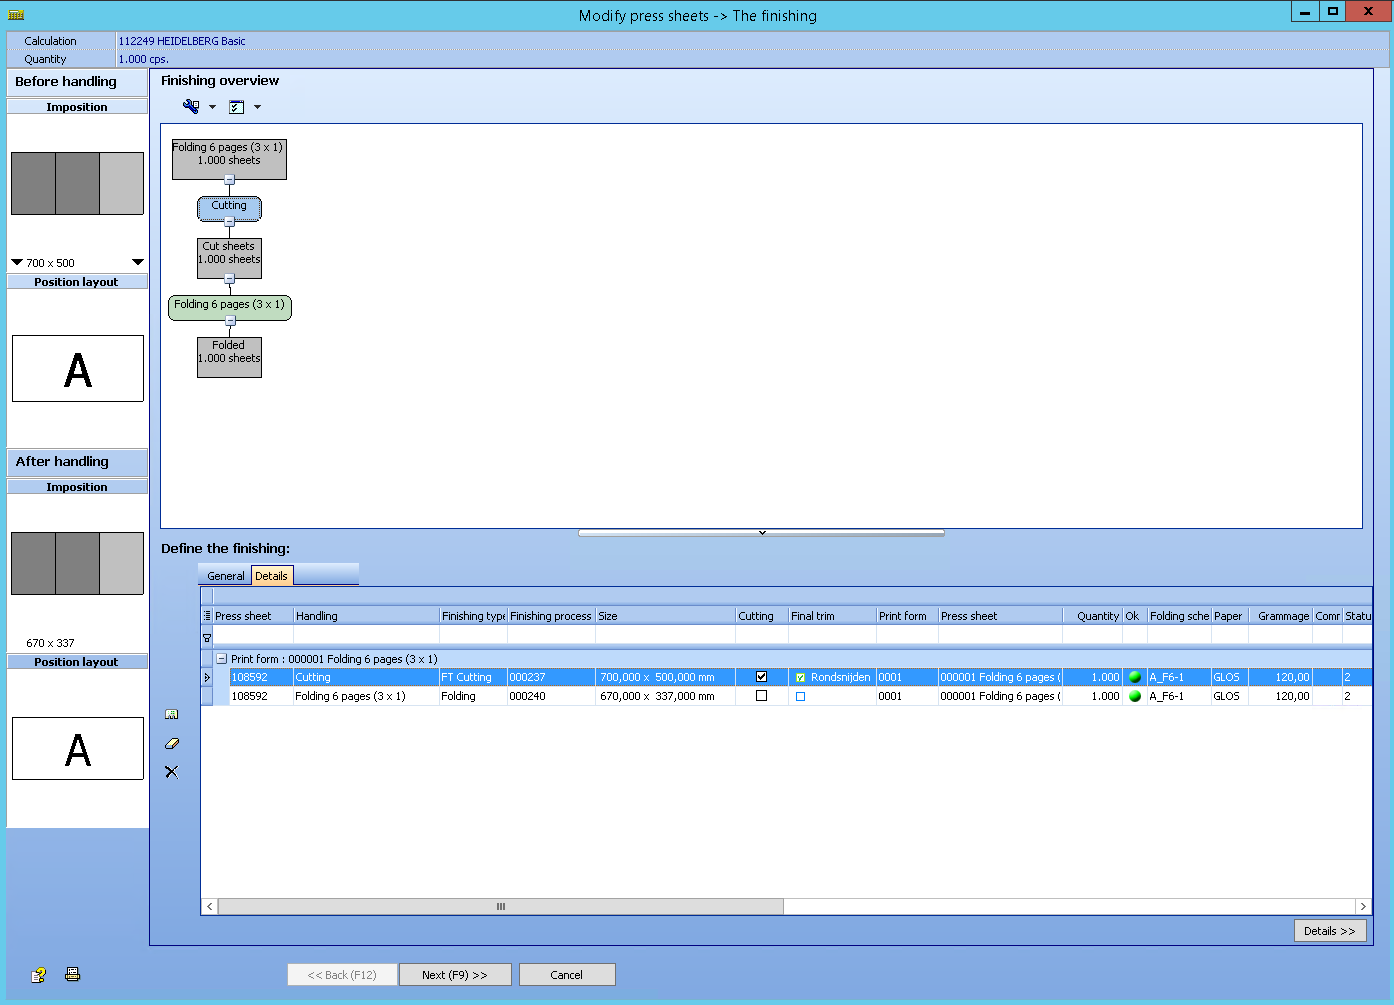
If other further processing, e.g. laminating, takes place before folding, the cut is carried out after this process and before folding.
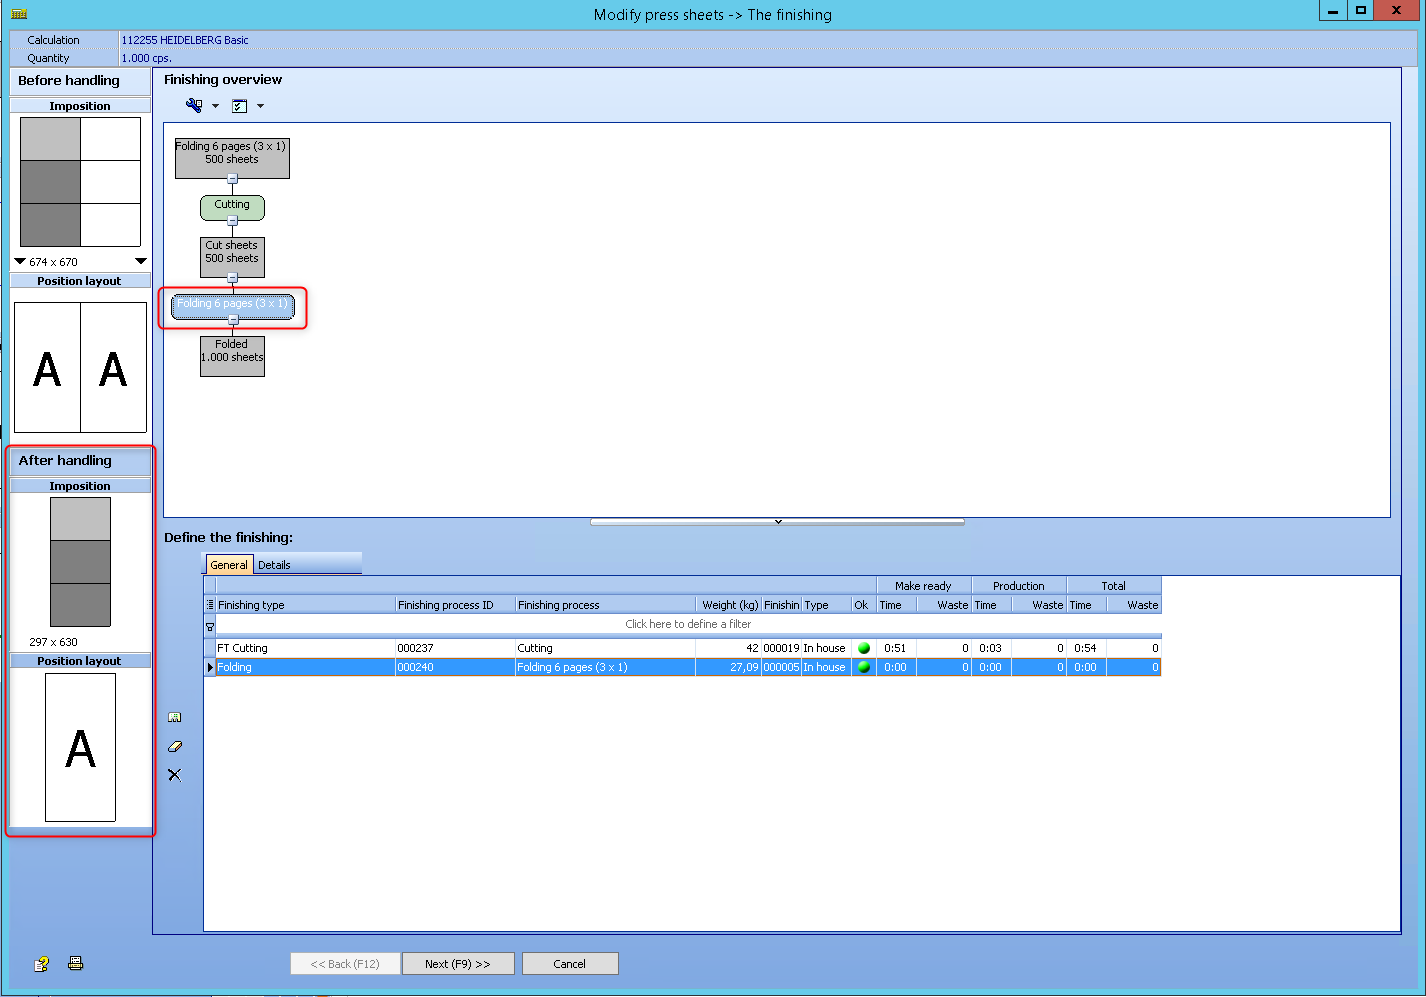
2. Two poses on the print sheet
The ups are not separated during cutting. Only the outer edges are cut off. A total of 4 cuts are required before folding. When folding, the 2 ups are separated from each other. The result is a finished trimmed and folded flyer.
Result of cutting the outer edges:

Result of the folding process and the included cutting:
iii
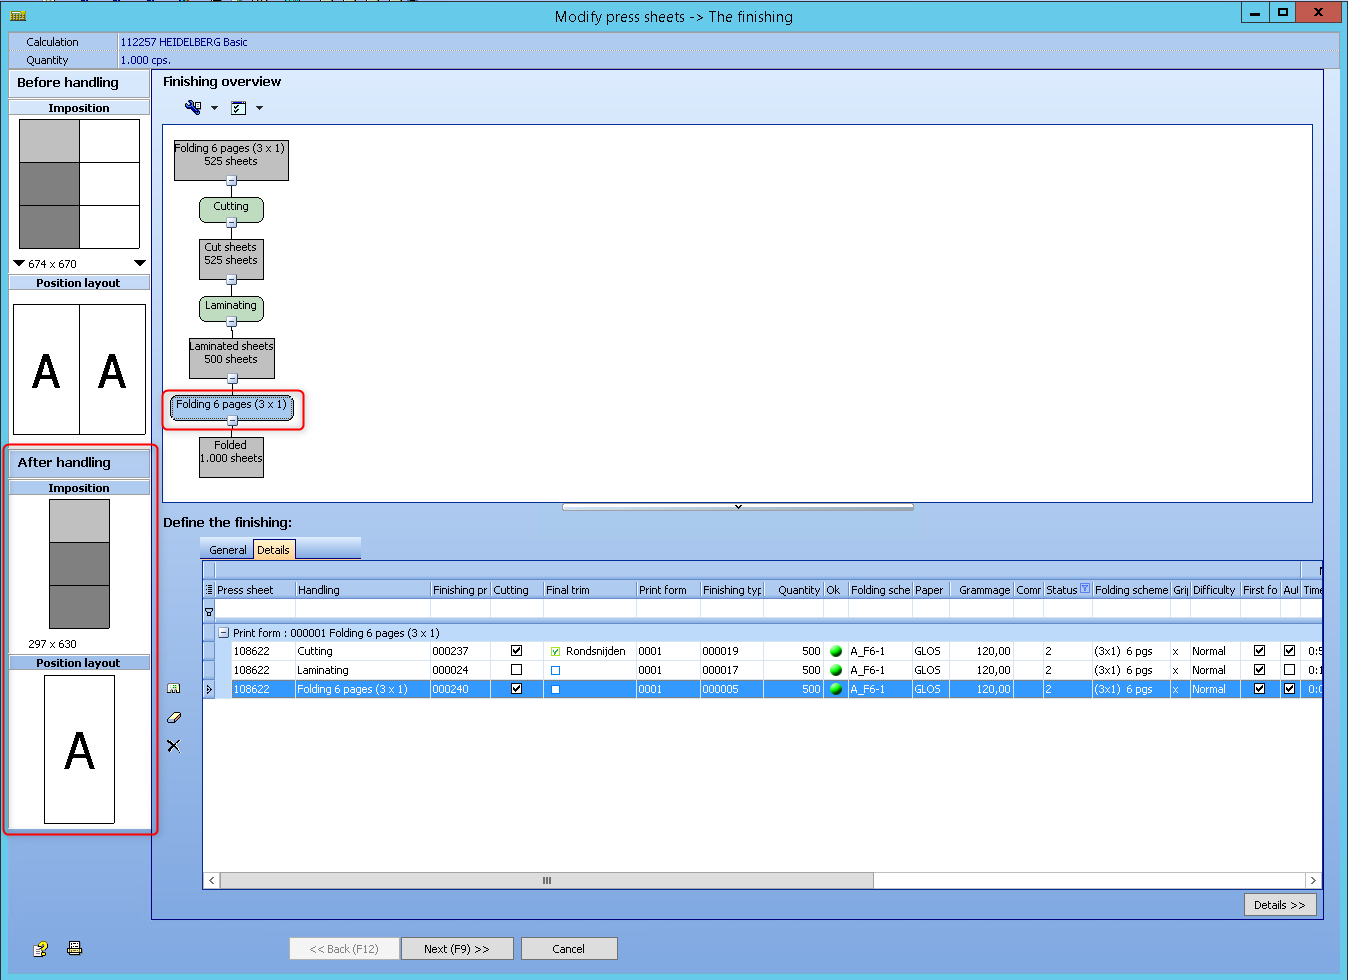
If further processing e.g. laminating takes place before folding, the cut is carried out after this process and before folding.
Result after laminating:
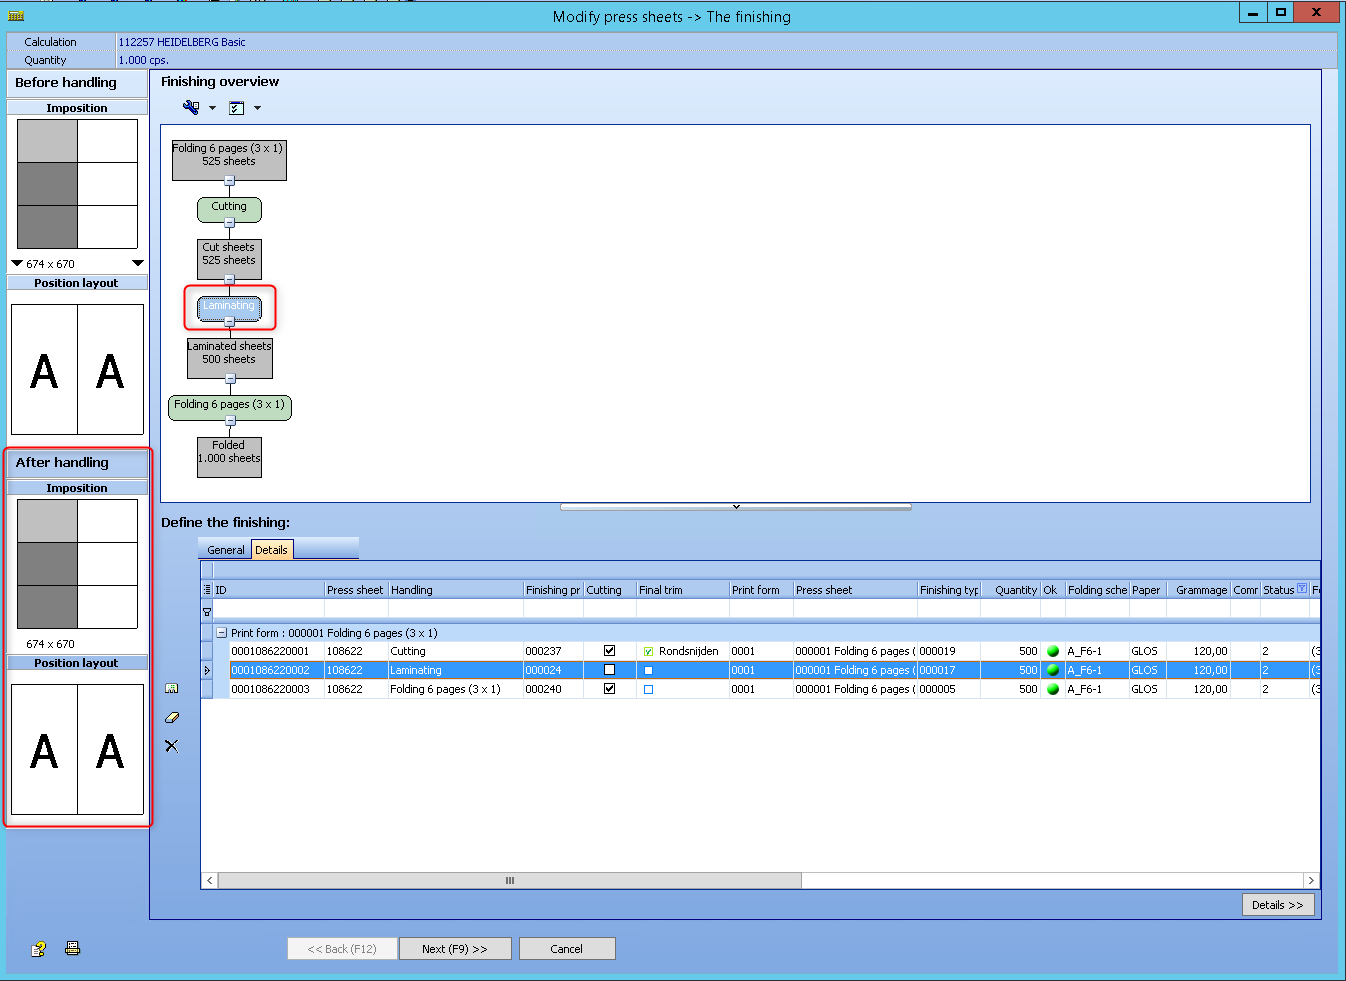
Result after folding:
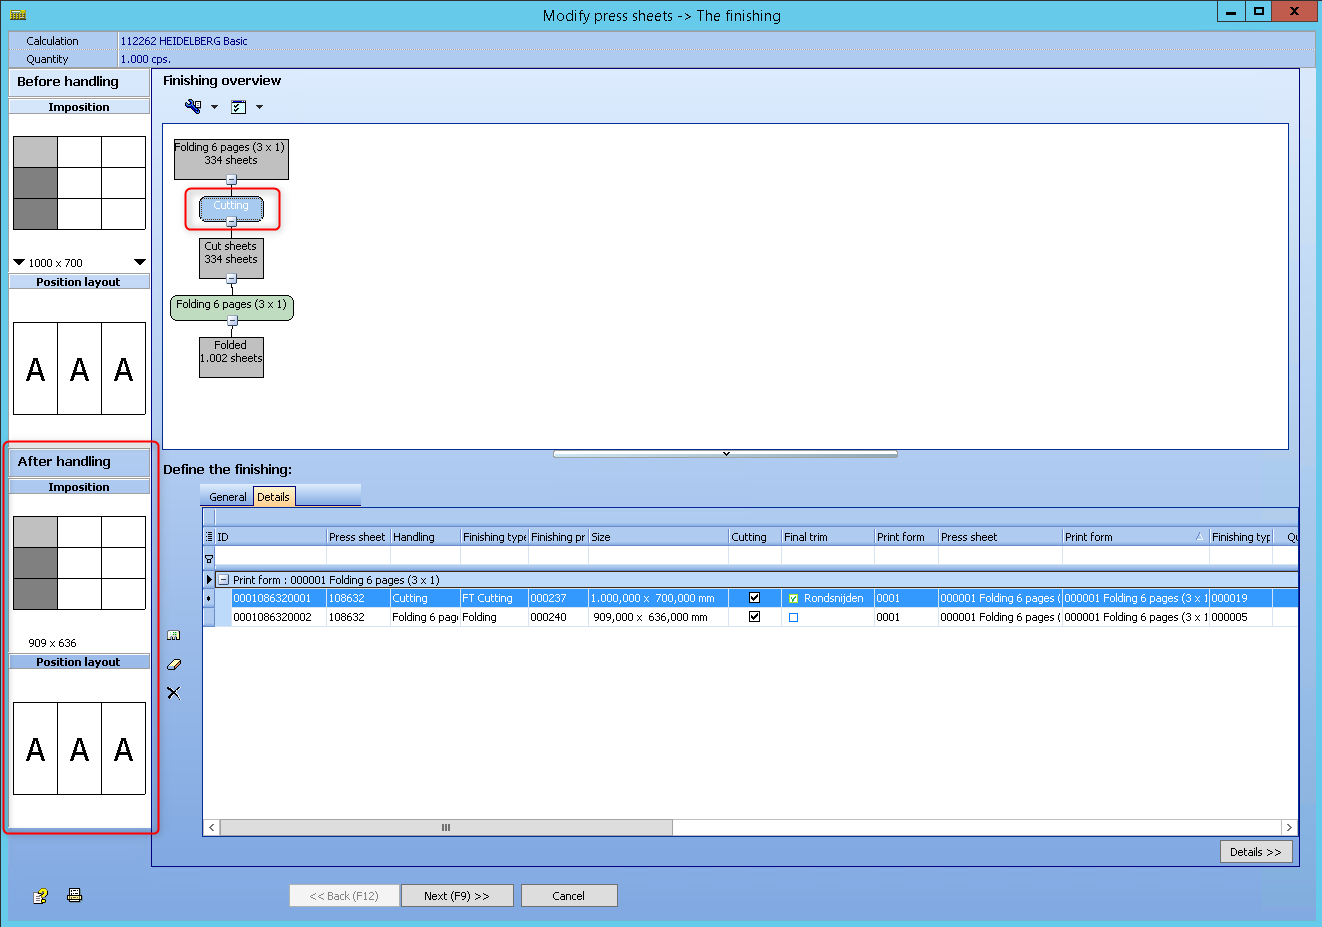
3. 3 ups on a print sheet
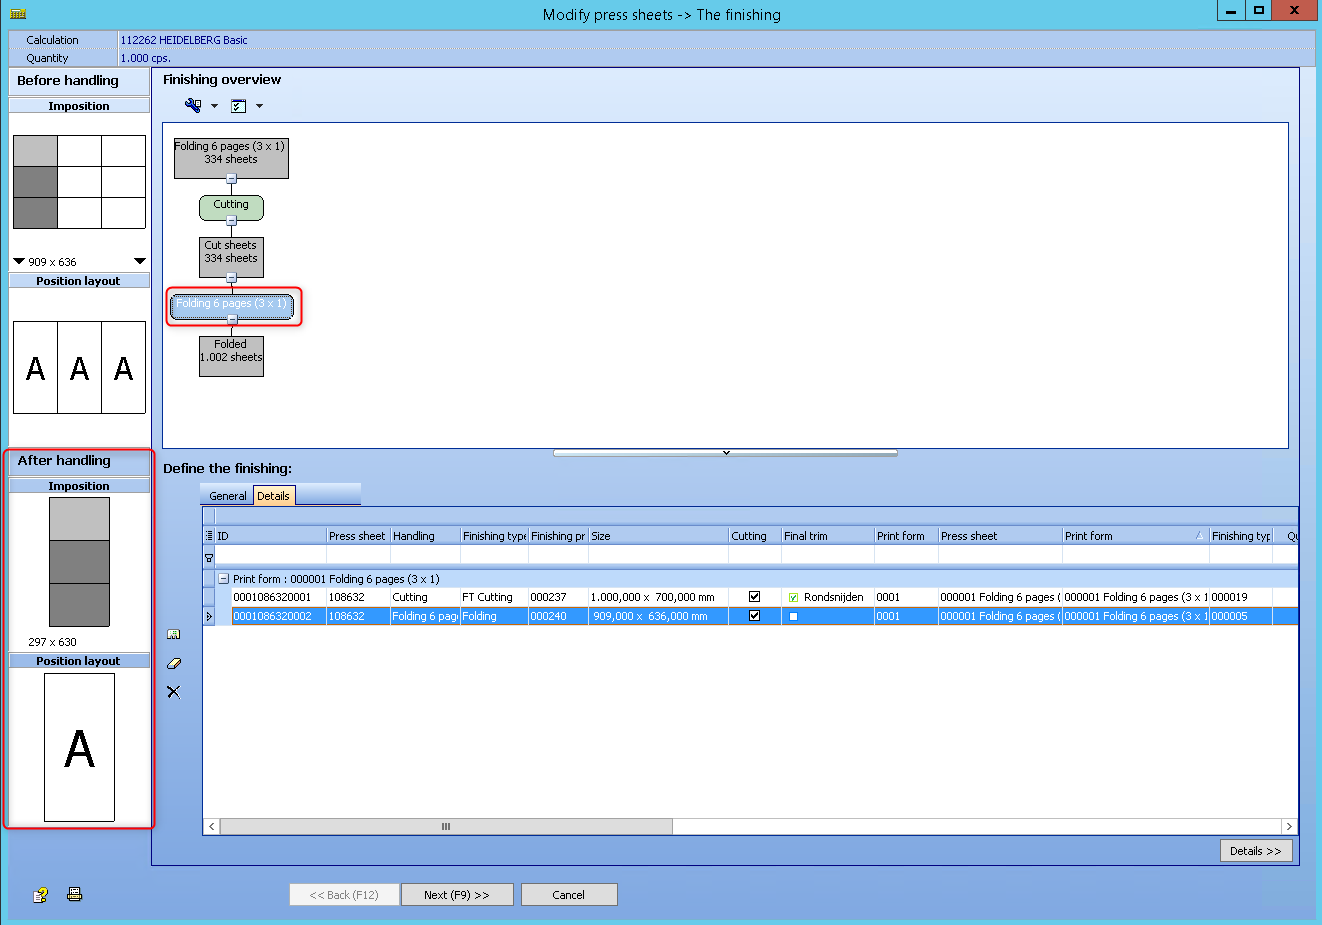
The ups are not separated during cutting. Only the outer edges are cut off. A total of 4 cuts are required before folding. When folding, the 3 ups are separated from each other. The result is a finished trimmed and folded flyer.
Result of cutting the outer edges:
Result of the folding process and the included cutting:
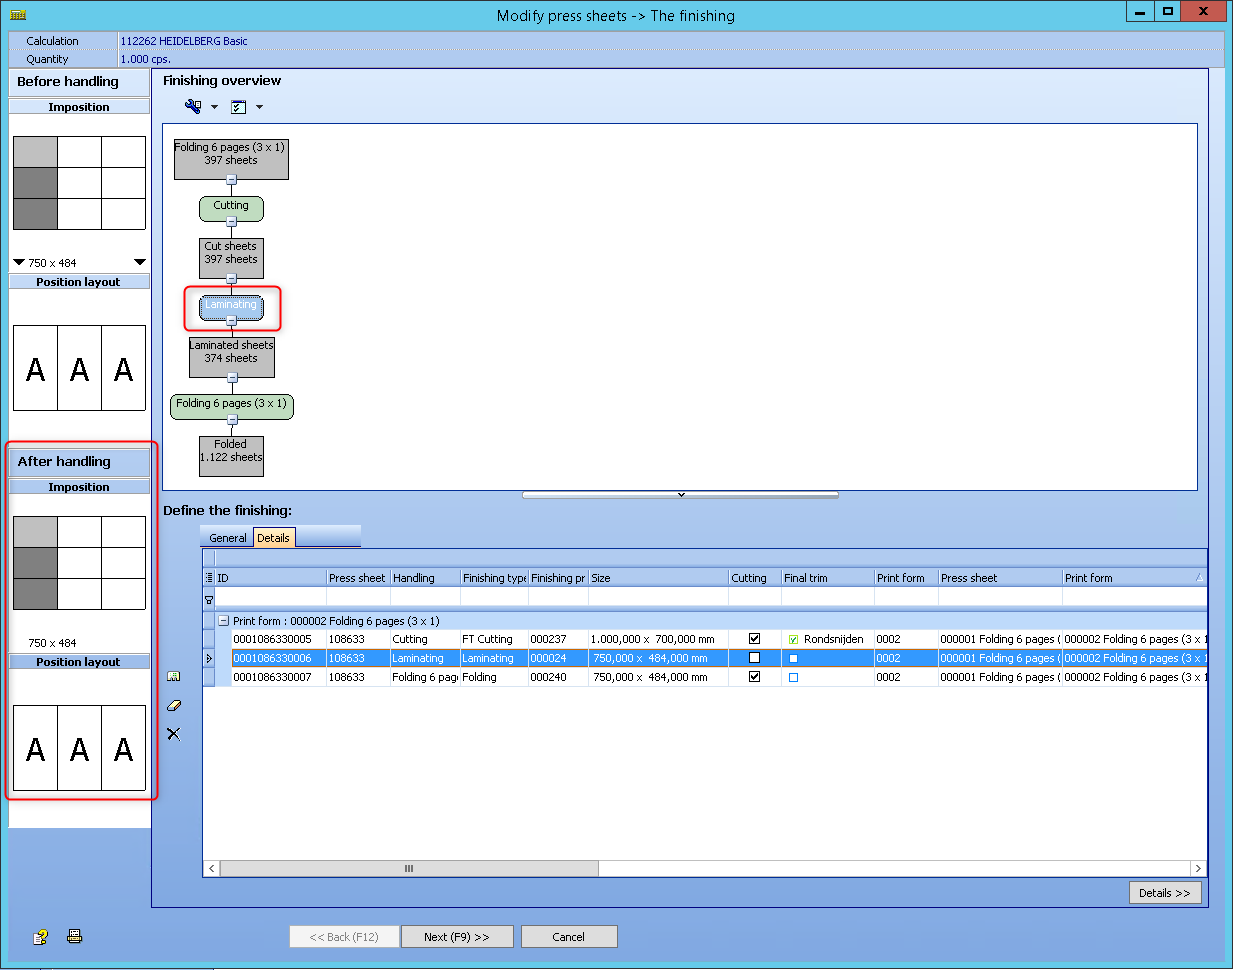
If further processing e.g. laminating takes place before folding, the cut is carried out after this process and before folding.
Result after laminating:
Product type that doesn’t require a folding process. For example a poster:
If no other sheet related finishings are done, then the trimming is added. When more ups are printed, the cutting for separation of positions will also trim.
Bleed specification individually possible for the product part
![]() Video-Tutorial:
Video-Tutorial:
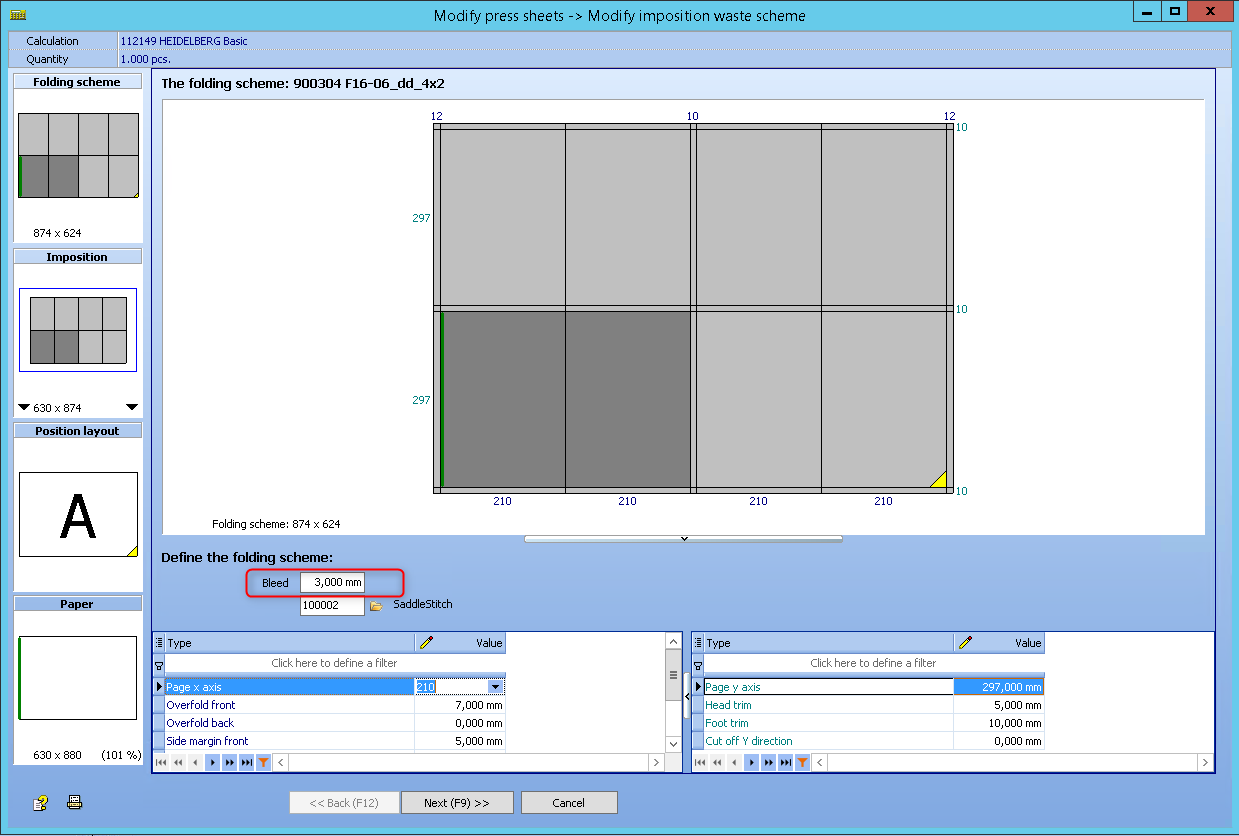
Bleed specification for the product part
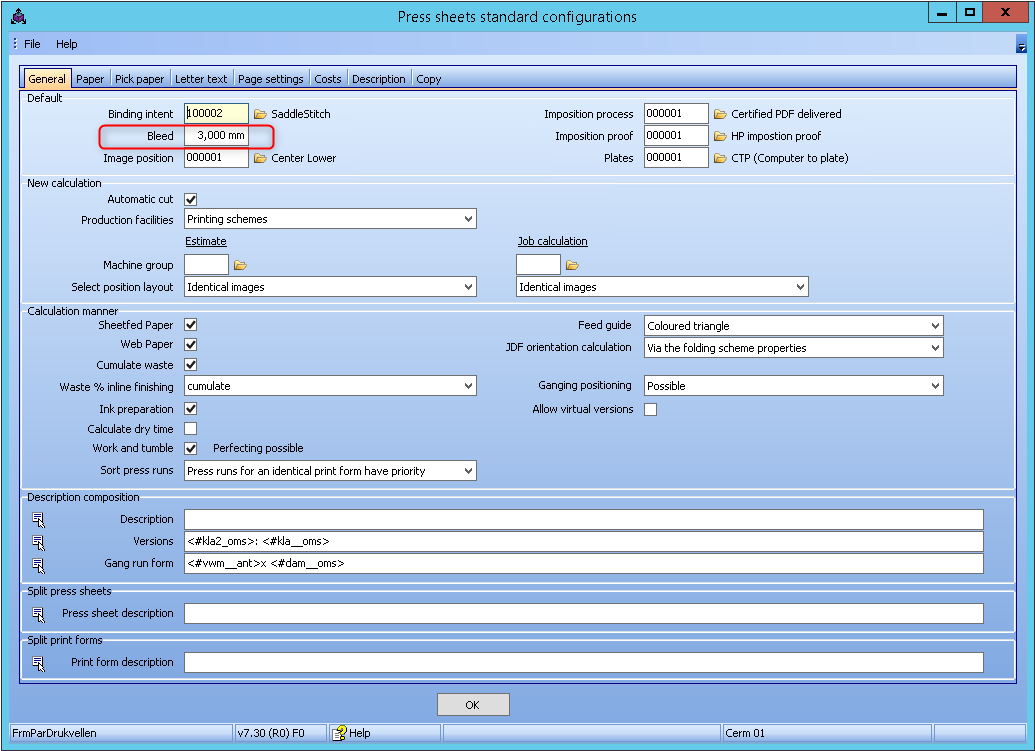
The default value for bleed can be configured in the parameters.
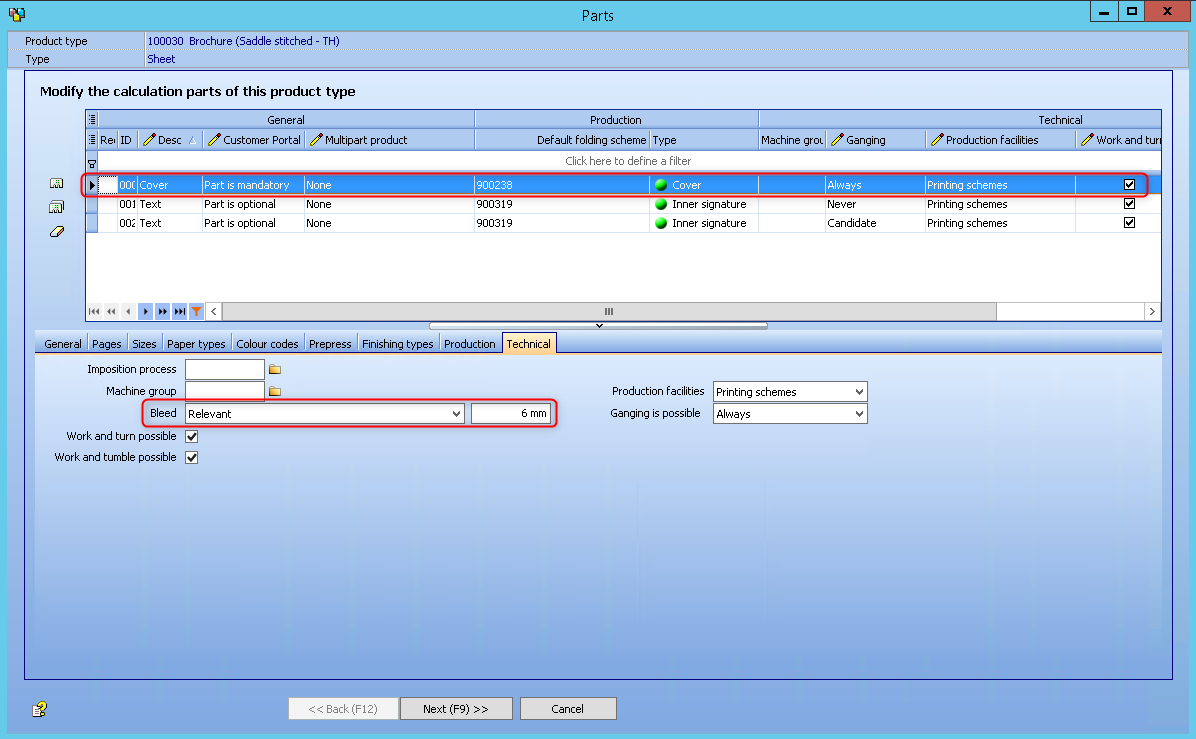
For special cases, an additional configuration is added to the product parts.
For example, the default bleed can be 2 mm. For a product, that is typically printed on a digital press, the user can set the default bleed to 0 mm for single product parts.
In the product parts, the bleed setting is set to "Not applicable" by default. However, the user can set the bleed to "Relevant" in the product type part and and store it with an appropriate bleed value.
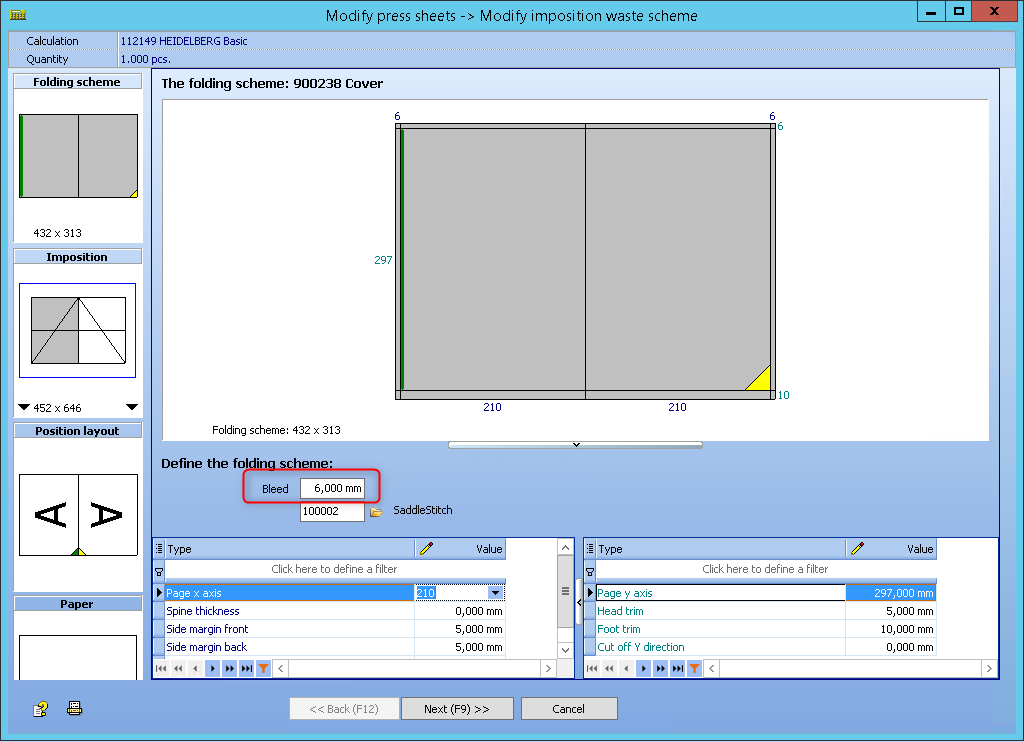
When a press sheet is added to an estimation, the Prinect Business Manager will check if the product part has a relevant bleed. If so, this bleed will be used. Otherwise the default bleed will be applied.
PBM explorer > Parameters > Calculation parameters > Sheets/web parameters > Standard configuration > General
PBM explorer > Production > Product types
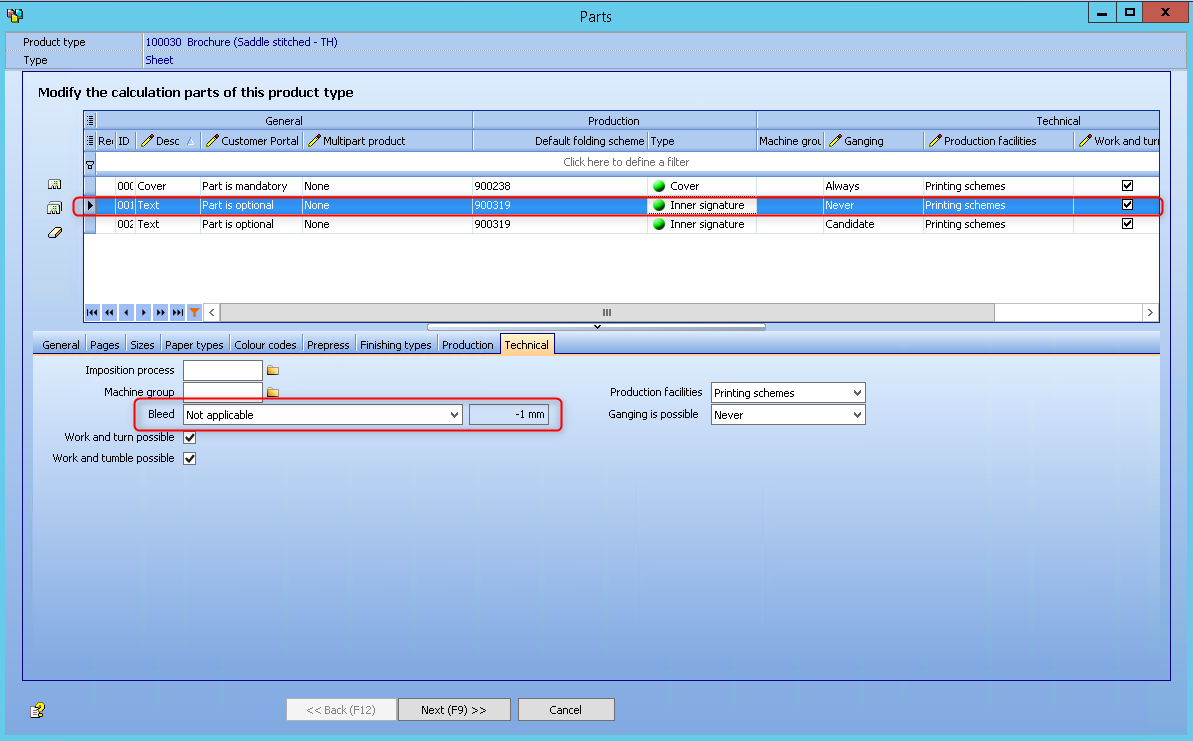
The following screenshots show the result:
Transport cost for gang jobs in an sales order
![]() Video-Tutorial:
Video-Tutorial:
Transport cost for gang jobs in an sales order
Different products can be grouped in a gang job using the sales order. For each gang job, Prinect Signa Station will generate a layout that is imported as a gang sheet for the gang job.
When "Customer from sales orders" in the settings of the parameters is selected, also the transport in the gang job can take over the address of the sales order (if they are all equal). In this case, total cost is including now also the transport costs.
PBM explorer > Parameters > General Parameters > Calculation and production > Production standard configuration
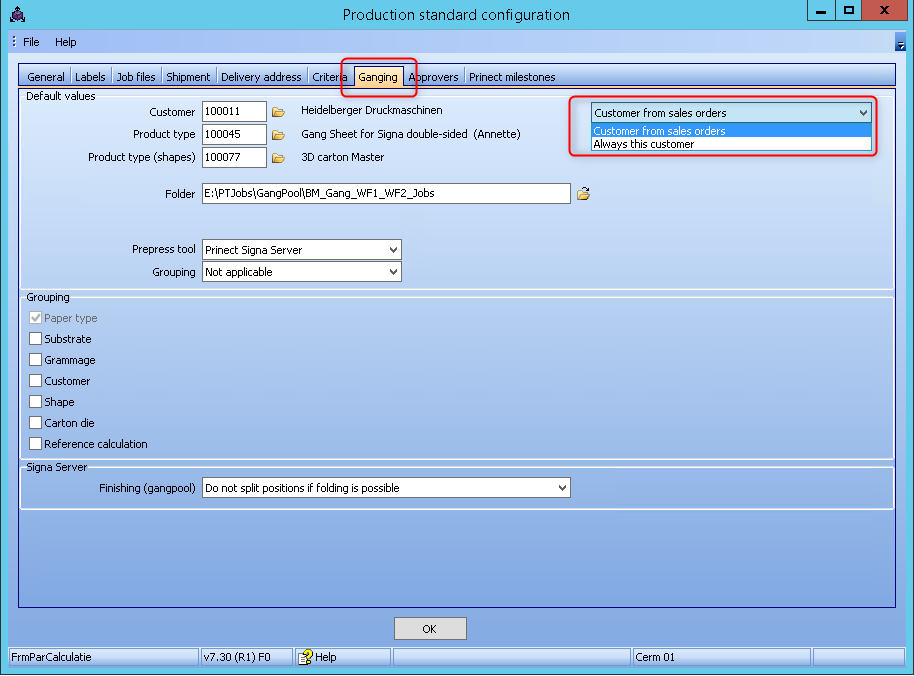
In case all the selected sales orders for ganging have the same customer, this parameters can be set so that this customer will be assigned to the new gang job.
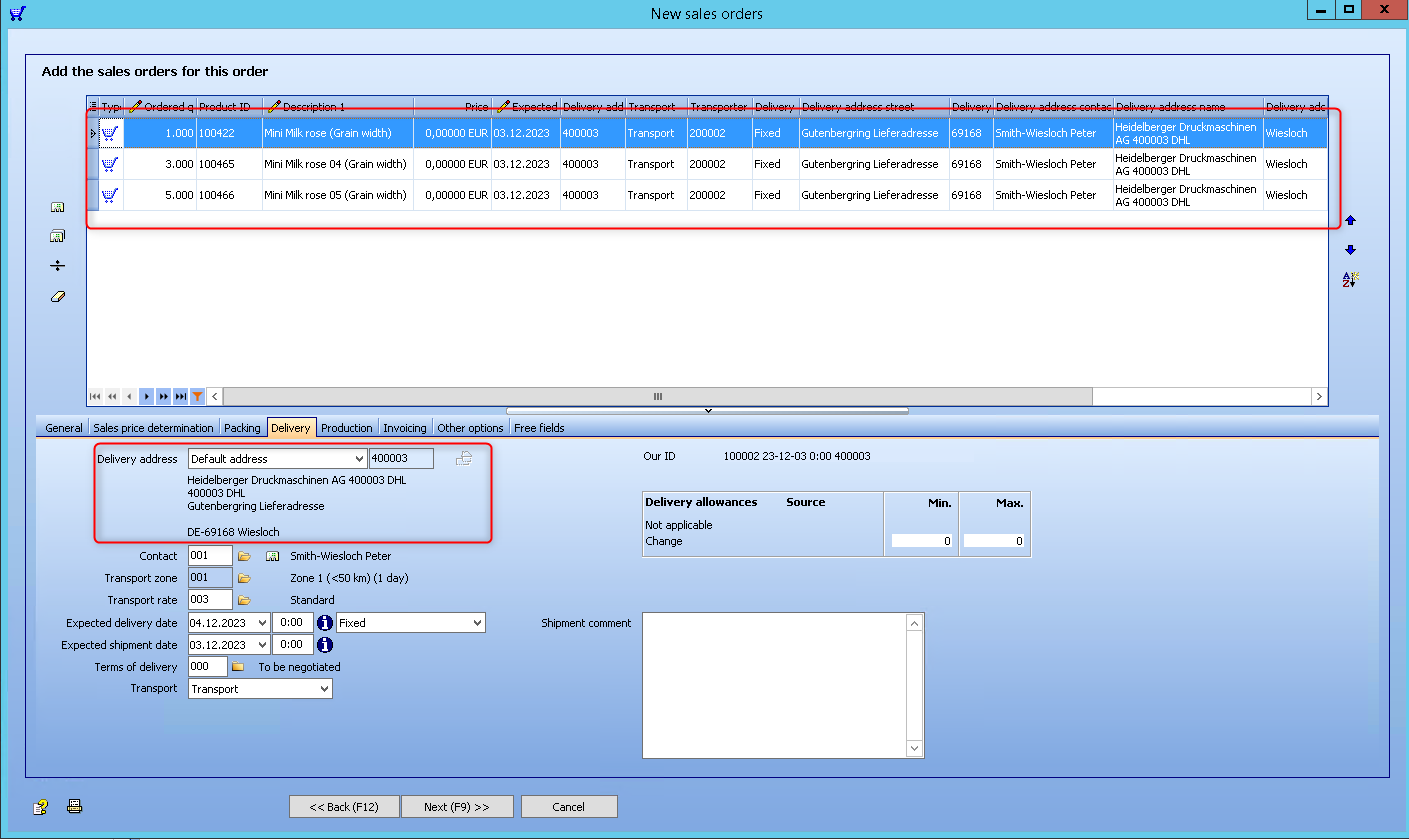
Example:
The sales orders belong to one customer and the delivery address is the same.
After ganging the 3 sales orders, the gang job will have the same customer. There will also be one transport line as before. But now, instead of "No transport", the address is taken over.
This screen you will find in the job, press "F6" (Quick Menu), and open Nr. 23 - Transport.
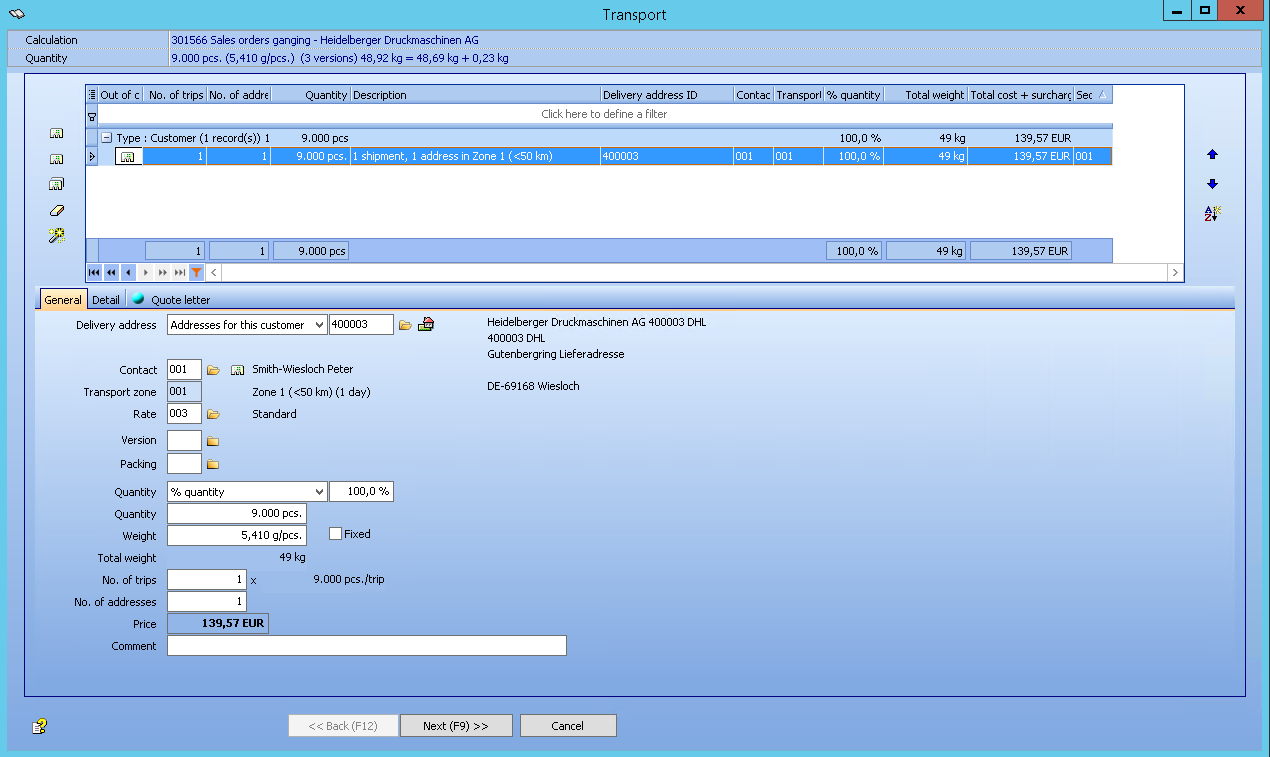
 Note: Under certain conditions, transport costs may be included in a gang job. The customer of the gang job needs to be the same as the customer of the sales orders. All sales orders can only have the same delivery address.
1. There is no split into versions for transport, even if the packaging is split into versions.
2. The sales orders can have different delivery dates.
Export the margins for a diecut tool to Prinect Signa Station
![]() Video-Tutorial:
Video-Tutorial:
Export diecut tool to Prinect Signa Station
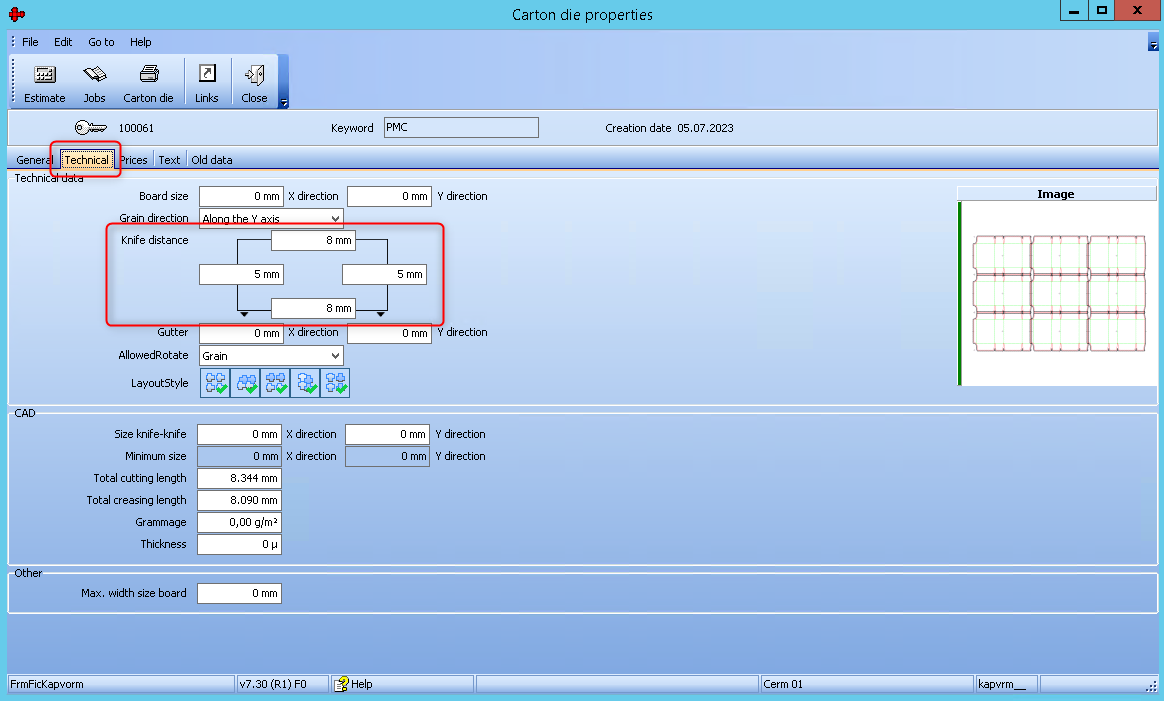
When creating a tool via the Package Designer, margins (top, bottom, left and right) are defined that must be taken into account during placement. These margins can also be specified when importing existing tools and transferred to the properties of the tool.
These margin values are sent to the Prinect Signa Station so that the layout can take these margins into account.
The Prinect Business Manager provides the option of defining margins. Margins can also be defined in the Prinect Signa Station.
1. Prinect Business Manager
PBM explorer > Production > Carton dies > Properties > Technical
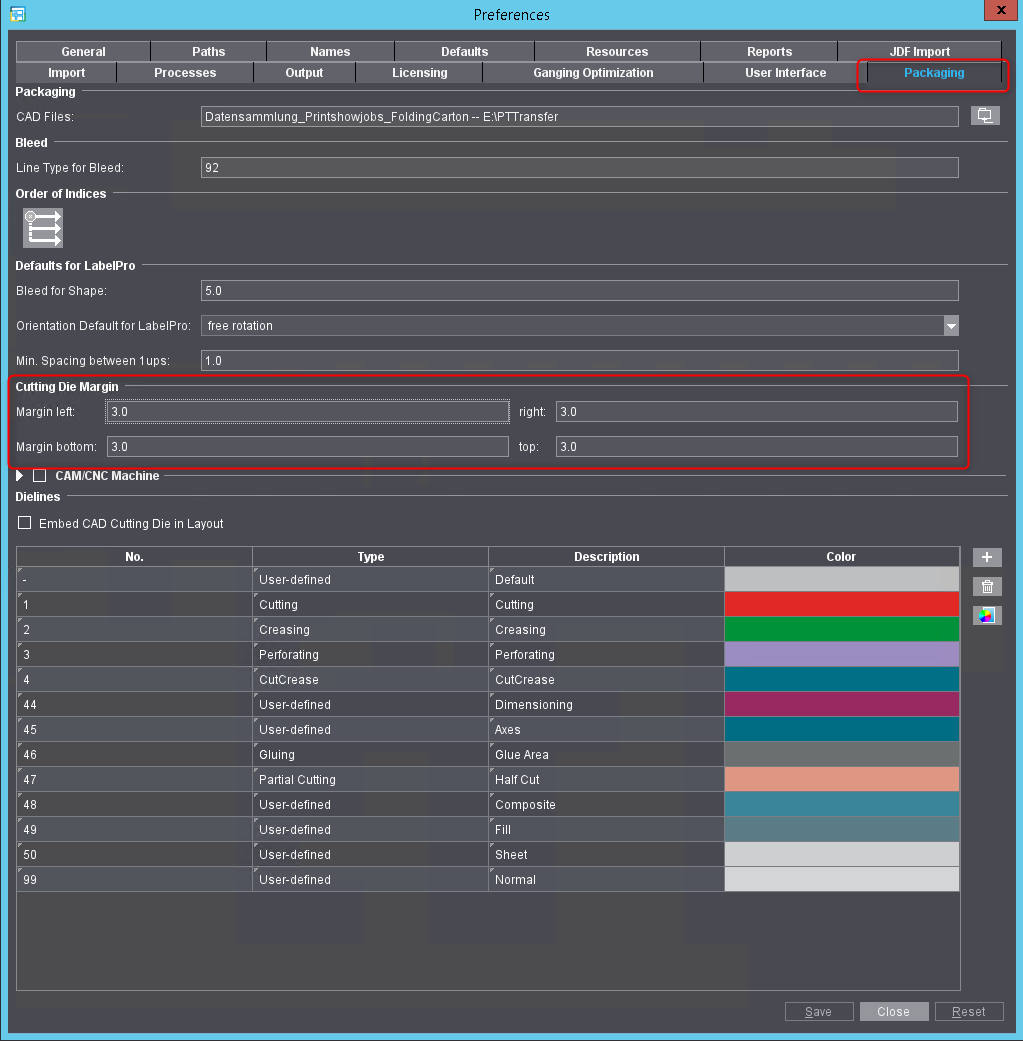
2. Prinect Signa Station
If all margins of the die-cut tool in the Prinect Business Manager are defined as "0", the margins from the Prinect Signa Station are taken.
File > Preferences > Packaging
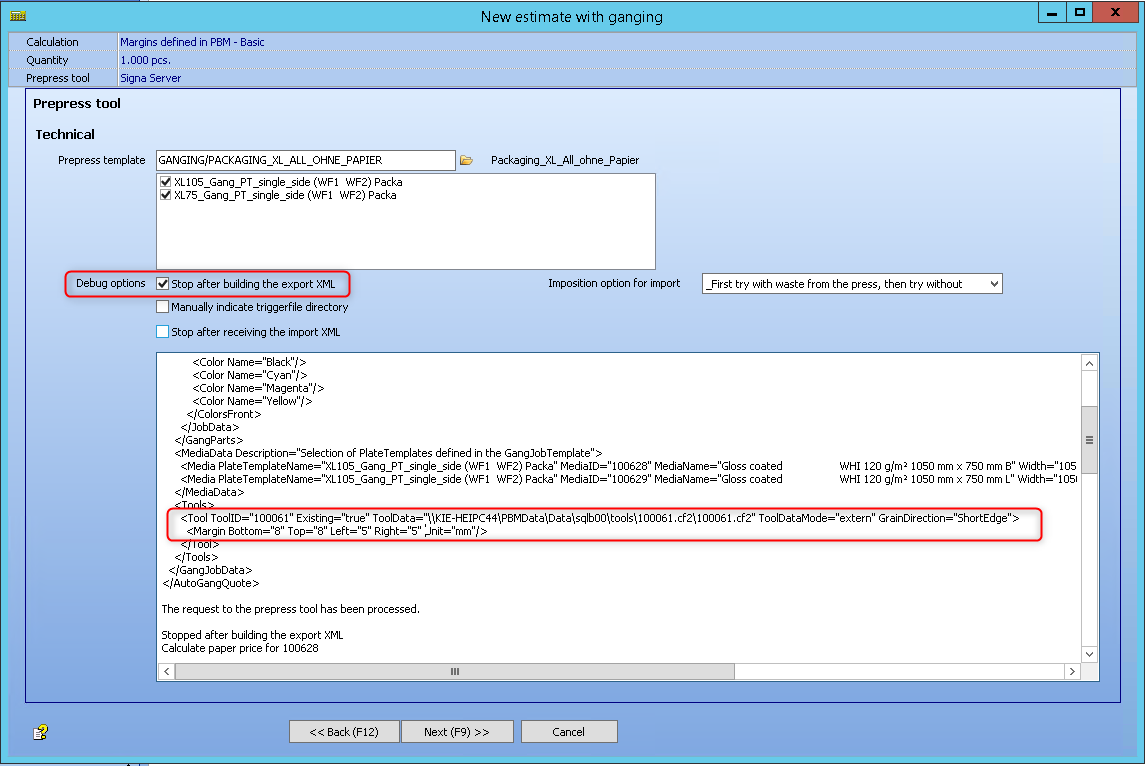
In this example, margins were defined in the Prinect Business Manager. Left and right 5 mm, top and bottom 8 mm.
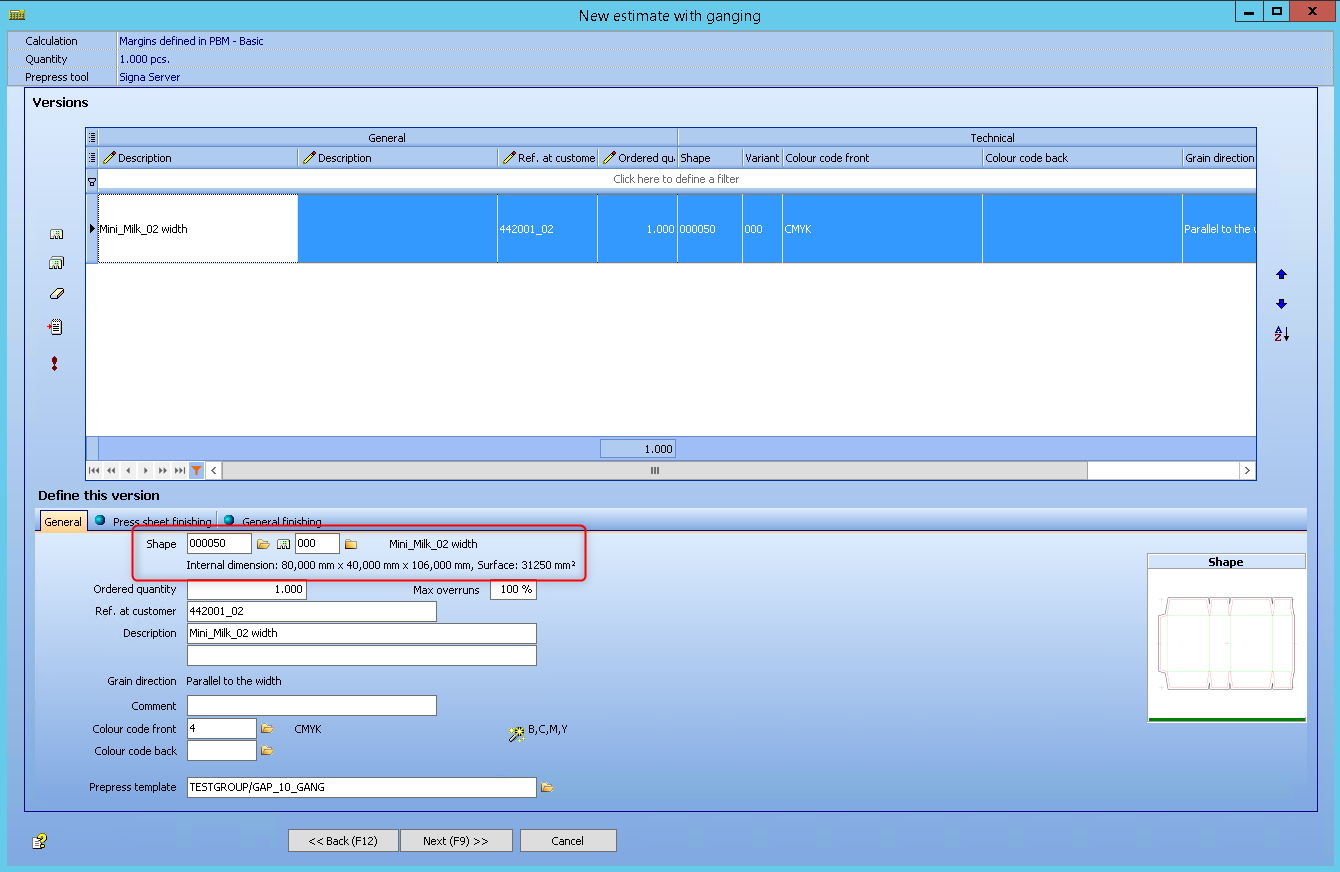
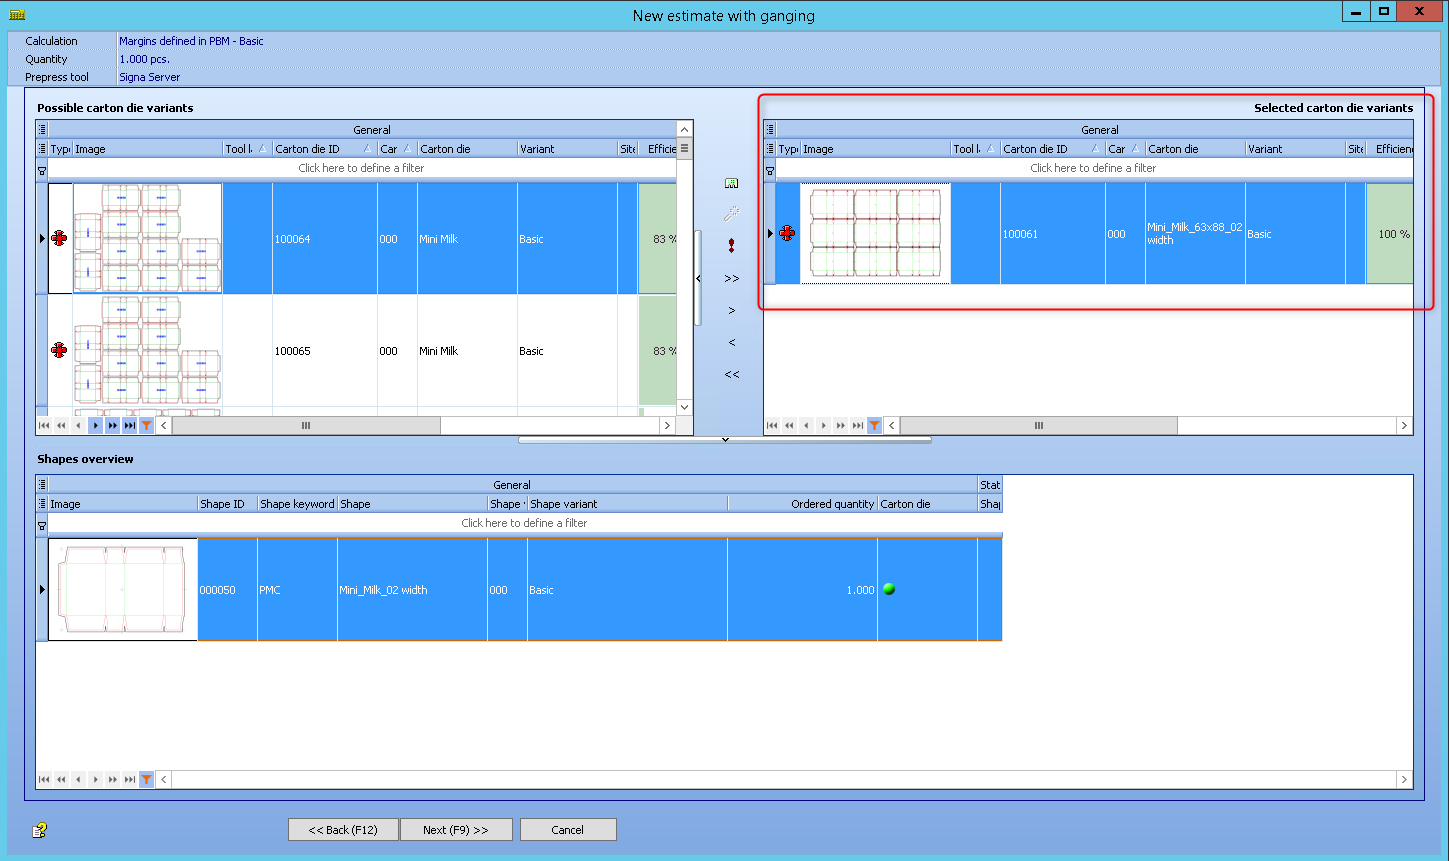
A new estimation "New estimate with ganging" is now started and the die-cut tool is selected.
It is important that the die-cut tool is available in the "Selected carton die variants" area.
If the debug mode is activated with "Ctrl + alt + d" and "Stop after building the export XML" is checked, the defined margins in the XML are displayed here so that they can be checked for validity.
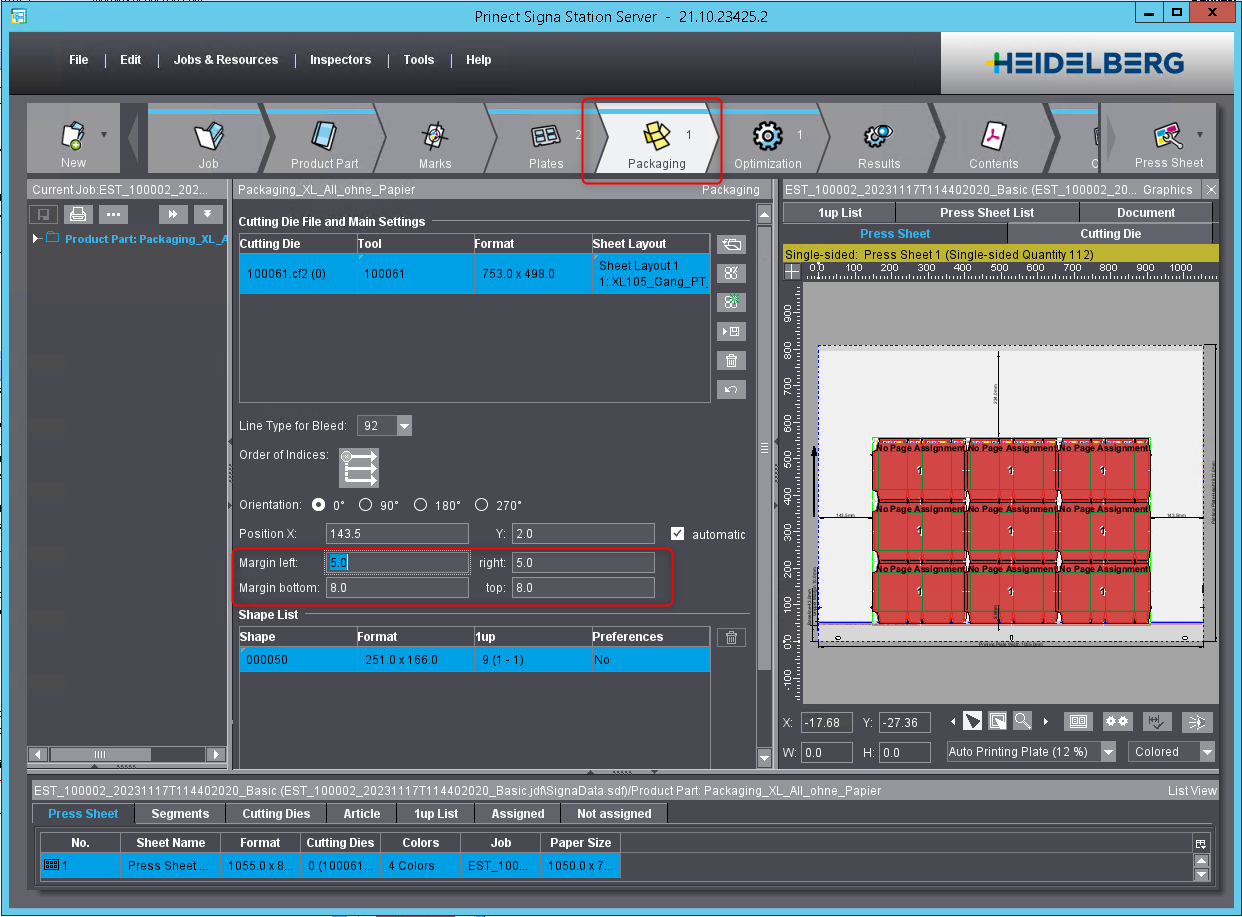
If the job is now opened in Prinect Signa Station, the margins defined by the Prinect Business Manager are visible here.
Production job has to show existing spot colours of the products
![]() Video-Tutorial:
Video-Tutorial:
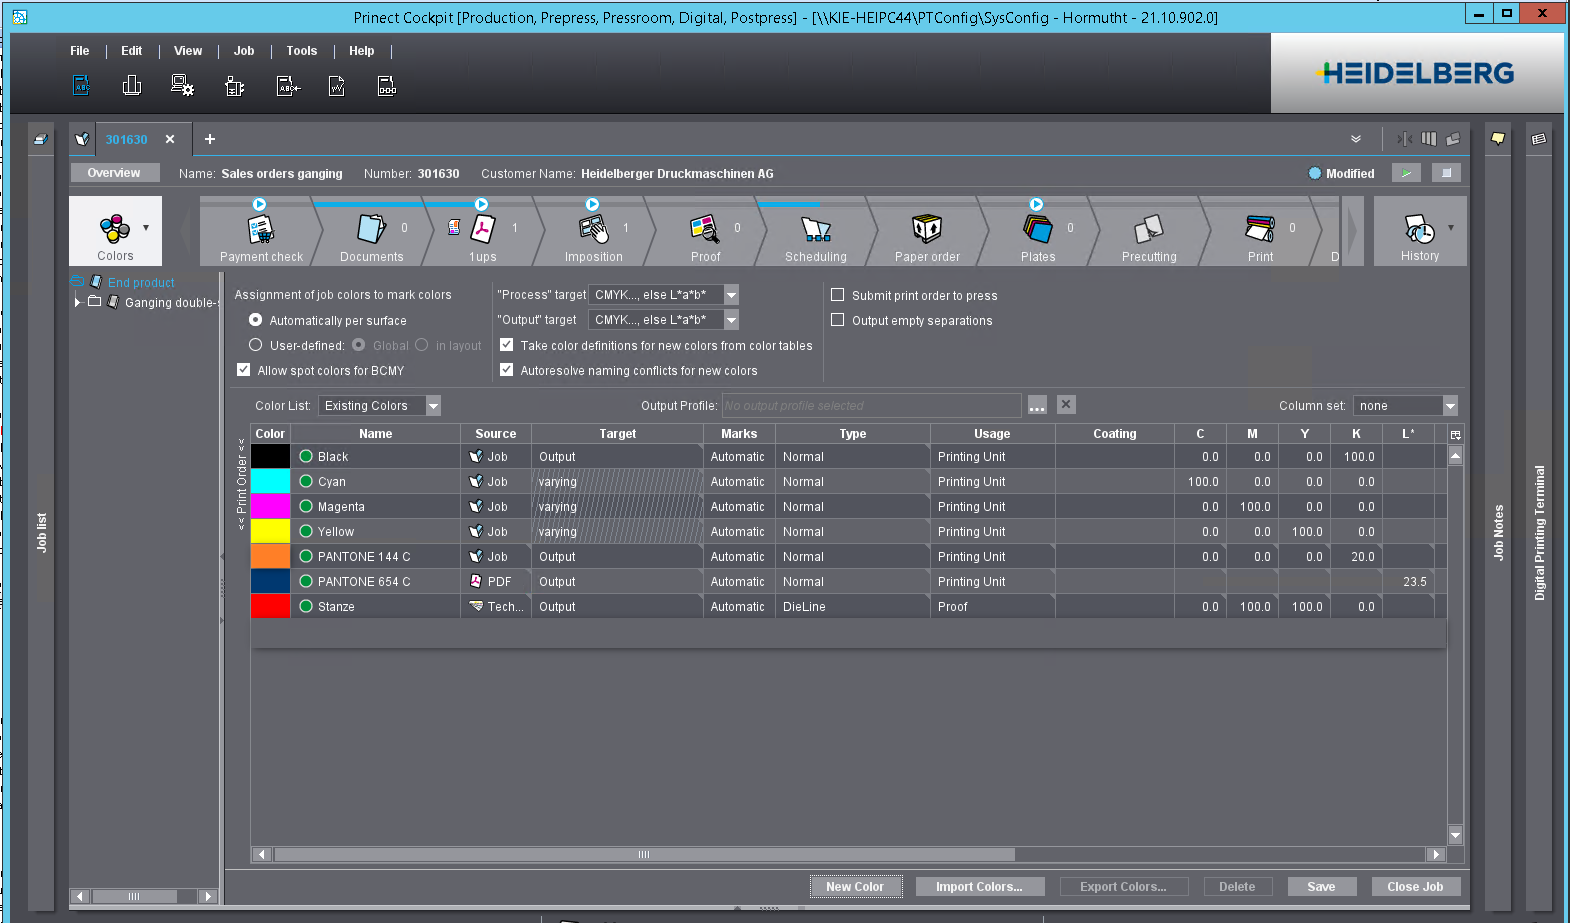
Production job has to show existing spot colours of the products
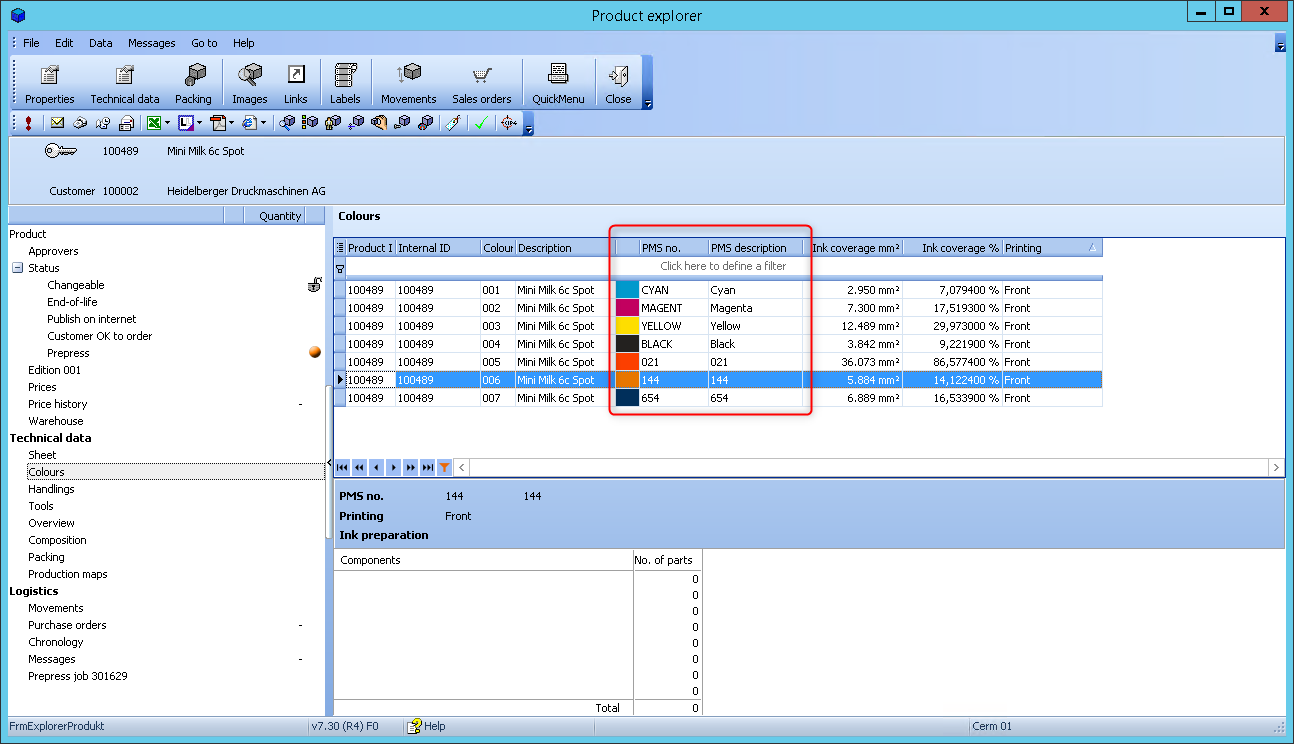
The spot colours from the pdf specified in the 1up workflow are listed in the production job and are automatically assigned to the press sheet.
The colours of the corresponding content file can be seen in the product (pdf).
The basis for this functionality is the configuration of the 1-up workflow.
These colours from the pdf file are transferred to the Prinect Business Manager job.
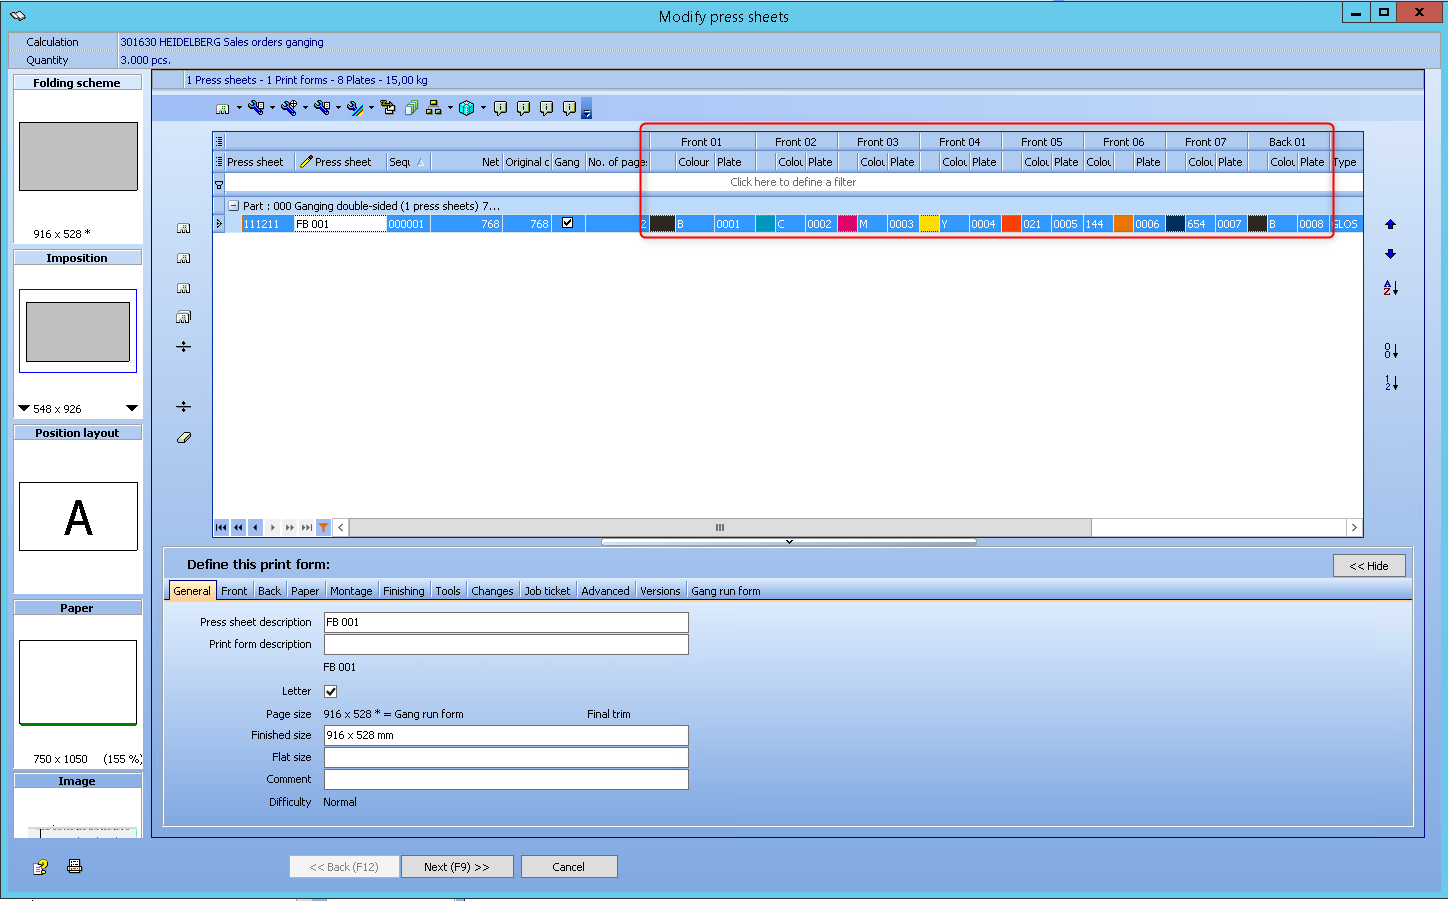
The Prinect Cockpit also contains exactly the same colours in the job.
Privacy Policy | Imprint | Prinect Know How | Prinect Release Notes