Labelfire Primefire
This step exists only in the Labelfire workflow. Please change the selection of the machine in the filter settings. See Filter settings.
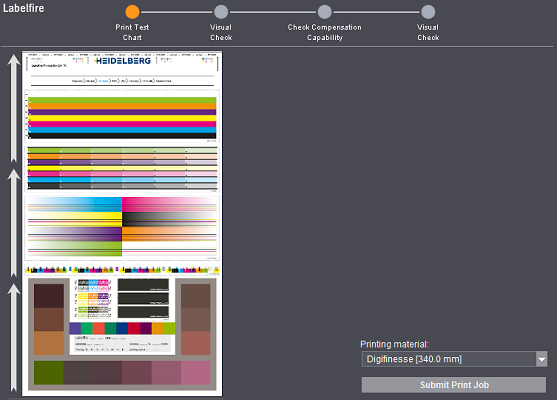
Click "Submit Print Job" to print the test chart. The test chart is submitted to the Cockpit. This process can take some time.
This test chart will help you find the correct press settings for pinning and corona. In addition, you can check adhesion and total area coverage.
After each change you make, reprint the test chart on the press until you are happy with the result. Then click "Next".
Ink can stick to most plastic materials only to a certain extent. To be able to print on these materials, their surface undergoes corona treatment. In this process, the plastic film is subjected to an electric high-voltage discharge. Corona is checked using the test patches at [1] and [2].
In pinning, the consistency of the drops of ink are gelled through radiation with UV light before they are applied. This prevents the drops from running and a sharper printed image is produced. The setting for pinning depends on whether the printed result later is to be more glossy or more matt.
Pinning is checked using the test patches at [3] and [4].
The test chart varies slightly depending on the ink generation used. See Ink generation .

The test patches are arranged in such a way that they are processed from top to bottom. Firstly, you set corona with the help of areas [1] and [2]. After that, you set pinning with [3] and [4]. The remaining patches are used for different purposes and are checked subsequently.
[1]
Corona affects the pin holes. With [1] check whether there are still holes in the printed image and, if necessary, customize corona. In addition, the test patches are designed to check the gloss and print behavior across the entire printing width.
[2]
Check color screening with [2]. Screening should have a harmonious and even effect. If this is not the case, correct the corona settings.
[3]
With [3] horizontal lines are printed on different shades in all the process colors. They check intercolor bleeding. Using a magnifying glass, check whether the lines are fringed or not. If necessary, correct the pinning settings.
[4]
With [4] thin vertical lines that jut into different color patches are printed in all the process colors. They check intercolor bleeding. Using a magnifying glass, examine the transition between white (or substrate background) and color. Are the lines restricted? Do the lines run or are they thicker? If so, correct the pinning settings on the press and reprint the test chart.
[5]/[6]
You can assess color reproduction and gloss in areas [5] and [6].
The patches [6] are slightly lighter for UVLM inks than for DCS-UV 02.
[7]
You can enter the settings of the press in [7]. This makes it easier for you to assign the correct settings when comparing several test charts.
[8]
Corona and pinning settings can have a negative impact of the legibility of small fonts. For that reason, check different font sizes in [8]. If necessary, change the settings for corona and pinning and check the printed result again from [1] thru [4].
[9]
The test patches in [9] were printed with different area coverages between 240 % and 340 %. They check adhesion. Run an adhesive strip test, a scratch test or a scratch test with an adhesive strip to do this.
Note down the optimal area coverage to enter the value later in the "ICC Profile" step. See Calculate ICC Profile.
In the case of UVLM inks, there are three instead of six test patches.