Privacy Policy | Imprint | Prinect Know How | Prinect Release Notes ![]()
Setting Up a New Printer
 Note: In Windows, problems can occur if you use a network printer with a user account different to the one used when it was created. For that reason, the following basic rule applies for Color Proof Pro: You should always install a network printer with the Windows user account that is also used to configure the services of the Renderer software (Prinect Production, Prinect Prepress). You should also configure Color Proof Pro with this user account.
In this tab, you select the printer model and enter a description of the printer if necessary.
Option "RIP and print on the fly"
With this option enabled, individual sections of the documents to print are printed immediately after they have been calculated. Without this option enabled, print output starts only when the entire output data of each of the documents has been calculated.
Proceed as follows to set up a new printer:
1.Open the "Printer" tab and click "Add" in the "Installed Devices" group.
The "New Device" dialog opens.


2.Enter the name for the new output device in this box. Then click "Save". This name will appear in the Prinect user interface (Prinect Cockpit) as the device name.
3.Select the manufacturer of the proofer in the "Manufacturer" list box.
4.Select the model of the printer to set up in the "Device type" list box.
The "Device type" list box contains different types of printer control. The control types can appear:
•Contone (CT): These printers control screening and ink usage independently and use halftone image data. Color Proof Pro only does "fine tuning". All the contone printers in the list are tagged as such.
•Halftone (HT): Color Proof Pro controls screening and ink usage. In this mode, the user can influence the starting points and the distribution during calibration. The printers use bitmap data.
•Without any additional information: All printers without any additional information are "halftone" printers.
•RGB: These printers control screening and ink usage independently and use RGB halftone image data. Color Proof Pro only does "fine tuning". All the contone printers in the list are tagged as such.
5.In the "Description" box, you can type a short description of the printer to better identify it.
6.Enable the option "RIP and print on the fly" as desired (see Option "RIP and print on the fly").
7.Then click "Apply". Go to the "Port" tab.
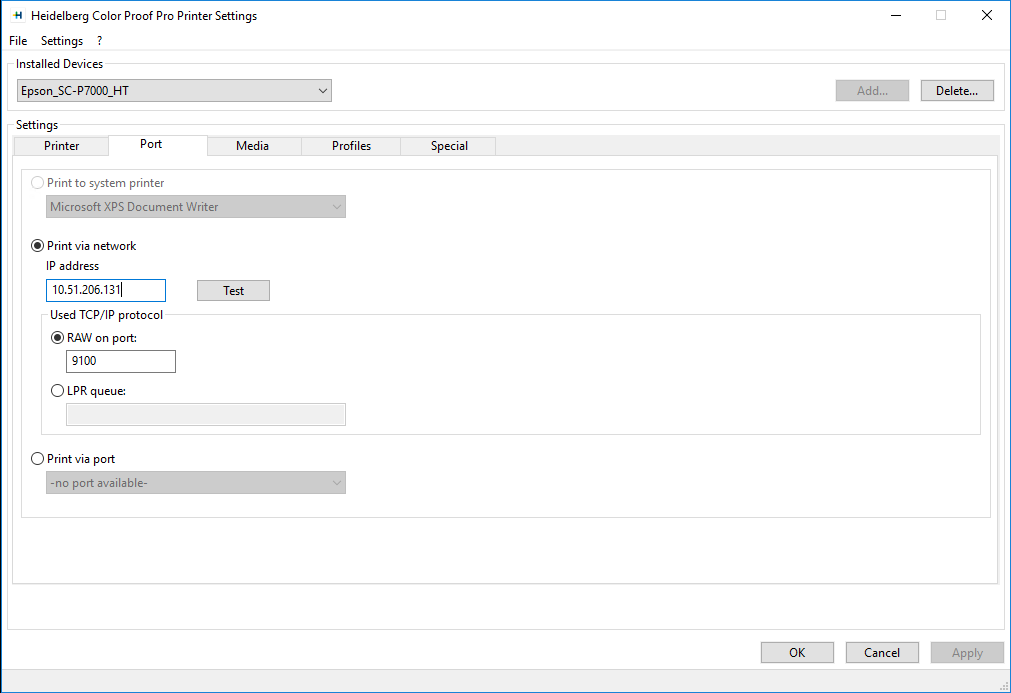
In this tab, you define the port to which the printer is connected. You must configure the port that is used to connect the printer to the Color Proof Pro PC. The following options are available:
•Print to system printer: "System printer" refers to printers controlled by a Windows printer driver. If you choose this port, the printer must have been installed as a Windows printer and be present in the list of devices in the Windows Control Panel. System printers usually connect via the USB or network port.
•Print via network: To use this port, the printer must feature a network connection. To configure such a connection, you need the TCP/IP address of the printer or its LPR queue name if it is controlled by the LPR protocol. Usually, you can find the TCP/IP address in the configuration data of your printer. See the user manual of the printer for details on this.
If you use the TCP/IP port, enable the option "RAW on port". You can leave the "9100" entry unchanged in most cases.
With the "Test" button, you can test the network connection to the printer. An appropriate dialog displays.
•Print via port: If the printer connects to the Prinect PC (where Color Proof Pro is installed) via USB but is not be operated as Windows system printer, you can enable this option and choose a suitable port.
8.Choose a suitable port and specify necessary details if applicable.
Note: The printers of the HP Zx100 family can be controlled by one of the "Print via network" options or via the option "Print via port" because printer and Color Proof Pro directly communicate via the port.
Note: Heed the above notes on user accounts if a printer cannot be reached or cannot be installed correctly for any other reasons (see Setting Up a New Printer). There is another alternative if you still have problems with your network printer: Instead of configuring the printer as a network printer, install a local "dummy" printer, e.g. with the "Generic/Text only" driver, and define a local port for this printer made up of the "computer_name\share_name" or "IP address\share_name" entries. Color Proof Pro will always identify such a printer and include it in the list box of available printers.
9.Go to the "Media" tab.
"Media" Tab
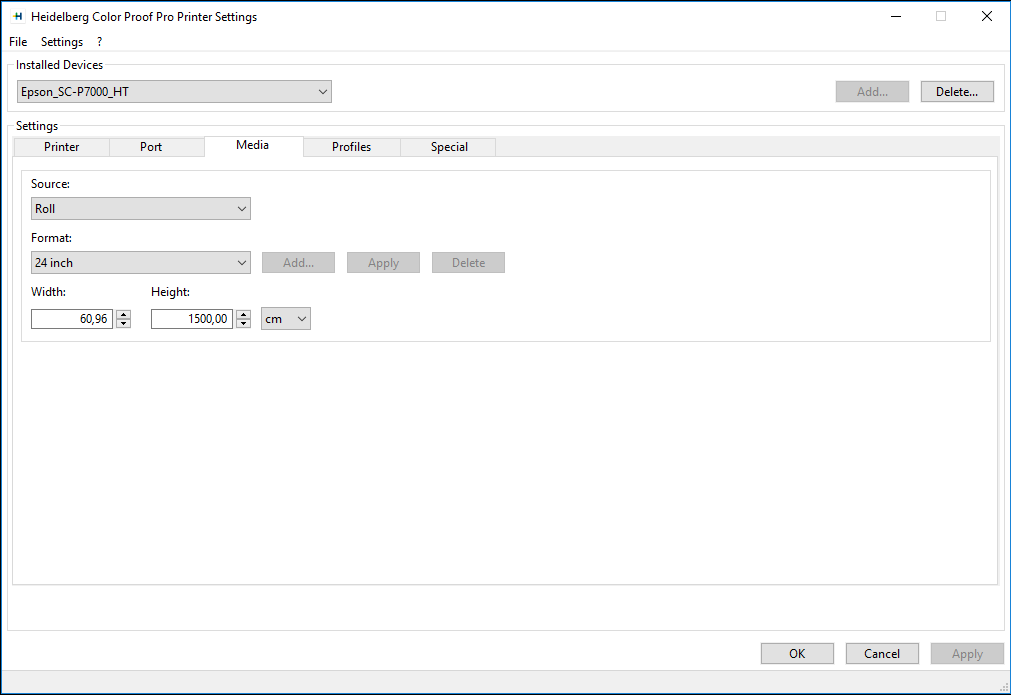
In this tab, you can define print media for the selected printer. The defined print media are submitted to the connected Prinect system (Prinect Production/Prinect Prepress) and can be selected in the sequence templates.
The "Source" and "Format" list boxes only offer options that are available for the selected printer.
Defining new paper formats
In the "Width" and "Height" boxes, you can define new paper formats and choose the dimension unit if needed. When you click "Add" (1), a dialog appears where you can type a name for the new format. Confirm the dialog with "Save". With "Apply" (2), the new print medium is added to the "Format" list box and and is available for selection in the Renderer in Prinect Cockpit after the respective services were restarted.
Deleting a medium
With the "Delete" button, you can delete the selected medium from the list. After clicking this button, you have to confirm a safety query.
10.When all necessary print media have been defined, click "Apply" (2) to accept the settings.
11.Go to the "Profiles" tab.
"Profiles" Tab
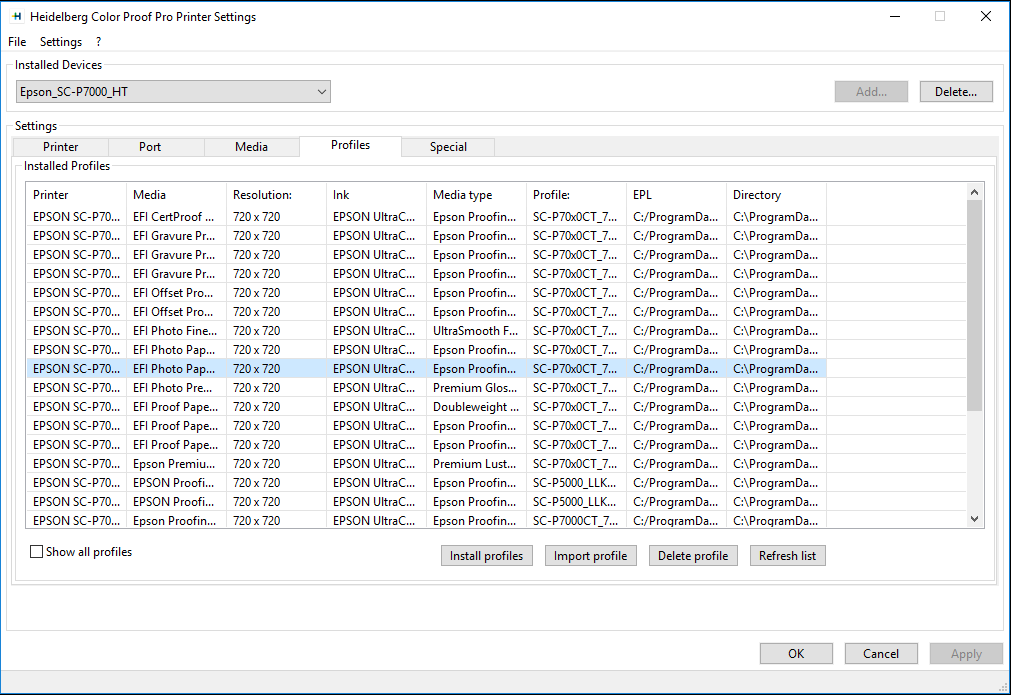
It is mandatory to assign color profiles for the used paper types to the printer to ensure correct color reproduction.
Option "Show all profiles"
With this option enabled, all profiles installed in the system are shown, not only those for the selected printer.
Installing predefined profiles
For each supported printer, the Color Proof Pro installation comes with standard profiles for appropriate paper types. You can transfer these profiles to the Color Proof Pro software with the "Install profile" (1) button. These profiles are assigned as possible selection to the respective printer.
Note: We strongly recommend that you create custom color profiles and use these for proofing to obtain the best color settings of the printer. You generate such color profiles with the calibration functions offered by Color Proof Pro. See Calibration – General or Create ICC Profiles in Automatic Mode.
Import profiles
With the "Import profile" (2) button, you can or must import existing custom profile files to Color Proof Pro. These profiles are assigned to the printer selected in "Installed Devices".
Deleting profiles
With the "Delete profile" (3) button, you can delete one profile or several selected profiles. After clicking this button, you have to confirm a safety query.
Note: Please note: A physical combination of profile and calibration could be displayed several times if it is compatible with different printer types. Deleting will also remove all compatible combinations that are not selected.
Refreshing the list
You should click the "Refresh list" (4) button after you installed or imported profiles. This will verify the list and ensure all existing profiles appear in the list.
12.When all necessary profiles are imported or installed, click "Apply" (5) to accept the settings.
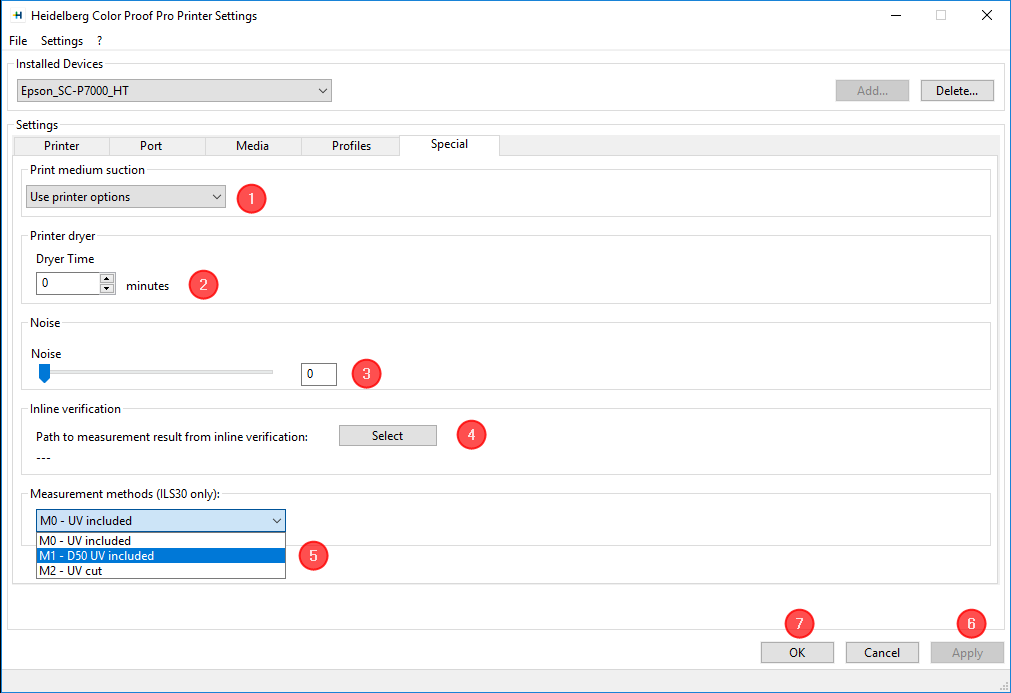
13.Go to the "Special" tab.
In this tab, you can make special settings some of which are available for specific printers only. In other words, the groups (1) and (2) can contain different options depending on the printer model that is selected.
"Print medium suction" (1) parameter
This option is available for some printers such as the Epson Stylus Pro 7890. These printers have a device that holds the print medium to the paper guide by way of suction. The list box lets you adjust the suction or choose the printer's settings.
"Dryer Time" (2) parameter
In this box, you can choose a Dryer Time in minutes. The dryer time affects the automatic process, for example until a subsequent color measurement starts.
Note: The dryer time depends on the paper and the ink. It should be set so that the colors are completely dry before measuring starts.
Parameter "Output Tray"
This option is only offered for printers that have different output trays or finishing options. You can select the tray you want in the list box.
"Noise" (3) parameter
With the "Noise" parameter, the reproduction of transitions in shades can be made "softer". You may have to experiment to find the setting that provides the best results.
By default, the value for "Noise" is set to 10% for printers of the HP Designjet Zx100 family. You can change this value if necessary. This can be the case if you see breaks in your proof.
"Inline verification" (4) parameter
This is where you can set the path for the IT8 output files of inline verification.
During certification label printing, a special test chart is measured by the internal measuring device of the printer and the result is also printed on the test chart page as a label. In addition, the measured data are saved to an IT8 file. This IT8 file can be read and evaluated by Prinect Color Toolbox. The file names are made up of the job name and the date. You can use "Select" to set the target folder where the IT8 file will be stored. By default, the "HD_Temp\Renderer\CPPro\Output" folder is set.
"Measurement methods (ILS30 only)" (5) parameter
This is where you can select a measurement method for the internal measuring device (optional) for Epson x900 and x890 printers. Up to the end of 2014, this measuring device was an X-Rite ILS20. As of the beginning of 2015, new proofers will be fitted instead with an X-Rite ILS30. This measuring device is supported by Color Proof Pro 6. The ILS30 supports measuring modes M0, M1 and M2. In this case, you must select "Epson SpectroProofer (ILS30)" for calibration.
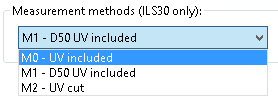
To define the suitable measuring mode also for page outputs (e.g. for certification label printing or for profile optimization), you can set the measuring mode of the colorimeter in the "Special" tab:
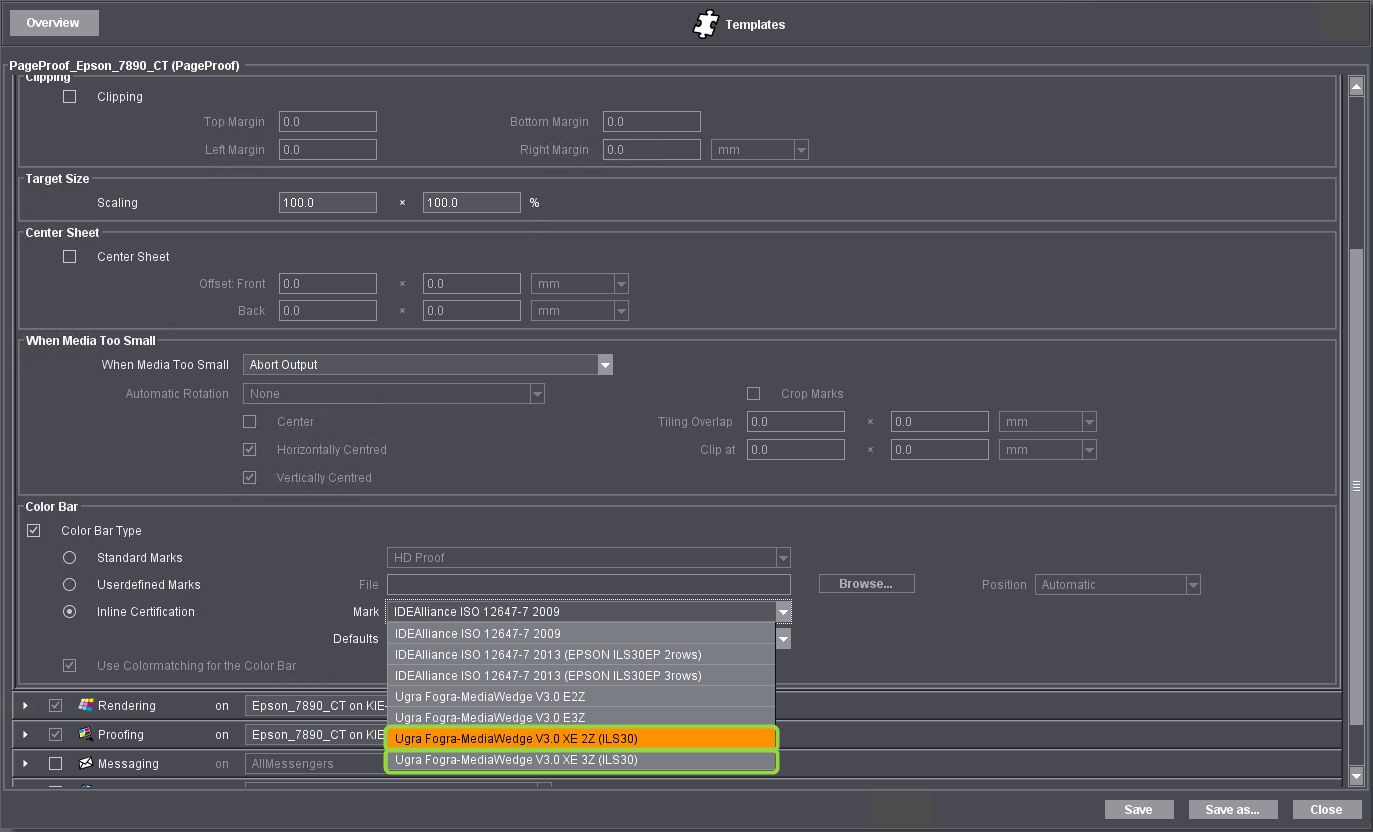
Note: If you are going to use the ILS30, you must set the color control bars designed especially for this measuring device in the Prinect Cockpit. It is important that this is set because the ILS30 is not detected automatically.
To do this, in the PageProof sequence you must select a suitable color control bar in "Imposition > Color Bar > Inline Certification":
•Ugra Fogra-MediaWedge V3.0 XE 2Z (ILS30) or
•Ugra Fogra-MediaWedge V3.0 XE 3Z (ILS30).
These are two and three-line variants of the Fogra MK3 strip.
14.When all necessary special parameters are set, click "Apply" (6) to confirm your settings.
15.Click "OK" (7) to finish the printer setup. The window "Printer Settings" closes.
"Special" Tab for HP DesignJet Z6- and HP DesignJet Z9 Printers
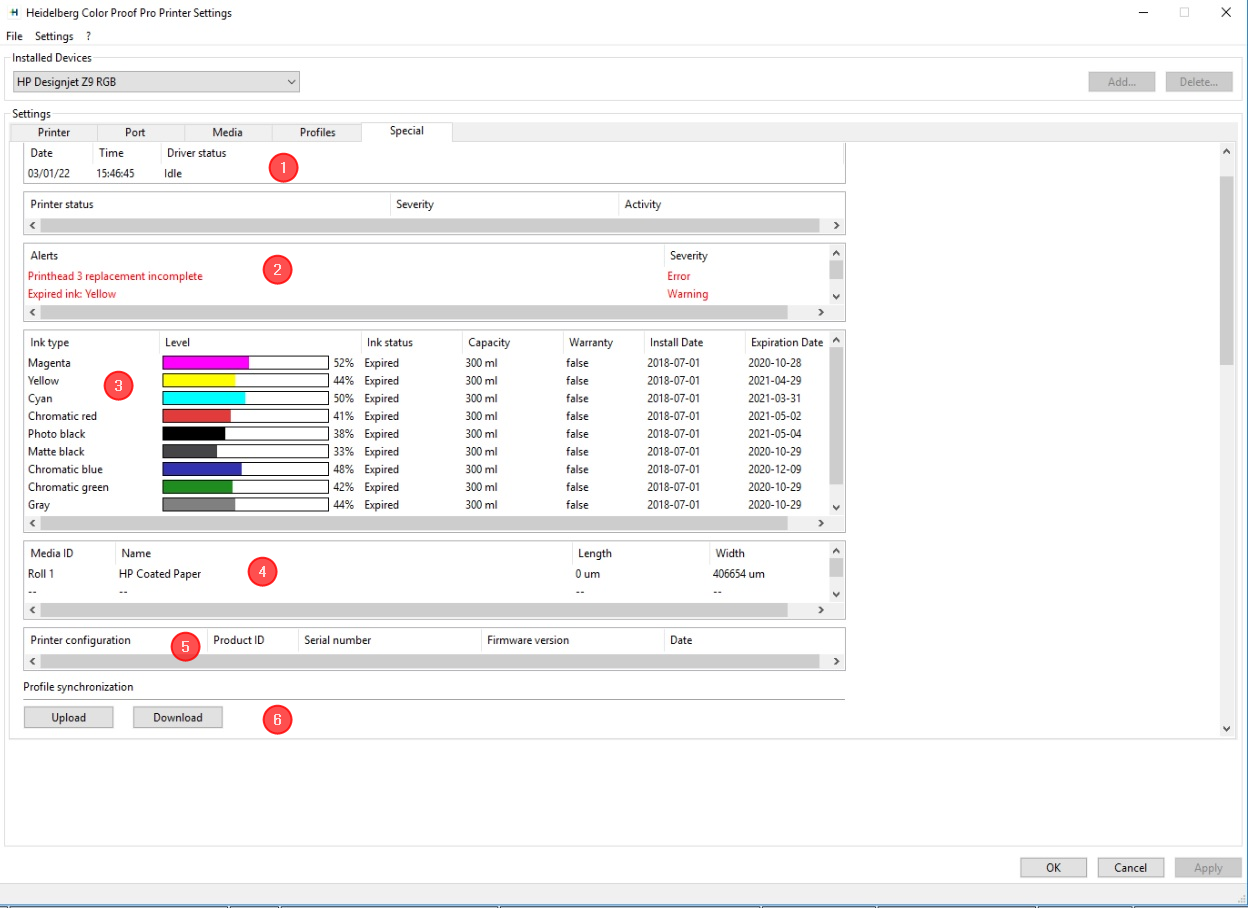
The "Special" tab is different for HP DesignJet Z6 / Z9 printers as for other Printers. This tab contains the following elements:
Information Area (1)
Here you get actual information on the printer status.
Warnings (2)
Here printer-specific warnings are displayed.
Ink Information (3)
Here you get detailed information on the individual ink cartridges.
Media Information (4)
Here you get information on the papers available at the printer.
Prineter configuration (5)
Here you get information on the individual properties of the set up printer.
Profile synchronization (6)
The HP DesignJet Z6 / Z9 printers can internally store color profiles. With these buttons you can access this profile storage:
•"Upload" button: you can upload the color profiles (local profiles and/or portable profiles) from Color Proof Pro into the internal profile storage of the printer. Then these profiles can be used e.g. on a second, external computer which is connected to the printer.
•"Download" button: You can download the color profiles stored on the printer for using and saving in Color Proof Pro.
Note: Some of the following settings have no influence on the operation with the Prinect Renderer (Prinect Production). Therefore these functions are not described.
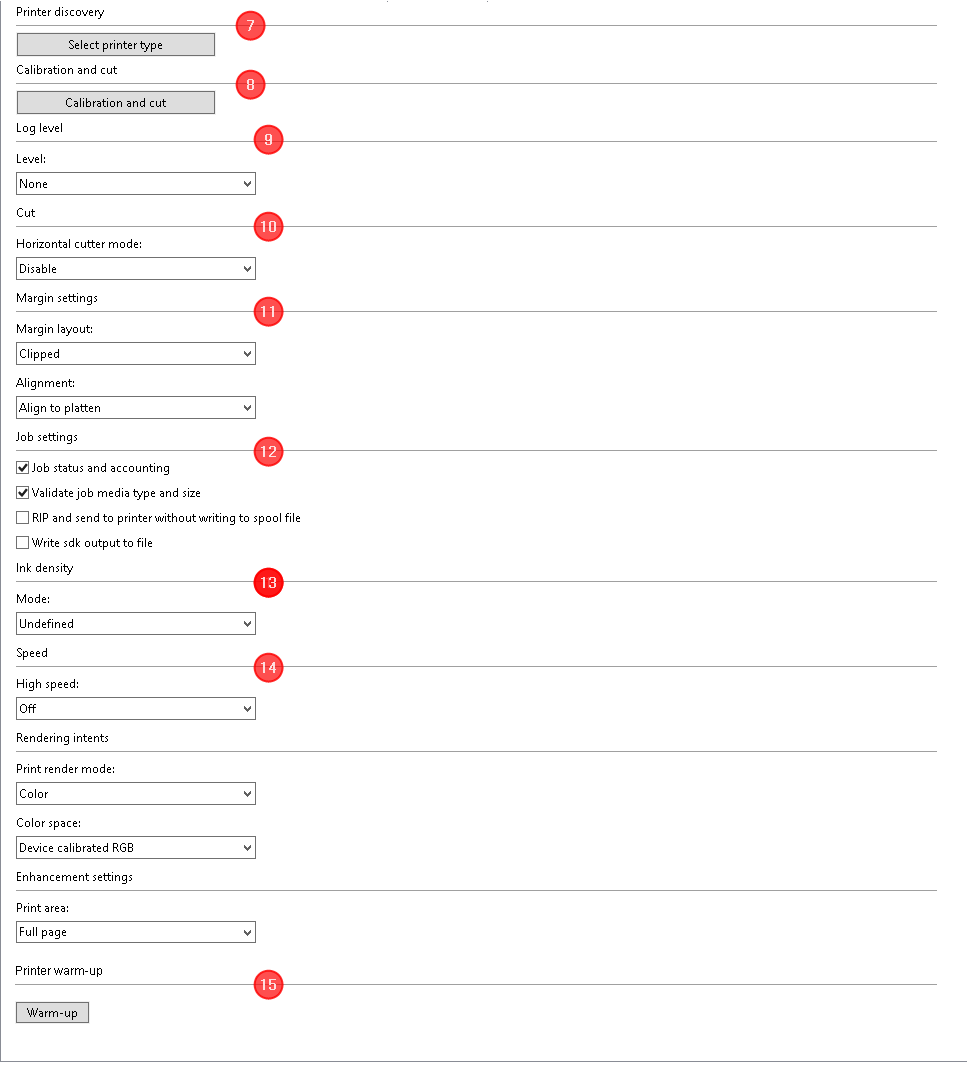
Prineter discovery (7)
Here you select the printer you want to configure and control. If more than one HP DesignJet Z6 / Z9 printers are available in the system environment, you can select the desired printer here. Clicking the "Select printer type" button opens the "Select printer type" window.
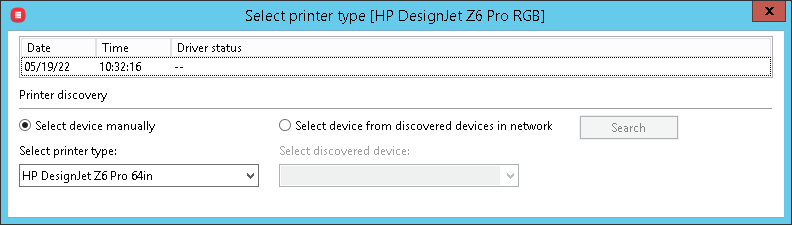
•"Select device manually" option: here you can select the type of the HP DesignJet Z6 / Z9 printer manually.
•"Select device from discovered devices in network" option: If one or more HP DesignJet Z6 / Z9 printers are accessible in the network, you can select the desired printer here.
After selecting the printer, close the window by clicking on the "X" in the top right corner of the caption.
Calibration and cut (8)
Clicking the "Calibration and cut" button opens the "Calibration and cut" window. Here you can set up printer-specific functions.
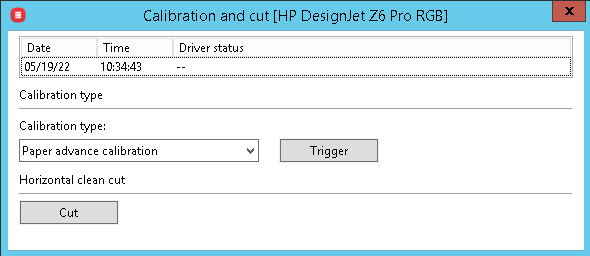
•Calibration type: Here you can calibrate the printer head alignment or the paper advance. With "Trigger" the respective calibration is triggered.
•Horizontal clean cut: Clicking the "Cut" button triggers the cut.
Close the window by clicking on the "X" in the top right corner of the caption.
Log level (9)
In the "Level" list box you can select which information is included in the printer protocol.
Cut (10)
In the "Horizontal cutter mode" list box you can select if the cutting is activated or deactivated for the whole job and/or for the last page only.
Margin settings (11)
In the "Margin layout" list box you can select between different settings for the sheet content alignment.
Job settings (12)
Here you can set up the information transfer between the printer and the renderer and/or the job processing.
Ink density (13)
In the "Mode" list box you can choose between different settings for the ink density used for printing.
Speed (14)
In the "High Speed" list box you can switch the high speed mode on or off.
Printer warm-up (15)
By clicking the "Warm-up" button you can trigger the warm-up process.
Click on "OK" to finish the printer setup. The "Printer "Settings" window is closed.
Note: After finishing the setup of a HP DesignJet Z6 / Z9 printer the renderer engine must be restarted. For this, open the Prinect Maintenance Center and open the "Supervisor" view. Mark the "Prinect Renderer Highres" component in the component list and restart the component. You can obtain detailed information in the Prinect Maintenance Center online help.
Privacy Policy | Imprint | Prinect Know How | Prinect Release Notes