
X-Rite eXact supports all filter conditions compliant with ISO 13655:
•M0: non-specified illumination (measurement used to date)
•M1: D50 daylight illumination (optimal illumination of new standard)
•M2: UV cut filter (IC-NG, fluorescent whitening agents in papers have no impact)
•M3: Polarization filter
X-Rite eXact does not need any external filters, making it easy to use. It has an external switch for the M1 filter condition. If you select M1 in Color Toolbox and the M1 switch is not set, you will see an error message about this when you go to connect the device. In this case, you must set the switch from "M0-M2-M3" to "M1". After that, you must connect the measuring device again in Color Toolbox.
The reference white tile is built into the sensor head and is swung into the beam path when required. For calibration, place the measuring device in its support and start calibration in Color Toolbox.
You can switch between the spot mode (single measurement) and the scan mode using X-Rite eXact. In Color Toolbox you must also select the correct mode and run calibration again after you switch mode.
Note: Color Toolbox also supports the X-Rite Exact 2 (spot and scan mode).
1.After calibration, you place the measuring device on the color patch you wish to measure.
2.On its integrated display, the device tells you that it is connected to the PC.
3.You start measurement by lowering the measuring device. The display shows you the measuring process during measurement.
4.At the end of measurement, you will hear a beep and see a message, informing you that measurement is finished.
The displays let you monitor the current measurement condition.
If the device does not measure for a certain period, it automatically switches to the "sleep mode", and the display dims and is empty. You must switch it on again before you connect it for a repeat measurement in Color Toolbox.

Note: The "eXact-Scan" option is required for the scan mode.
To use it, the "X-Rite_eXact_Driver.exe" driver software in "...\Prinect Color Toolbox\USB_Drivers\XRite" must have run.

Note: To work in scan mode, use the test charts of the XRite i1Pro (scan).
1.Select "X-Rite-eXact (Scan)" in Color Toolbox and calibrate it.
(2).In M0, M2 and M3 you must measure printing material again to conclude calibration (confirm the message and measure paper white).
3.When you click the "Start" button in Color Toolbox, the device goes to the scan mode (can be seen by the LED of the sensor).
4.Position the sensor on the first patch of the element you wish to measure.
5.Press the sensor down and start measuring.
The display first shows the initialization icon, then a white circle for every correct scan. Make sure to move the device evenly and at the right speed. If you move too quickly or too slowly, there is not enough contrast for the sensor and a red circle appears as an error message on the display.
The sensor automatically detects the last measure patch and finishes measurement correctly if you move the device too far.
eXact with Bluetooth connection
Color Toolbox not only supports the X-Rite eXact via USB cable connection but also in Bluetooth mode.

Prerequisites:
- The Bluetooth mode of eXact is switched on
- The eXact Bluetooth USB dongle is plugged in at the PC
- The eXact is enabled in the operating system.
After selecting the X-Rite eXact and clicking "Connect", the system first searches for known eXact devices in Bluetooth mode.
If the search is successful, the eXact BT devices are offered in a selection dialog. If no Bluetooth devices are found, a search for an eXact connection via USB cable is performed.
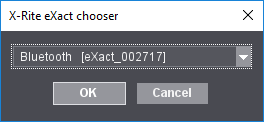
When the eXact is fully powered up and set to Bluetooth mode, it can be connected with "OK".
If the last used eXact is among the devices found, it will be automatically connected. In this case, the selection box does not appear.

Note: If the eXact is connected to the PC via a USB cable at the same time, the Bluetooth mode is switched off on the device and the device is connected via the USB cable.
When the calibration button is activated, the eXact is connected; and measuring the test chart in Bluetooth mode is now possible after a calibration and clicking on "Start".

Note: After the eXact has successfully established a Bluetooth connection, the device ID is automatically saved in "...Color Toolbox\Color Toolbox 21\settings\preference\CTSettings.ini". When the eXact connects the next time, the device with the saved device ID is searched for first. For example, the following entry can be found in the CTSettings.ini file: "Measure.DeviceSerialNum=002717".
Working with Bluetooth connection is possible in both spot and scan modes. After successful connection, calibration and clicking on "Start" in scan mode, the message dialog for measuring a color control strip appears (measuring takes place from left to right).