
Binding, gluing folding cartons, folding, cutting, die-cutting
The operations shown are sorted by sheets (in binding, sorted by product or product part). Within a sheet, the operations shown are sorted by their order in the production run. In the "Folding" and "Cutting" planning steps, each folding sheet is listed at least once, even if it is not assigned an operation.
You can add and delete operations. To do this, select an operation and click one of the following buttons:
Split Amounts
The selected operation is split into two equal operations. As a result, the total amount can be split and produced in parallel on several machines.
Note: Be sure to make several plate sets if you want to print on several machines at the same time. The "Platemaking" step does not indicate any additional plate sets.
Merge Amounts
Select several operations whose amounts you split in an earlier step and combine them together again with this button.
New Operation Before
The inserted operation is processed before the currently selected operation during the production run. At the same time, a predecessor operation can also be created for several operations (with multiple selection).
New Operation After
The inserted operation is processed after the currently selected operation during the production run. At the same time, a subsequent operation can also be created for several operations (with multiple selection).
Add Stock Quantity
This function lets you create a new operation for adding a production volume to stock. As a result, you can use available capacities, for example, and produce in advance for a later repeat job. You will find a description of how to define a quantity for adding to stock and to withdraw a quantity in a repeat job in Change Press Assignment to a Different Format.

Note: Remember there is no automatic feedback to stock management.
The following window opens when you select this item:
Stock Quantity
Amount: This option lets you enter the quantity to be added to stock.
Remove Quantities from Stock
This function lets you create a new operation for a stock withdrawal. This gives you the option of removing a quantity for a product part from a predecessor job (e.g. the cover of a booklet).
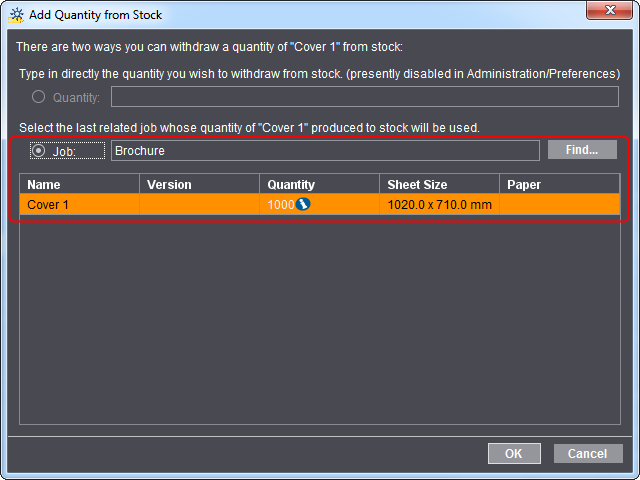
When you click the menu item, the "Add Quantity from Stock" dialog opens.
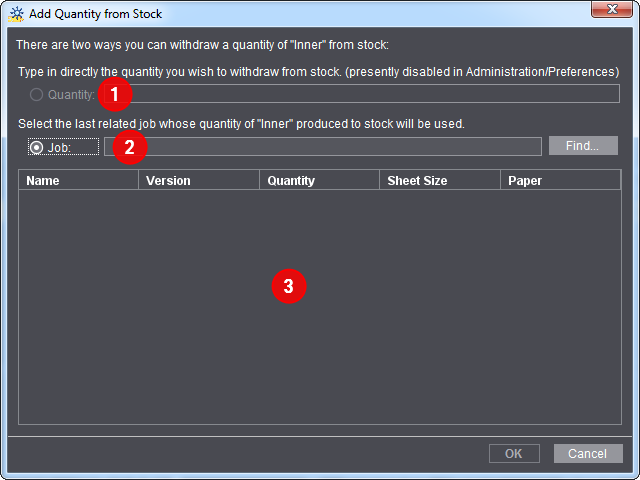
•"Quantity" (1)
This box is active only if you enabled "Stock withdrawal: Allow manual input of quantities" in the Preferences. To do this, go to "Administration > Preferences > All Users > Planning Assistant".
The quantity you enter in this box is sent to the system, informing it about a quantity you would like for withdrawal. This quantity is filed in the current job but has no impact on other jobs or stock management. This requires that you know exactly that the quantity needed is already in stock.
•"Job" (2)
Use the "Find" button to select a predecessor job from which you wish to withdraw a quantity.

Prerequisite: A quantity for adding to stock must have been defined for the selected predecessor job in order for operations with such a quantity to display in the list (3). Not only that, the operation names of the predecessor job and of the current job (the repeat job) must be identical and the current job must be a real repeat job. You will find details about how to create a repeat job in Repeat Jobs.
Example for stock withdrawal
In the example below, we will describe how you withdraw stock from a predecessor job.
A booklet with a cover and body will be produced in a master job for this. The cover of the booklet is to be pre-produced for a later repeat job. In the master job, 1000 copies of the cover will be added to stock for this.

Note: We will not describe manual stock withdrawal in this example.
Proceed as follows for stock withdrawal from a predecessor job:
1.Open the master job where you will pre-produce a certain quantity of a product part (in this example, the cover) for a later job.
2.Go to the Planning Assistant with "Edit > Scheduling".
3.Go to the "Cutting" step.

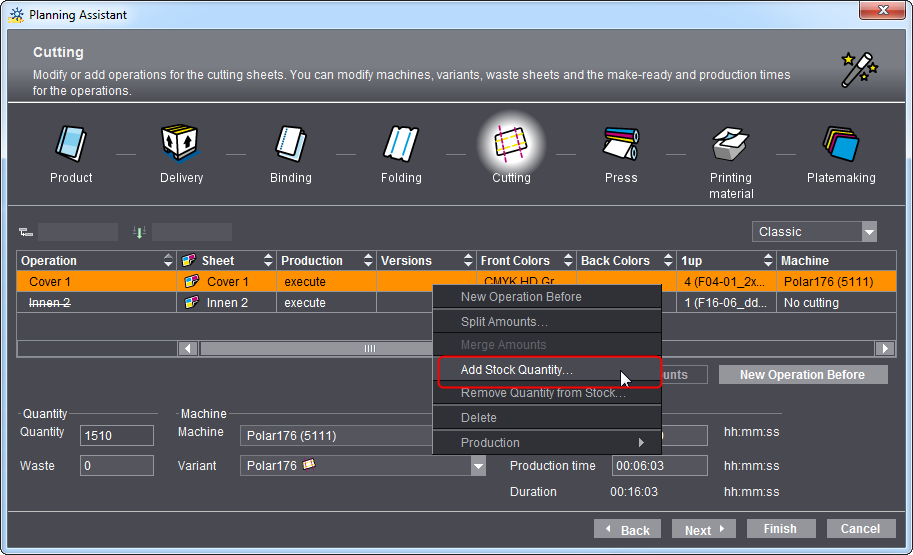
4.Select the operation for the cover and click "Add Stock Quantity" in the context-sensitive menu.
The "Stock Quantity" dialog displays.


5.Enter the quantity you want to produce to stock. In this example, 1000 copies.
6.Click "OK".
A new operation for adding to stock is created automatically.

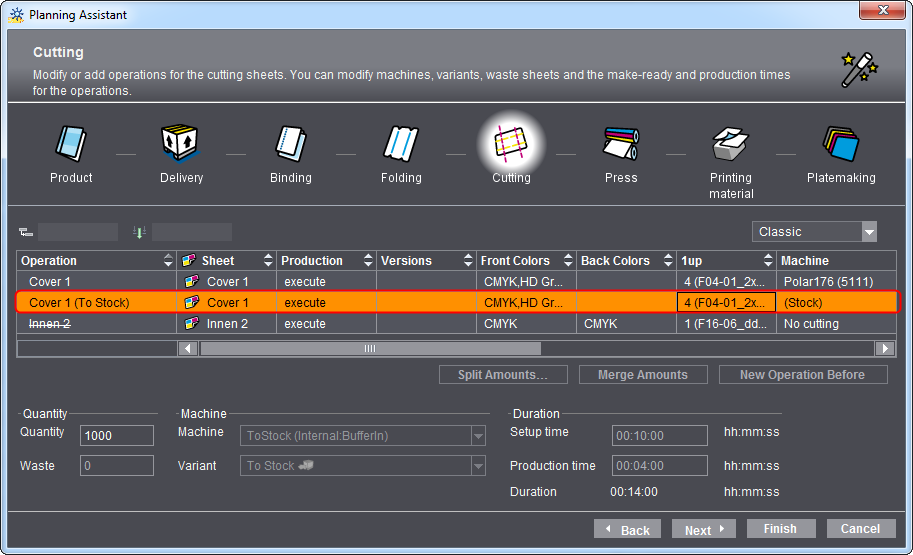
This operation also displays in the process chain in "Processing" as "Stock_ToStock".
This concludes all steps for adding to stock.
In the next step, we will describe how you can remove the quantity in the repeat job from the stock of the master job.
7.To do this, create a repeat job of the master job.
You will find details about how to create a repeat job in How do I create a repeat job and import the data from the previous job?.
8.In the open repeat job, go to the Planning Assistant with "Edit > Scheduling".
9.Go to the "Press" step.
10.Select the operation for which you wish to remove a quantity from stock.

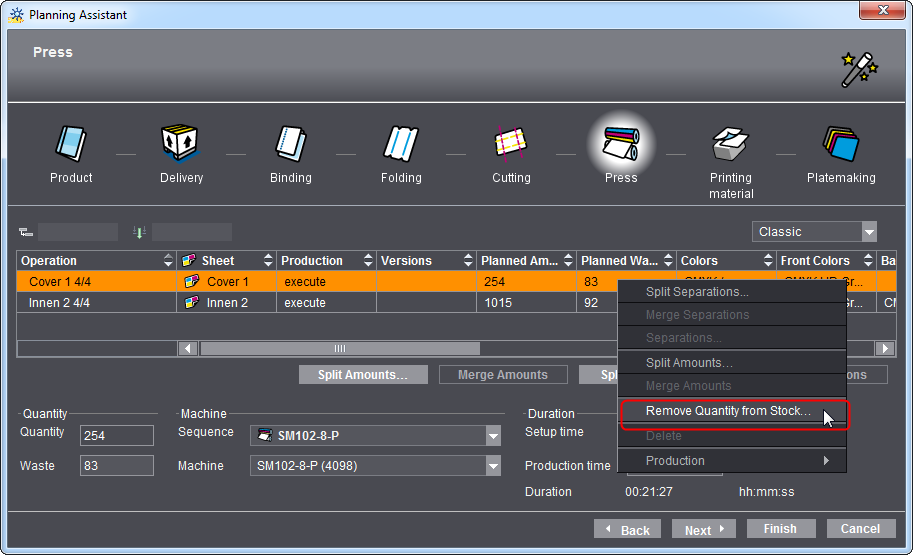
11.Select "Remove Quantity from Stock" in the context-sensitive menu.
The "Add Quantity from Stock" dialog opens.

12.Select the "Job" option.
The "Quantity" option is designed solely for manual stock withdrawal.
In our example, we only need the "Job" option because this is a repeat job.
In the "Job" option, the predecessor job with its quantity of 1000 copies added to stock is detected automatically. An "i" indicates that only a subset of the stock quantity is needed and that an operation for producing to stock again will be created automatically.
13.Click "OK".
A new operation for stock withdrawal is created automatically. This operation also displays in the process chain in "Processing" as "Stock_FromStock".
In addition, a new operation for adding the residual quantity to stock will be created in our example.
This concludes stock withdrawal.
"Production" in context-sensitive menu
•delegate
Use this function to remove the selected operation from processing of the current job. This lets you run this operation in another job. This function is used, for example, in gang jobs. Delegated operations are dimmed.

Note: Remember that this is not assigned automatically to another job.
•execute
Use this function to return an operation set to "delegate" back to "execute".
"Machine" / "Variant" list boxes
Select the machine you want and the variant of this machine you want. If allowance, setup time and production time are set up for the selected machine, then these data are set by default in the input boxes. (You can view the setup of the machine in the device assistant in "Administration > System > <name of Prinect server> > CDM > selected machine > Edit" context-sensitive menu.) The "SheetFinishing" and "StitchFinishing" sequences are set up automatically based on the selected machines and variants.