Example: PDF Workflow and Page Approval
In this example, we will show you all the steps that are needed for approval of PDF pages. This includes creating users and a customer, creating a job with the "Qualify" and "SendAssembledPDF" sequences and approval of the PDF pages on the Prinect Remote Access Web User Interface.
Prinect Cockpit: Permission to Use Prinect Remote Access
First of all, you must make sure that you can work with Prinect Remote Access at the Prinect Cockpit.
You will only see "Remote Access" if you as a user of the Prinect Prepress Manager have permission to "Use Remote Access PlugIn".
The default permission group "RemoteInternalUsers" has precisely this permission. Assign all the users who will work with Prinect Remote Access to this permission group.
Proceed as follows:
1.Go to "Administration > Users".
2.Click "Groups" on the left.
3.Select the "RemoteInternalUsers" permission group in the group list.
4.Select all the users that you wish to add to this group from the "Available Users" list.
5.Click "Add". You will now see all the members of the selected group in "Members". These users can work with Prinect Remote Access at the Prinect Cockpit after you save your data.
6.Click "Save".
Prinect Cockpit: Set up users and customers
In this example we will set up a customer (company) with an external user. We will also set up an internal user configured as the customer's sales representative.
Prinect Cockpit: Setting Up An Internal User
1.Open user administration in the Prinect Cockpit ("Administration > Settings > Users" > "Users").
2.Click "New". The "Create User" dialog opens.
3.Type a user name and a password and click "OK".
If you are a Windows user, make sure that the user account and password are identical on the Prinect Prepress Manager and on the Prinect Remote Access server. (Enter the other settings as desired.)
4.Click the "Properties" button.
You must specify at least a family name and an e-mail address for the contact.
5.Click "Apply" and then "Close".
6.The internal user is now to become a member of the "CustomerSalesRepresentatives" group.
The user has to be selected in the list of users. Select the "CustomerSalesRepresentatives" permission group in "Available Groups".
7.Click "Add". Now you see the "CustomerSalesRepresentatives" permission group under "Member of".
8.Click "Save". The user is now a member of this permission group.
Prinect Cockpit: Setting up a Customer with Contact and (Customer) Person
To set up a customer as an organization:
9.Open customer administration in the Prinect Cockpit ("Administration > Settings > Customers"). When user administration is open, like in this example, click "Overview > Settings > Customers".
10.Click "New" below the list of customers. The "Create Customer" dialog opens.
11."Sector": Choose "Business".
12."Name": This is where you enter the customer (company) name.
13."Customer ID": Enter a customer ID in this box.
Assigning a nickname is optional.
We will not create any person now either since this person would automatically be allocated to the "Customer" contact type. For Prinect Remote Access, we need a person with the "Approver" contact type instead.
14.Enable the "Remote Access" option.
A permission group is automatically created for the new customer if the "Remote Access" option is set. We configure the group name as follows: The name is to always start with "X" (for external), to be followed by the customer name, i.e. Xcustomer name. (For group name parameters, see "Administration > Preferences > Permissions").
All persons belonging to this customer (now or later) are always member of this permission group, i.e. they have all permissions of this group.
15.In the "Quota" box, specify the space in Gigabytes you want to allocate to the customer on the Prinect Remote Access server.
In our example, we type "5".
16.Click "OK".
Assign permissions to the customer permission group
17.The "Remote Access" dialog displays automatically.
The "Selection" box shows you the name of the automatically created customer permission group. Below that, you see the individual permissions for Prinect Remote Access. The permission will be allocated to the group if you enable it. Allocate the following permissions:
·"Express Upload"
·"Mail on create Job"
·"Job Status"
·"Preflight Report"
·"Web Access"
·"Job View"
18.Click "OK".
To assign an internal user (customer sales representative or contact) to the customer
19.The "Assign CSR" dialog displays automatically.
Our internal user is defined as Customer Sales Representative for our customer. For that reason, we assigned the internal user to the "CustomerSalesRepresentatives" permission group. For only members of this permission group are available potentially as contacts for customers.
20.Assign the customer sales representative you want to your customer with "Add" and confirm with "OK".
This allocation automatically makes the customer sales representative a member of all permission groups specific for Prinect Remote Access, i.e. the customer permission group and the "RemoteAdministrators" and "RemoteUsers" groups.
Setting up a (customer) person with "Approver" contact type
21.You must now set up a real person for your customer (who is an organization). This individual must be assigned "Approver" as the contact type. (In this example we assume you have not yet set up any "Approver" contact type.)
The customer is selected in the list of customers.
Click "New" in the button bar at the top. The "Create Contact" dialog displays.
22."Contact Type": Select "Approver" in the list.
23."Person": Click "New".
The "Create Contact" dialog displays. We now create a new person for the "Approver" contact type.
24.In this example we type a family name only: "DemoPrintbuyer"
25.An email address is mandatory for this person.
Click "New" below the "Communication Channels" section. The "Phone" entry appears.
26.Click the "Phone" box and select "E-Mail" in the list.
27.Click the neighboring text box and type the email address for this example.
28.Click "OK".
You return to the "Create Contact" dialog.
To set up a (customer) person as external user
29."User" section: You must set up an external user account for this person here.
Enable the "Is External User" option.
This external user automatically becomes member of the customer permission group and has the appropriate permissions (see Assign permissions to the customer permission group).
30."User name": You can edit the suggested user name.
31."Password": Assign your password with at least six characters in this box.
(32)."External Administrator" In this example, the user does not need administrator permissions to operate the Web User Interface. However, if you continue working with this user and later wish to create new users at the Web User Interface and change user accounts, then you must assign the "External Administrator" here by setting this option.
The external user becomes a member of the "RemoteAdministrators" permission group (in addition to the customer permissions group) when this option is set. This means he has the permissions of both groups.
33.Click "OK".
The new "Approver" contact now appears in the top left list box. You can view the new person in the "Person" area. You see the appropriate e-mail address in the "Communication Channels" section.
34.In "Remote Access", you will find a list box with workflows. The customer can use all the workflows if you do not select anything. If you select a workflow, the customer is restricted to this workflow.
In our example, we will not select anything.
35.Click "Save" at the bottom right in customer administration.
This individual receives (for reasons of safety) two e-mails, one e-mail with user name and URL, and a second e-mail with the password. The user can now log in at the Web User Interface with this data.
You have now made all settings in the customer and user administration required for Prinect Remote Access operation.
1.Click "Administration > Templates > Sequence Templates".
2.Click "Qualify".
3.Click "New" in the button bar at the bottom.
4."Remote Access" work step: Tick this option.
5.Click the arrow to the left to open the "Remote Access" step.
Do not change the following settings:
•The "Express Upload" option remains enabled to have job data imported into the job automatically when they are uploaded.
•The "Notify Customer when Job is Created" option remains enabled, which means that the "Org_DemoPrintbuyer" customer is notified by e-mail when a job was created for him/her.
•The "Generate Token Links in E-mail Communication" option remains enabled, which means that the links in the e-mail notifications will guide you to the respective upload or approval functions automatically.
6.Leave the "Approve Page" work step enabled and open it.
•Enable the "Production Approval Follows Customer Approval Automatically" option. This means: the Production Approval is given in Prinect Cockpit for each page the customer approves, and the job is processed automatically.
If you do not want this to happen automatically because you wish to inspect the pages in Prinect Cockpit, you have to give the Production Approval manually in order to have the job processed.
7.Save and close the sequence.
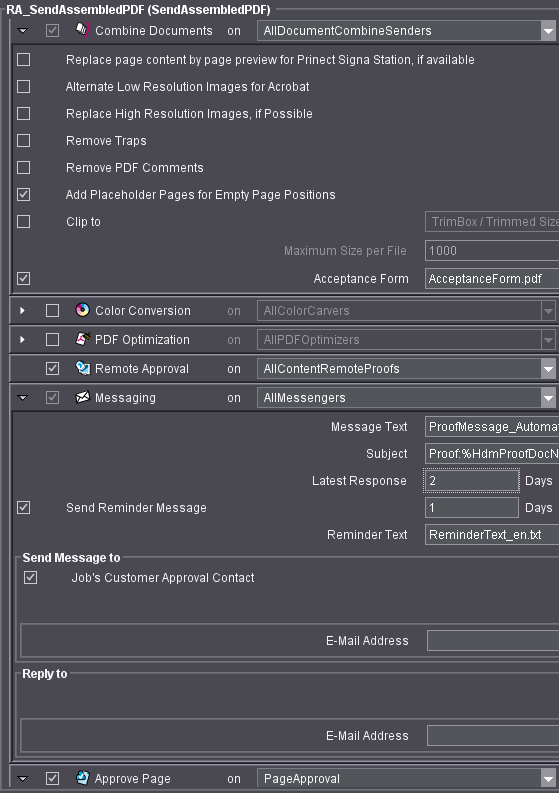
8.Click "SendAssembledPDF".
9.Click "New" in the button bar at the bottom.
10.Open the "Combine Documents" step.
•"Maximum Size per File" and "When Maximum Size is Exceeded": Disable this function by clicking the box in the list box.
•"Acceptance Form": Select an acceptance form with "Browse". Forms that contain the text "Login" force you to enter your user name and password for approval.
Remember that you must select an acceptance form in this step so that an approval process is possible.
11.Enable the "Remote Approval" step.
12.Open the "Messaging" step.
•"Message Text": This message text is sent in the email to the customer informing him that an approval is pending.
Select the text file you want.
•"Subject": We will leave the suggested text and variables for the Subject line of the e-mail as they are. See also "Messaging" work step .
•"Latest Response": The response deadline indicates the last date for giving approval.
•"Send Reminder Message": If you do not receive the approval by the set deadline (see Latest Response), you can send a reminder to the customer using the "Reminder Text" you selected.
•"Send Message to": This section indicates the email addresses to which the notification email is to be sent.
The e-mail will be automatically sent to all persons of the "Approver" contact type, in our example to "DemoPrintbuyer".
•"Reply to": Type the e-mail address of the internal user (CSR), in our example, "DemoPrinter".
13.Check the "Approve Page" step, open it and set another checkmark for "Production Approval Follows Customer Approval Automatically". Production approval is then automatically set after each customer approval. Production approval is essential to continue with the next steps of your work at the Prinect Cockpit.
14.Save and close the sequence.
15.Go to "Jobs" in the Prinect Cockpit.
16.Click "New Job".
17.Enter the following job parameters:
•"Basic job data": "Job number", "Jon name", "Start Job" enabled;
•"Customer Data":
"Customer name": This is where you select the customer for whom you want to create the job, in this example "Org_DemoPrintbuyer". The appropriate customer number automatically appears in "Customer ID".
•"Processing": Click "Add" and select the generated Qualify and SendAssembledPDF sequence you want.
•"Scheduling":
"Set Due Date": Enter a date here. This date appears in the notification email to your customer if an approval is pending. (You can also enter this date later when the job is open in "Jobs > Job Settings > Properties > Set Due Date".)
18.Click "Finish".
The job is created, opened for inspection and started. Your customer will receive a notification email when you set up the job (the job need not be opened or started).
(Remember: We assigned the customer the "E-Mail on create Job" permission and enabled the respective option in the Qualify sequence of this job).
Logging in to Prinect Remote Access via Email
1.In this example, the customer person "DemoPrintbuyer" receives a notification email because we created a job for the "Org_DemoPrintbuyer" customer organization (see above).
Open the email. You also see "Job URL" and a link next to it.
2.Click the link. The current job opens in the web UI, and the Upload tab appears because we enabled the "Generate Token Links in E-mail Communication" option in the qualify sequence.
3.Open the Upload dialog with "Upload Files".
4."To": This shows you our internal user "DemoPrinter" (customer sales representative /CSR).
If you have several recipients who are all selected by default, you must select the ones you want.
5.By default, the job number appears in "Subject". Enter the desired text.
6.Click "Add".
7.Select the file to upload in the browser dialog and confirm with "Open". (You can also use drag-and-drop.)
8.Click "Upload".
9.Close the Upload dialog.
You return to the "Upload" tab in the open job after you close the Upload dialog. The upload just finished displays in the upload list. (If not, click the![]() icon to refresh the view.)
icon to refresh the view.)
During uploading, a Preflight was automatically performed. You will see a green tick in the Preflight column if the Preflight was successful. Click this symbol in the Preflight column to view the Preflight report. (Preflight parameters see "Preflight" work step ).
You can also see how the "Quota" value has changed: you use more storage space on the Prinect Remote Access Server after uploading.
After the upload is finished, an e-mail is sent automatically to the "DemoPrinter" internal user (customer sales representative).
Prinect Cockpit: Editing Job Data in the Job
(1).After the customer upload, the internal user "DemoPrinter" in the production shop receives an e-mail. The e-mail also contains the Preflight report as an attachment.
You will see the following if processing in the "SendAssembledPDF" sequence has reached the point where a customer approval is required:
·In the status area at the bottom of the job.
·In the "Pages" > "Pages" view work step: the "Status" column is shown for each page for which a customer approval is needed.
In this example, approval is done with Acrobat Professional.
1.Your customer received an email informing him/her that pages are waiting for his/her approval.
You automatically go to the "Page Approval" tab of the opened job in the web UI because we enabled the "Generate Token Links in E-mail Communication" option in the Qualify sequence. .
A prompt displays, offering you "Open", "Save" or "Cancel".
2.Click "Open" or "Save".
•"Open": The PDF file is not saved on the customer computer but only opened for processing.
•"Save": The PDF file is saved on the customer computer and opened for editing.
Acrobat opens and displays all pages, including the Acceptance form. The following picture shows the Acceptance form.

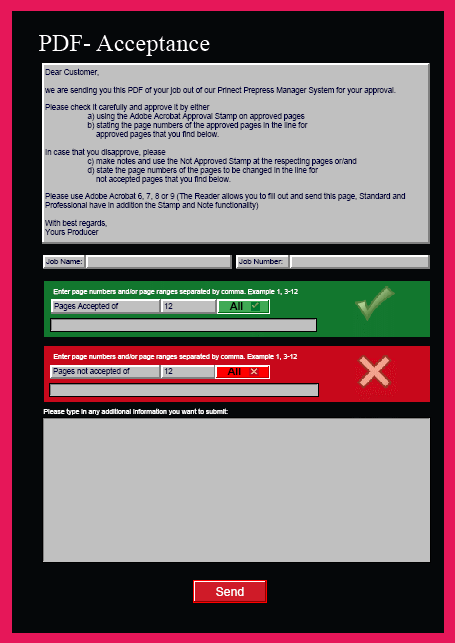
(3).You can add notes to the single pages and use the Approval Stamp on them if you use Acrobat Professional ("Comment > Markup").
Here is some information about this:
·If you marked a page with an approval stamp and you do not approve it later, you will be asked during approval whether you really wish to use this stamp.
·Prinect Cockpit: The notes and the approval stamps are sent together with the approved PDF file to the Prinect Prepress Manager where you can view them in "Jobs" > "Pages" step.
·Prinect Cockpit: The note is listed in the "Customer Approval Comment" column together with the approval comment from the Acceptance Form.
·Prinect Cockpit: Double-click the Acrobat Professional icon (in its column) to launch Acrobat Professional and view the PDF file with notes and approval stamp.
4.You cannot approve the PDF pages of a file separately. You must give all the PDF pages a status during the approval procedure. This means that each page must have been accepted in the green section or rejected in the red section.
We accept all pages.
To do this, click "All" in the green section.
5.Click "Send" to start the approval procedure.
6.Confirm any alert messages that may appear.
7.An Acrobat message telling you that the pages were successfully approved appears.
Confirm with "OK".
All pages are now approved. The production shop (internal user) automatically receives an email stating the approval of the pages.
8.Click "Refresh" below. The customer approval icon next to the pages changes:
|
|
Before approval |
|
|
After approval |
Prinect Cockpit: Finish the Job after Customer Approval
The production shop (internal user) received an email stating the approval of the pages.
1.Open "Jobs" > "Pages" step > "Pages" view in the Prinect Cockpit.
This lists all the pages.
·"Customer Approval Status" column: Here you see the approval icons for the pages the customer has approved.
·"Production Approval Status" column: Here you see the approval icons for production approval.
·"Customer Approval Comment" column: Any approval comment from the Acceptance Form and the Acrobat note are listed in this column.