Approval Workflows and Their Sequences
List of Key Workflows
There is a specific sequence for each workflow that you must always set up. All workflows must also contain a Qualify sequence (see For all workflows: Parameters of the Qualify sequence ). The present chapter explains only those settings that are specific for Prinect Remote Access.
•PDF data - approval of separate pages; specific sequence: SendAssembledPDF
Parameter setup: PDF data - approval of separate pages ;
Example: Example: PDF Workflow and Page Approval.
•PDF data - approval of the layout; specific sequence: SendImposedPDF
Parameter setup: Workflow PDF data - layout approval ;
Example: Example: PDF Workflow and Layout Approval.
•Ripped (TIFF) data - approval of separate pages; specific sequence: PageProof
Parameter setup: Ripped (TIFF) data workflow - approval of separate pages;
Example: Example of TIFF Workflow and Page Approval.
•Ripped (TIFF) data - approval of the layout; specific sequence: ImpositionProof
Parameter setup: Ripped (TIFF) data workflow - approval of the layout;
Example: Example of TIFF Workflow and Layout Approval.
•Express Upload: See Express Upload workflow
•Page assignment on the Web User Interface
Parameter setup: Page assignment on the Web User Interface ;
Example: Example of Page Assignment.
•Versioning; specific sequences: SendBookletPDF or BookletProof
Parameter setup: Workflow Versioning with Prinect Remote Access.
•WebToPrint
Parameter setup: WebToPrint Integration workflow.
•JPEG data - approval of separate pages; specific sequence: PageProof with RGB JPEG output;
Parameter setup: JPEG data workflow - approval of separate pages.
•Inviting employees
Parameter setup: Invite contributors for upload and download and for approval workflow.
Key differences between PDF and TIFF data workflows
•In the TIFF data workflow, bitmaps are generated for proofing in the "PageProof", "ImpositionProof" and "BookletProof" sequences. These are also called TIFF data in this documentation (do not mix them up with TIFF B data!). In other words, the PDF data have run right through the RIP and are ready for approval as screened data. The Heidelberg Pixel Proof Viewer is available for checking and approving the TIFF data (pages or layouts).
In the PDF data workflow, the job has not yet run through the RIP. Launch Acrobat to check and approve the PDF data (pages or layouts). An acceptance form is automatically added to the end of the Acrobat file.
•Images in the PDF files are generally low-resolution images (72 dpi) only (can be set in the Prinect Prepress Manager).
•Each TIFF page or layout always comes in a separate file. I.e. you must approve each of these.
You can group PDF pages or layouts in one or several files. In other words: you can simultaneously approve several PDF pages when they are contained in a single PDF file.
PDF data - approval of separate pages
Features:
•The job data is made of PDF data.
•Each PDF page is separately approved.
•You need at least the following sequences:
·"Qualify"
·"SendAssembledPDF"
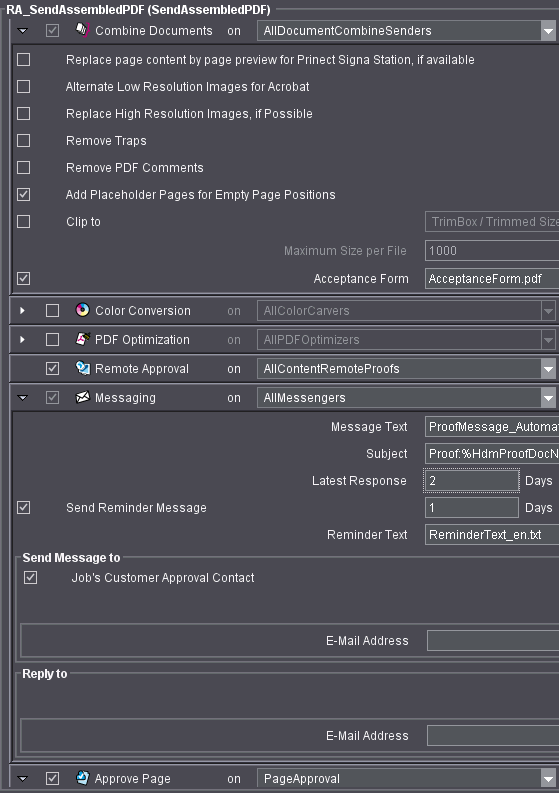
Parameters of the SendAssembledPDF sequence
"Combine Documents" work step > Set parameters for maximum file size
You can see the "Maximum Size per File" text box and the status information for the "When Maximum Size is Exceeded" option next to it in the second last line. This function lets you split files when they reach a specific size.
It is advisable to specify a maximum file size if you are working with the standard approval because the files are attached as e-mails.
This is not advisable if you are working with Prinect Remote Access. Splitting files is not desired except maybe for very large files. This would only complicate the approval process.
For that reason, disable this function by clicking the box in the list box.
"Combine Documents" work step > Select acceptance form
To approve the PDF pages, your customer will open the PDF file in Acrobat and find the attached acceptance form as the last page.
1.Select an acceptance form in this step so that an approval process is possible.
Below, you see the "Acceptance Form" text box with a default PDF file. Click "Browse" to open a dialog where you can choose from different default text files.
"AbnahmeFormular.pdf": German text
"AcceptanceForm.pdf": English text
"AcceptanceForm_ja.pdf": Japanese text
When Prinect Remote Access is installed, password-protected acceptance forms are available for these three languages. These forms contain the text "Login" and force you to enter your user name and password for approval. You can also edit these files or create your own PDF files. Remember that these files depend on the version of the Prinect Prepress Manager. For that reason, you cannot always use them on different versions.
Version 2.0 to 4.0: You must create these forms again.
Version 4.0 to 4.5: You can use the forms.
Version 4.5 to 4.5.1: You can use the forms.
Version 4.5.1 to 10.0: You can use the forms. (Version 10.0: The Acceptance Form also contains the job name and the job number.)
Version 10.0 to 11.0: You can use the forms.
1.Check this step. By doing this, you are able to work with Prinect Remote Access.
This is where you set up email parameters for the approval procedure. The customer will receive an email informing him that an approval is pending. The production shop receives an email when the approval has been given.
1."Message Text": This message text is sent in the email to the customer informing him that an approval is pending.
Verify that you have selected the desired text file for the message text. Click "Browse" to open a dialog where you can choose from different default text or HTML files.
"MessageText_de.txt": German text
"MessageText_en.txt": English text
"Message_Automatic_International.html": The correct language will be stored automatically.
(You can also edit these files or create your own files).
2."Subject": This is where you can define what will appear in the Subject line of the e-mail to the customers. You can enter any text you want as well as leave or delete the following variables:
%HdmProofDocName%: Document name
%HdmPrJobName%: Job name
%HdmPrJobId%: Job number
%HdmCustomerName%: Customer name (company or organization, not contact type or contact person)
%HdmMailIndex%: Index in the Subject line for split PDF proofs (irrelevant for Prinect Remote Access)
%HdmPartVersion%: Email designator in case the emails must be split.

Note: Depending on the email system you use, there may be certain restrictions regarding the number and kind of characters allowed in the Subject line. But every email system should warrant trouble free email traffic if the Subject line is shorter that 80 characters and does not contain any special characters or umlauts.
3."Latest Response": The response deadline indicates the last date for giving approval.
4."Send Reminder Message": If you do not receive the approval by the set deadline (see Latest Response), you can send a reminder to the customer using the "Reminder Text" you selected.
5."Send Message to": This section indicates the email addresses to which the notification email is to be sent. Click "New" to specify additional email addresses.
6."Reply to": Type the e-mail address of the internal user (contact) who is to be notified during approval. Click "New" to specify additional email addresses.
1.Open this step.
Once approved by the customer, the pages must also be approved by the production shop. Production approval can be given manually or automatically. But you can also specify in this section that production approval will automatically follow customer approval. Enable the "Production Approval Follows Customer Approval Automatically" option if you want this. The job then automatically continues after customer approval.
Workflow PDF data - layout approval
Features:
•The job data is made of PDF data.
•Each sheet is separately approved.
•You need at least the following sequences:
·"Qualify"
·"SendImposedPDF"
Parameters of the SendAssembledPDF sequence
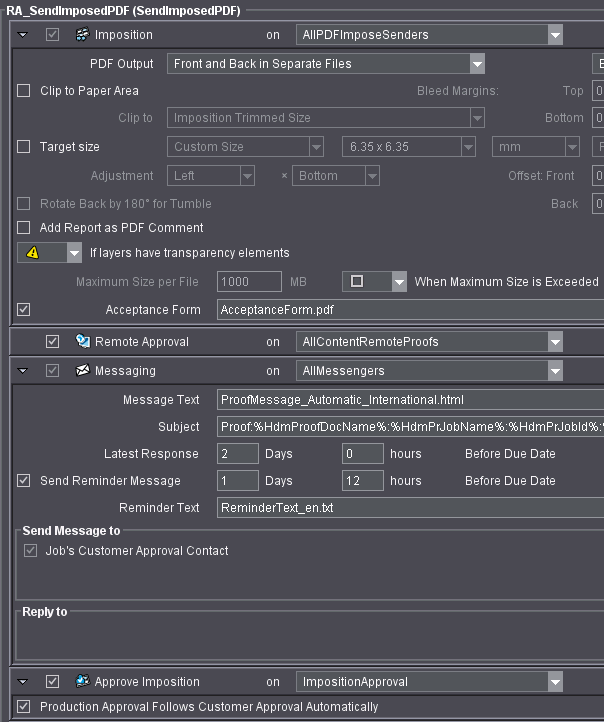
"Imposition" work step > "PDF Output"
We recommend that you set "Front and Back in Separate Files".
"Imposition" work step > Set the maximum file size
See "Combine Documents" work step > Set parameters for maximum file size .
"Imposition" work step > Select the acceptance form
See "Combine Documents" work step > Select acceptance form .
See "Remote Approval" work step .
See "Messaging" work step .
"Approve Imposition" work step
See analogously for an imposition scheme "Approve Page" work step .
Ripped (TIFF) data workflow - approval of separate pages
Features:
•The job data are PostScript or PDF data and are rendered as TIFF data ready for approval.
•Each page is separately approved.
•You need at least the following sequences:
·"Qualify"
·"PageProof"
Parameters of the PageProof sequence
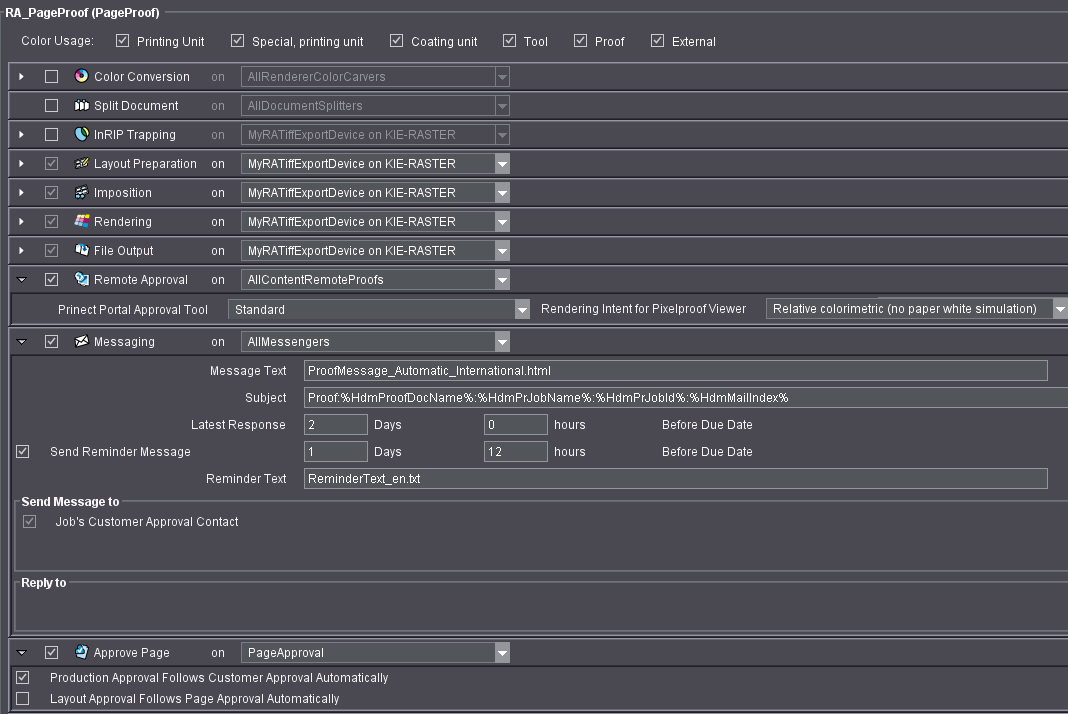
1.Check this step. By doing this, you are able to work with Prinect Remote Access.
2.Open the step.
3.Select the approval tool you want. The selected approval tool opens automatically if the customer's approver clicks the link in the approval e-mail.
·"Product Simulation (booklet/fold)": For JPEG approval, the product can be displayed in a booklet or layout simulation view. All folding schemes of the Heidelberger Fold Catalog folding in horizontal direction can be simulated.
·"Web Approval": Approval via the web UI or the Prinect Portal.
·"Pixelproof Viewer": Approval via the Pixelproof Viewer (Java-based) for TIFF data.
·"Standard": As default, the internal administrator can set either "Web Approval" or "Pixelproof Viewer" in the Prinect Cockpit Preferences.
4.Select Rendering Intent for the Pixel Proof Viewer in this step.
"Messaging" work step
5.Check this step. See "Messaging" work step .
See "Approve Page" work step .
"Rendering" work step
1.Disable the "Proof Color Management" option.
Ripped (TIFF) data workflow - approval of the layout
Features:
•The job data are PostScript or PDF data and are rendered as TIFF data ready for approval.
•Each sheet is separately approved.
•You need at least the following sequences:
·"Qualify"
·"ImpositionProof"
Parameters of the ImpositionProof sequence
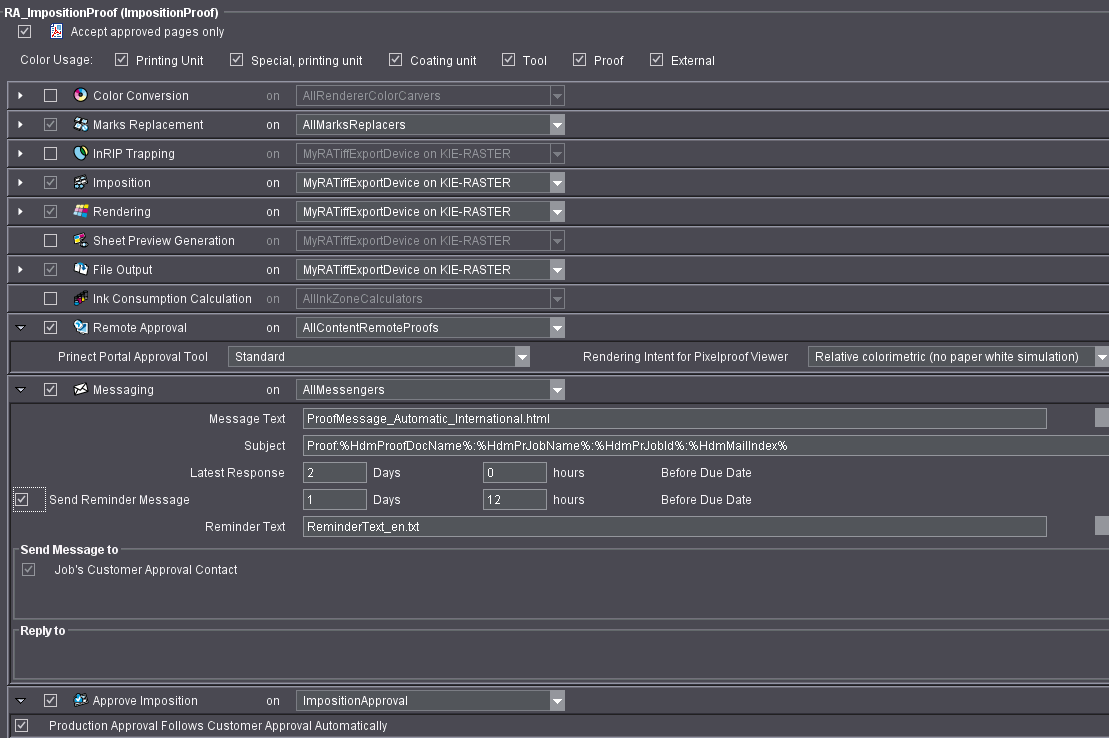
See "Remote Approval" work step .
"Messaging" work step
1.Check this step. See "Messaging" work step .
"Approve Imposition" work step
See analogously for an imposition scheme "Approve Page" work step .
"Rendering" work step
1.Disable the "Proof Color Management" option.
You can perform an Express Upload for all workflows. The Express Upload automatically moves the job data into the specified folder and the job will continue processing until a customer approval is given.
Without Express Upload, the job data is copied to the Prinect Remote Access server during uploading. In the Prinect Cockpit view, an internal user manually moves the data from the Prinect Remote Access server to production, i.e. to the desired job.

Prerequisites: The following prerequisites must be met to use the Express Upload:
•This option must be checked:
"Administration > Remote Access" > "Submit Uploads" area > "Move files to the job folder for submit".
•You have to assign the "Express Upload" permission to your customer.
•In the Qualify sequence of the job, you must set the "Express Upload" option in the "Remote Access" step.
•You must set that the "Upload" tab will be seen in the Web User Interface (correspondingly in Prinect Portal the "Upload" work step). You can set it as follows: Open job > "Job Settings > Remote Access > View in Internet > Tabs" > "Upload" option.
•The job must be started.
•The files to be uploaded are PDF or PostScript files.
Page assignment on the Web User Interface

Prerequisite: The job must contain at least one page list so that pages can be assigned on the Web User Interface. You can meet this prerequisite in the following ways:
·In the production shop, a job with a page list is set up before job data were uploaded by the customer.
·In the Prinect Remote Access Preferences, you can set "AutoCreate" in "Page List" and assign a page list name. When this option is set, the jobs created by the customer on the Web User Interface are assigned a page list. (default in the Prinect Cockpit in "Administration > Remote Access > Page List")
Customers view this page list on the Web User Interface (Job Details > "Page Lists" tab). Now they can assign pages to the page list positions.
We make a difference between the "Assign Pages" and "Assign" or "Replace" functions. You need the "Replace Pages" permission for both. You are not offered these functions when you do not have this permission.
•"Assign Pages" function: You can change the assigned pages as you like within the page list. The documents do not have to be uploaded again for this resorting.
•"Assign" or "Replace": These two actions are always linked to a renewed upload of the document.
The page list with its assigned data displays at the Prinect Cockpit as well as any related layout.
To be able to assign pages, you must set the following parameters in the Qualify sequence:
•"Online Content": Must be enabled and the "Express Upload" option must also be set.
The following further requirements must be met:
•Your customer must have the "Express Upload" permission.
•The job must be started.
•The Upload tab of the Web User Interface must be seen in the open job at the Prinect Cockpit. If this is not the case, you can set it as follows:
Open job > "Job Settings > Remote Access > View in Internet > Tabs" > "Upload" option.
Workflow Versioning with Prinect Remote Access
To edit versioned data with Prinect Remote Access, create a job as shown below:
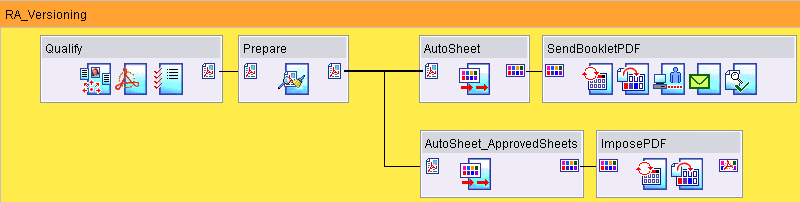
Note: This graphic shows you the workflow for PDF data. For the TIFF data workflow, use the "BookletProof" sequence instead of "SendBookletPDF" and "ImpositionProof" instead of "ImposePDF". The sequences are otherwise identical.
The second AutoSheet sequence "AutoSheet_ApprovedSheets" is set up as follows:

Procedure:
•You have loaded a versioned layout, and the job pages for all the versions are loaded.
•All the job data run through the Qualify, Prepare, AutoSheet and SendBookletPDF sequences.
The "SendBookletPDF" sequence splits the layout into single pages in which the base and the version elements are shown one on top of the other. These pages are shown on the Web User Interface for approval.
•Approval of the single pages is given.
•The workflow continues with the "AutoSheet_ApprovedSheets" sequence.
This sequence only works if all single pages were approved (see above).
•The ImposedPDF sequence is run and the layout displays on the Web User Interface for approval.
WebToPrint Integration workflow
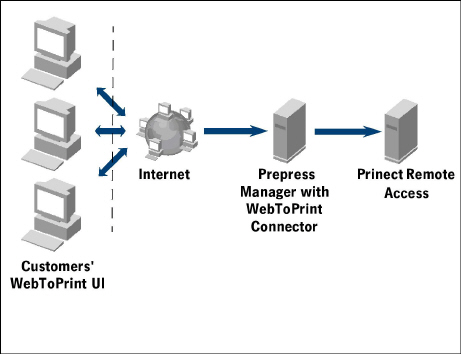
A simplified representation of WebToPrint integration in combination with Prinect Prepress Manager and Prinect Remote Access is as follows:
Procedure:
•With the WebToPrint UI, the customer creates the PDF or TIFF data file to process and sends it to the production shop (Prinect Prepress Manager).
•The WebToPrint Connector ensures the WebToPrint job is given the "WebToPrint" category.
•If a job has the "WebToPrint" category, Prinect Prepress Manager generates special links the customer either receives by email or can access in the WebToPrint UI.
The customer can give his/her approval via this link without having to start the full Web User Interface of Prinect Remote Access. Only the programs required for approval are started, i.e. Pixel Proof Viewer for TIFF data approval, Acrobat for PDF data approval, or the 3D Book View for JPEG data approval.
•The customer gives his approval, and production continues according to the approval state.
JPEG data workflow - approval of separate pages
In addition to the PDF and TIFF page approval, a JPEG page approval is also offered.
Advantages of the JPEG file format:
•requires approx. 1/10 of storage space
•fast and easy check of pages
•proof quality is sufficient in most cases
•the proof of ripped data also shows RIP errors
Operation of JPEG page approval is basically the same as for TIFF page approval, see Ripped (TIFF) data workflow - approval of separate pages.
The following items differ from Workflow 3:
1.In Meta Dimension or Renderer or in Prinect Cockpit respectively, you must set up JPEG device as follows:
•Choose "Start > Prinect Workflow > Output Device Configuration > Proofing Engine Manager".
•Click "New" and type the device name and the "JPEG" type in the dialog that opens.
•Click "OK".
•Double-click the device you have set up.
•Select the RGB color space and a quality level. We recommend 95 in this case.
2.You have to select this JPEG device in the Page-Proof sequence.
3.Set the "Rendering" step in the Page-Proof sequence as follows:
•Choose a lower resolution of 150x150 dpi.
•Enable the "Proof Color Management" option. (This option is not set for a TIFF workflow!)
•Make the following settings in "Proof Color Management":
·"Press Profile": Choose "Printer/ECI Offset 2007/ISOcoated_v2_eci.icc".
·Enable the option "Print all spot colors transparent to check overprinting".
When you process Workflow 3 with a PageProof sequence set up in this way, Pixel Proof Viewer > tab "Page Lists" offers the function "Show as Book" (for this purpose, your job must contain a page list). With this function, you can check and approve your JPEG pages fast and easily.
Invite contributors for upload and download and for approval workflow
In an open job, any number of contributors can be invited by e-mail and token link for a certain period to run uploads, downloads or approvals. On the Prinect Cockpit, the invite can be made by the administrator or on the Web User Interface by the external administrator.
You will find the settings on the user interfaces as follows:
•Prinect Cockpit user interface:
Open job > right-click > "Remote Access" > "Invite Contribution".
•Web User Interface:
Open job > "Contributors" tab > "Temporary Contributor" section.

Prerequisite: The job must be a Remote Access job. In other words, the "Express Upload" option must be set in the Qualify sequence.
Apart from the settings shown above for the invite of a contributor, no other setup is required.
This means that any person of any customer can be invited as a contributor. The customer does not have to be a Remote Access customer, and the contributor does not need a user account.
All the settings for temporary contribution (and also for group approval) display on both user interfaces. This means that any changes made on the Web User Interface are seen right away on the Prinect Cockpit and vice versa.
The contributor is disabled when the period for contribution expires. You can also disable a contributor manually before the set period expires.
Temporary contributors potentially are also available for group approval.
Automatic Creation of a Remote Access Environment plus Jobs workflow
You can set up an automatic sample job with automatically created Remote Access sequences, Remote Access customers and proof output devices in a few simple steps. This option is to help you learn how to handle Remote Access jobs in an Remote Access environment fast by look-and-feel.
1.Go to "Start > Heidelberg Prinect Workflow".
2.Start the "Prinect System Check" application.
3.Set "RemoteAccessInitialization" there.
4.Click the start icon (green arrow).
Setting this option makes sure the following actions are done:
•All Remote Access-specific sequences are generated automatically. The name of the sequence is made up of the name of the sequence template preceded by "RA_". The following sequences are generated automatically:
RA_Qualify
RA_SendAssembledPDF
RA_SendImposedPDF
RA_PageProof (with MyRATiffExportDevice, see below)
RA_ImpositionProof
RA_BookletProof
RA_SendBookletProof
RA_AddLayout
You can customize these automatically generated Remote Access sequences fast to your own needs to then create your own jobs.
•In customer administration, a Remote Access customer is created automatically with an "Approver" contributor, i.e. an approver with an external user account. They are given the following names:
Remote Access customer (company): TestPrintBuyer
Approver, family name: RA_TestApprover
Approver, first name: Test
External user account, name: TestApprove
External user account, password: 123456
•If a Renderer is installed and no devices of this type are available so far, the following Remote Access proof devices are created accordingly and are also suited for your various jobs:
MyRATiffExportDevice
MyRAJPEGDevice
You will find these in "Start > Heidelberg Prinect Workflow > Output Device Configuration > Proofing Engine Manager".
•Four sample jobs are created automatically that you will find in "RA_JobGroup". The automatically generated sequences are used in them.
For all workflows: Parameters of the Qualify sequence
You must use the Qualify sequence in all workflows, see graphic below:
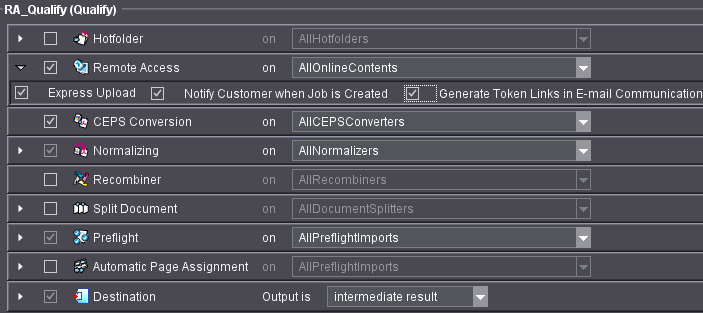
"Remote Access" work step
You must enable this step so that the job becomes a Prinect Remote Access job.
•You must set the "Express Upload" option for the following workflows:
·Express Upload
·Page assignment on the Web User Interface
•"Notify Customer when Job is Created":
Your customer is notified by email that a job was created with this Qualify sequence only if this option is set. The job need neither be opened nor started for this.
However, your customer needs the "Mail on create job" permission to receive this email.
•"Generate Token Links in E-mail Communication": With this option enabled, you will be guided to the respective functions by the links in the notification e-mails without having to log in to the web UI or the Prinect Portal. The e-mail for a new job guides you to the upload function, the e-mail for a pending approval to the respective approval function.
In an upload, a preflight is always run automatically. You can set it in this step.
When you create a new job on the Web User Interface or the Prinect Portal, the job parameters "Planned pages", "Format" and "Ink Series" are copied to the product description.
You would like to compare the actual job data with the job data from the product description. The comparison is done in the Preflight step if you set the following options:
•"Actions" tab > "Preliminaries" > "Use particulars from the job's Product Description, if available":
Set this option.
Then the parameters from the product description (Web parameters), and not the parameters as set in the Preflight, are used for the comparison with the actual job data.
In the Preflight you should set up a warning for these specific Web parameters ("Planned pages, "Format", "Ink Series") that is issued with the Preflight Report.
Set the warning triangle for the following parameters:
•"Pages/1ups" tab > "Trim box size is not": (The "Format" Web parameter is used for the comparison instead of the set value).
A warning displays if the page sizes in the uploaded file are different to the pages sizes defined in the product description.
•"Pages/1ups" tab > "Number of pages is": (The "Planned pages" Web parameter is used for the comparison instead of the set value).
A warning displays if the uploaded file has more pages than defined in the product description.
•"Separations" tab > "Contains": (The CMYK colors from the "Ink Series" Web parameter are used for the comparison instead of the CMYK colors set here.) A warning displays if the uploaded file has other process colors to those defined in the product description.
•"Separations" tab > "Number of spot colors is": (The "Ink Series" Web parameter is used for the comparison instead of the set value.)
A warning displays if the number of spot colors in the uploaded file is greater than defined in the product description.