
1.Go to "Administration > Device configuration > Actions".
2.Click "Create".
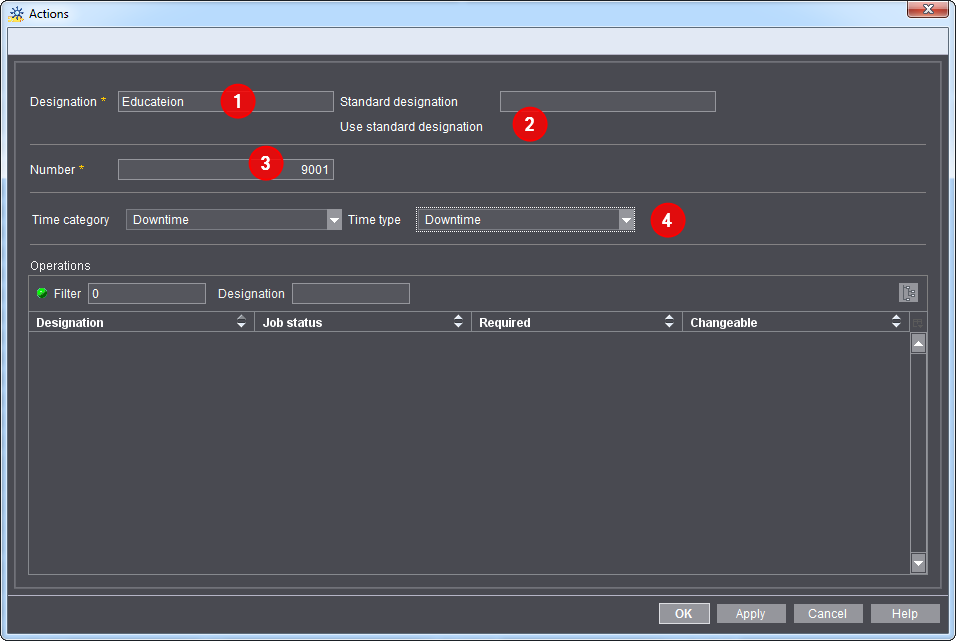
3.Enter the name you want for the action in the "Designation" text box (1).
You should enter the same designation that you defined in your Management Information System (MIS) in this box.
4.Enter the action number you defined in your MIS in the "Number" box (3).
5."Use standard designation" option (2):
If you enable this option, the action will not contain the designation that you entered, but rather an internal designation. In this case, the designation is no longer relevant for the workflow.
This setting is possible only with default actions.
6.Assign a time category and a time type to the action (4).
This assignment will be visible in the Time Evaluation in Analyze Point later. Its purpose is to group the actions and to separate productive times from unproductive times. To find out which time categories and time types are assigned to which actions, please refer to Time Type.
7.Click "OK".
The dialog closes and the new action displays in the list.
You can edit an action that is already defined. This can become necessary, for example, if you have changed the action in your Management Information System.
1.Highlight the action to be edited in the list.
2.Click "Edit".
3.Enter a new designation and/or a new number.
4.Click "OK".
The changes are applied and the dialog closes.
You can delete actions that you no longer need.
1.Highlight the action to be deleted from the list.
2.Click "Delete".
An alert message displays.
3.Click "OK".
The action is deleted.
All printing presses saved in the Master Data Store are listed here. The presses display with your usual parameters. If your press is not listed, we recommend you copy a similar press that already exists and then edit it.
You can send operating data to the Prinect Integration Manager from any workstation via the "Data Terminal" option. The Data Terminal is used for machines and manual workplaces that cannot be connected online. This allows manual job-related shop floor data collection to be run for these machines.
You can connect a Data Terminal device with a counter box via the Central Device Manager (CDM) interface. The totalizer reading of the press is sent to the Data Terminal using the counter box. In this case you do not need to manually enter the quantity produced at the Data Terminal.
When setting up a Data Terminal device with a counter box, you must assign the device a counter box that you set up beforehand here in the device configuration. You can connect up to 12 machines to a counter box.

Note: A detailed description of the installation and replacement of a counter box is enclosed with the counter box. Go to the document using the following link: Installation and Replacement of the Counter Box
To set up a new counter box in Prinect, we have copied the parts needed for this for you.

Prerequisite: A valid IP address was assigned to the counter box.
1.Go to "Administration > Device configuration > Counter box".
2.Click "Create".
The dialog for configuration of the counter box opens:

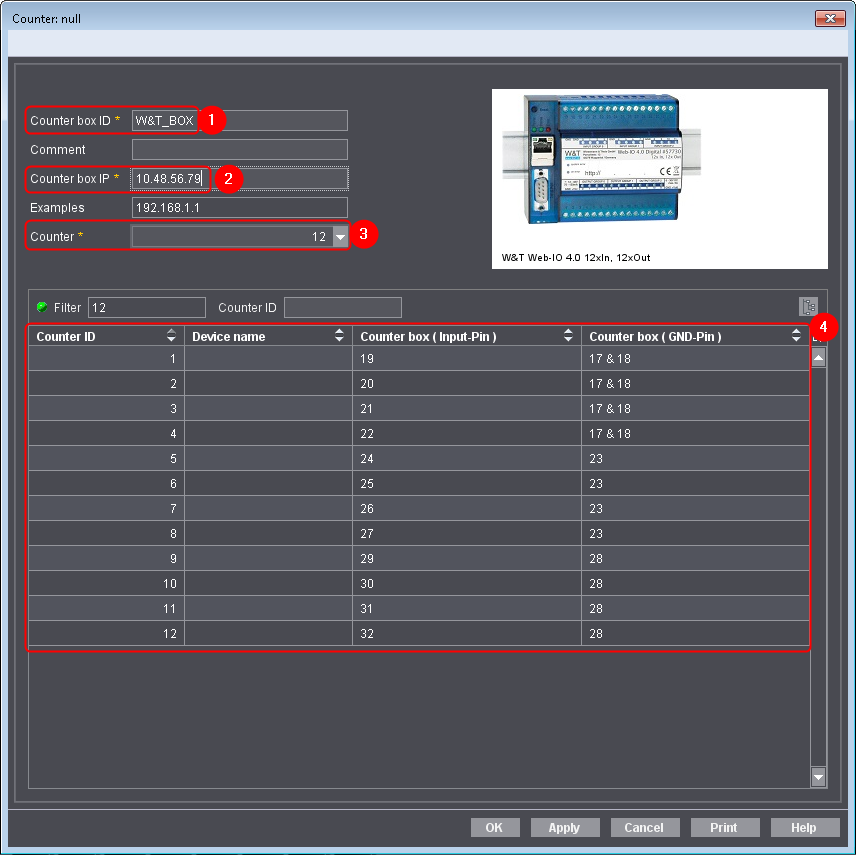
3.Give the counter box a name (1).
The name displays when the device is set up on the CDM.
4.Enter the previously assigned IP address (2).
5.Select the number of channels (3).
12 = New counter box
6 = Old counter box
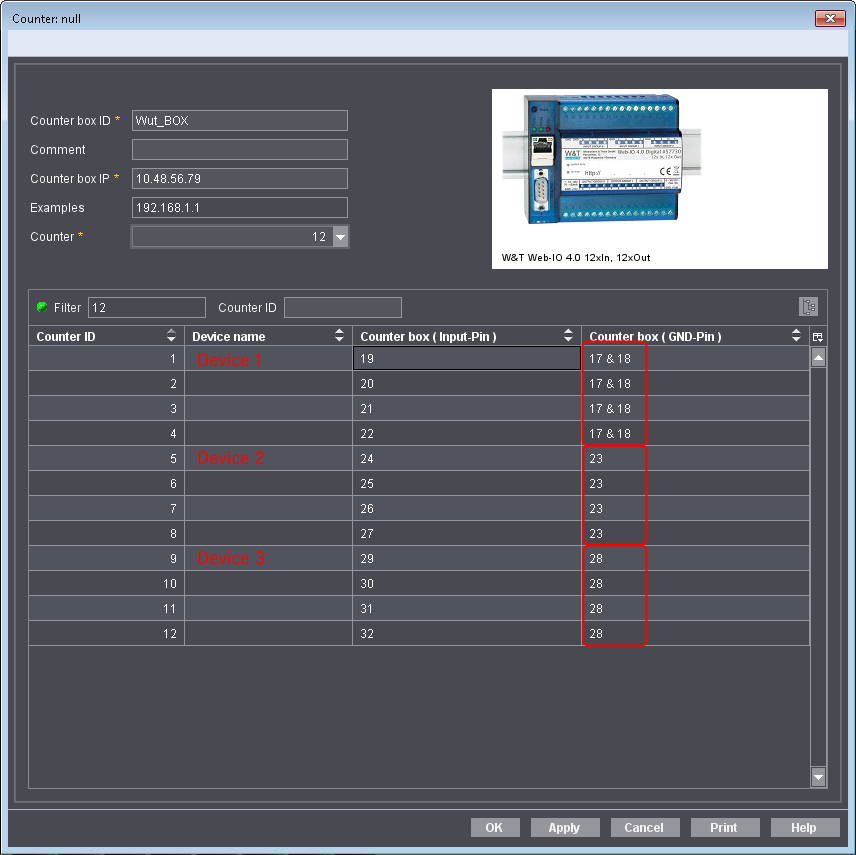
In the example below, you can see a connection variant as is used for voltage signals. Because each machine has its own ground connection in a connection and the counter box links four channels with one ground, the voltage signal in each ground block must be shifted. This means:
Device 1 to channel 1-4
Device 2 to channel 5-8 and
device 3 to channel 9-12

6.Make a note of the channels for each device (you can print the dialog with "Print").
7.Click "OK" to save your settings.
In the next step, you assign a channel to the devices.
Assign a channel to the devices
When the counter box is set up, you must assign the channel to the devices. You assign it on the Central Device Manager (CDM).

Prerequisite: We assume below that the devices are already set up on the CDM. You can find out how to set up a new device in the Online Help of the Prinect Cockpit.
Proceed as follows to assign a channel to the device:
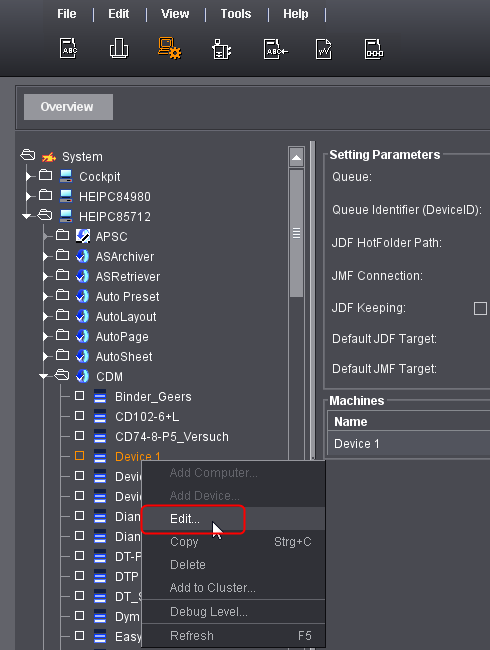
1.In Prinect Cockpit, go to "Administration > System > <name of the Prinect server>".
2.Open "CDM".
3.Select the device.
4.Click "Edit" in the context-sensitive menu.

The "Device assistant" opens:

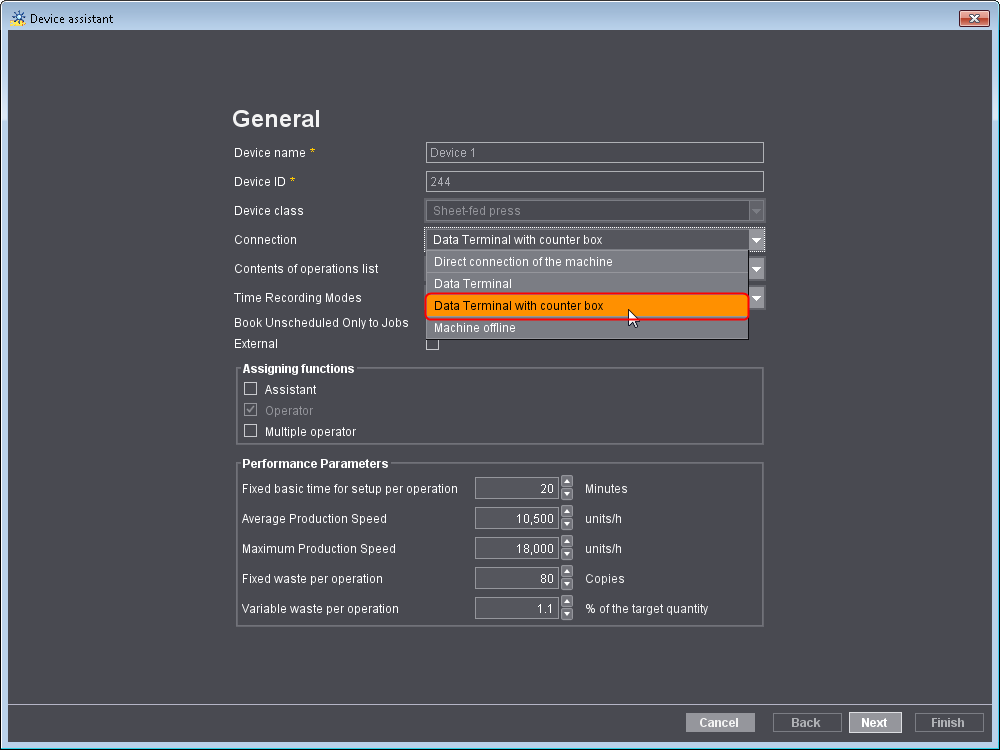
5.Select "Data Terminal with counter box" in "Connection".
6.Click "Next" until you are at "Counter box configuration".

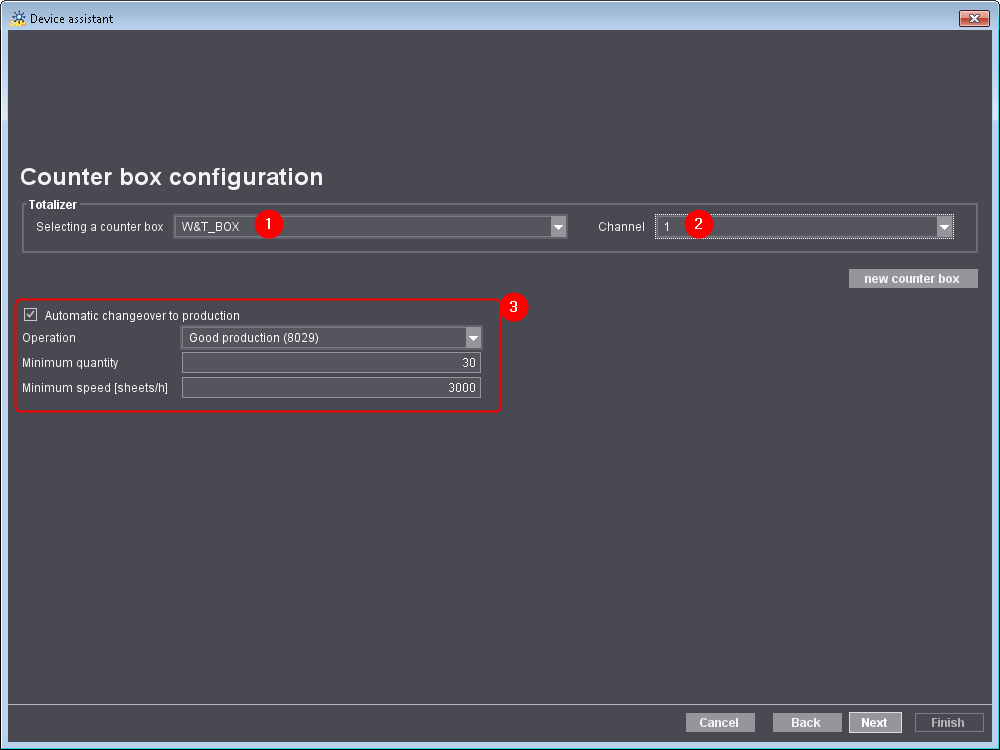
7.Select the counter box you set up beforehand (1).
8.Assign the channel to the device (2).
In this example, we assign channel 1 to device 1.
(9).If wanted, enable "Automatic changeover to production" and enter the appropriate values (3).
10.Click "Next".
11.Click "Finish".
12.Repeat the steps for the other devices.
13.Restart the Prinect Cockpit. If you don't, the device names do not appear correctly in the device configuration.
Afterwards, check whether you assigned the channels correctly. To do this, go again to "Administration > Device configuration > Counter box" and open the counter box.
The devices should now be assigned to the correct channels:
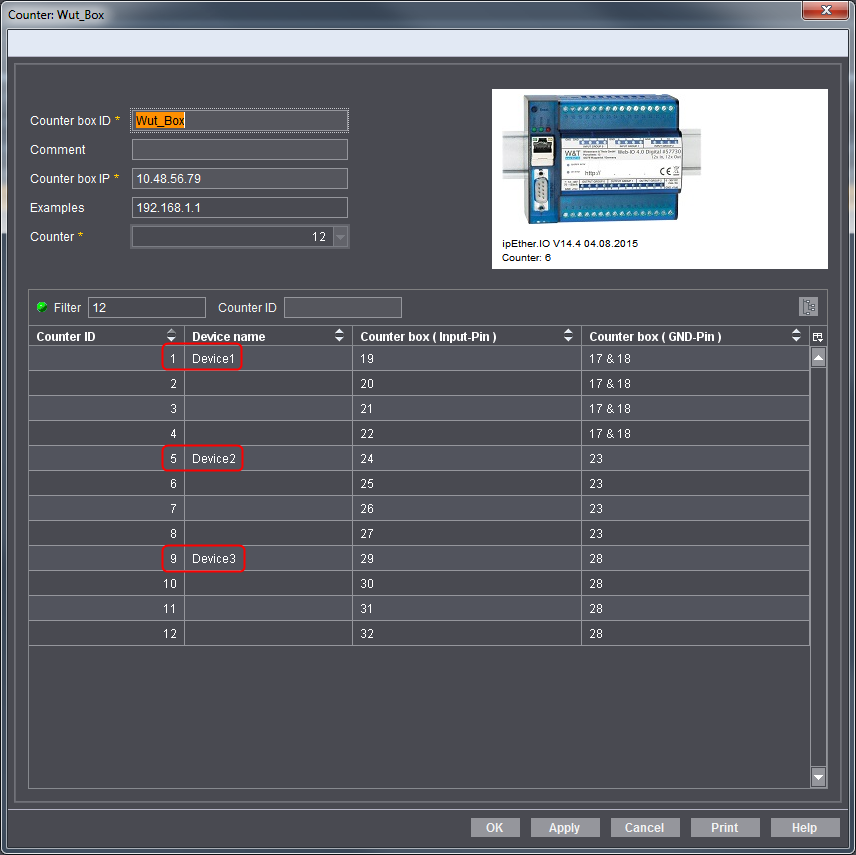
Print the graphic to then set up the wiring on the machine.
Accompanying papers refer to the various papers that accompany a quantity of goods (e.g. pallets, plates, etc) to the next step in their processing (e.g. press or finishing). Accompanying papers contain all relevant details needed for the next step in goods processing.
In the "Accompanying Papers" tab, you manage all the accompanying paper templates for prepress, press and finishing. Later on ,you can assign these accompanying paper templates to a device/machine,
By default, there are 16 accompanying paper templates at your disposal. A number of templates are available for some device classes such as sheetfed presses. These differ in the information that can be displayed.
•Find out which information is printed in:
Which job data is printed out? for pallet sheets and
•What information will be printed? for plate sheets.
Please contact your Prinect Service if you require more templates.
"Export" Button
With this button, you export the selected accompanying paper in the jxml format.
Editing accompanying paper templates
You have the following setting and preview options for accompanying paper templates:
•Selecting a logo for an accompanying paper template
•Assigning an accompanying paper template to one or several device classes
•Showing a preview of pallet sheet templates
Proceed as follows to edit an accompanying paper template:
1.Go to "Administration > Device configuration > Accompanying papers".
2.Select an accompanying paper template from the list.
3.Click "Open".
The "Accompanying Papers: <device name>" dialog displays.

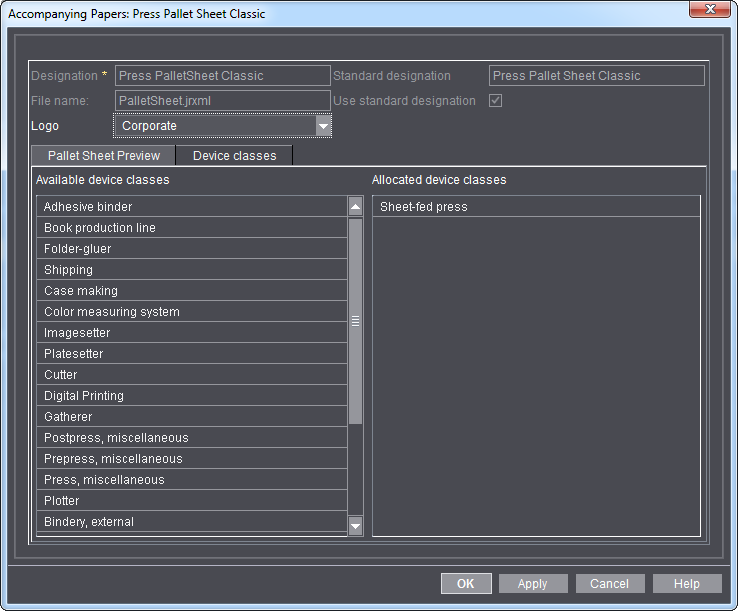
4.Define the settings you want:
•Box "Designation"
This is where you define the name of the accompanying paper. This function is not available for standard templates.
•List box "Logo"
Select a logo for the accompanying paper template here. You are offered all logos you imported in "Administration > Device settings > Logo" beforehand. See Logo.
Here, you specify the device class the selected accompanying paper template can be assigned to.
Background: An accompanying paper template can be assigned to every device in "Administration > Device configuration > Devices". But it is unfeasible to assign any type of accompanying paper template to a given device. It should be possible, for example, to assign pallet sheet templates to a sheet-fed press only. In this case, you must assign the "Sheet-fed press" item to the "Allocated device classes" column.
•"Pallet Sheet Preview" tab
This tab shows a preview of the accompanying paper template with your settings.
5.Confirm your settings with "OK".
The settings are activated immediately.