
Plate sheets are printed after imaging and uniquely identify an imaged plate set of a sheet.
When is a plate set sheet printed?
The manager you are using determines when a plate set sheet is printed.
•Prinect Prepress Manager Standalone:
A plate set sheet is printed automatically as soon as you submit a sheet to an "ImpositionOutput" sequence (even in case of a single separation).
•Prinect Prepress Manager + Prinect Pressroom Manager:
A pallet sheet is printed automatically as soon as all plates necessary for the next printing operation have been imaged.
What information will be printed?
The content of the plate set sheet varies according to the accompanying paper template you selected. By default, three templates are available:
The following table shows you the job data that are printed with the respective templates:
|
Job data |
Template |
Template |
Templates |
|---|---|---|---|
|
Logo •Logo you allocated to the pallet sheet. See Editing accompanying paper templates. |
Yes |
Yes |
Yes |
|
Job Number |
Yes |
Yes |
Yes |
|
Job number as a barcode |
Yes |
Yes |
Yes |
|
Job Name |
Yes |
Yes |
Yes |
|
Sheet •Sheet name. |
Yes |
Yes |
Yes |
|
Customer |
Yes |
Yes |
Yes |
|
List of all separations (front and back) with specification of variants. |
Yes |
Yes |
Yes |
|
The date and time at which the pallet sheet was printed |
Yes |
Yes |
Yes |
|
Versions if this is a versioned job. |
Yes |
Yes |
- |
|
Next operation if the information is available. |
Yes |
Yes |
- |
|
Machine scheduled for the next operation if the information is available. |
Yes |
Yes |
- |
|
Sheet name |
Yes |
- |
- |
|
Version Description |
Yes |
- |
- |
|
Barcode of the plate number of each separation |
Yes |
- |
- |
|
Printing material data: •Material No. •Paper Name •Length •Width •Thickness •Grammage |
Yes |
- |
- |
Setup for output of a plate set sheet
1.A Windows printer (only DIN A4 printer) must be set up on the Prinect server (Defining Windows printers on the Prinect server).
2.If required, a new logo can be defined for the standard template (Editing accompanying paper templates).
3.A plate set sheet template must be assigned to the respective device (Assign an accompanying paper/time sheet template to a device).
You can place a custom logo at several points within Prinect. The logos are set up centrally in the device configuration.
You can place a logo at the following points:
•Accompanying papers (pallet sheet and plate set sheet)
A logo can be printed on the top right corner on pallet sheets and plate set sheets. You can define a custom logo for each accompanying paper template:
•Scheduler
In the Scheduler, a logo can be printed on the hard copy of the machine schedule.
•Analyze Point
In Analyze Point, a logo can be printed on the reports. The logo selected appears on the following reports:
·all Quality Reports
·all Productivity Reports except "P-N diagram" and "T-N diagram"
·the Performance Report
•Wallscreen
A splash screen can display on the Wallscreen. This can be used, for example, as a personal welcome for customers.
Define Logo for Accompanying Papers / Scheduler / Analyze Point / Wallscreen
To define a logo for one of the fields mentioned above, proceed as follows:
1.Go to "Administration > Device configuration > Logo" in the Cockpit.
2.Click the "Import" button.
The "Import Logo" dialog displays:

3.Select a logo in the file system (1).
The logo must be in PNG format.
4.Enter a designation (2).
The system can see from the designation where the logo will be used.
·Scheduler:
Enter "Scheduler" as the designation (note upper case!).
·Analyze Point:
Enter "Corporate" as the designation (note upper case!).
·Accompanying papers and Wallscreen:
The designation is not relevant in this case.
(5).For use on the Wallscreen, enable "Relevant for splash screen on wallscreen" (3).
The logo can be selected later on the Wallscreen. See Select a logo on the Wallscreen.
6.Click "OK" (4).
The logo is imported and is immediately available.
7.The following steps are also necessary for accompanying papers and the Wallscreen:
Assign a logo to an accompanying paper template
The logo must be assigned to an accompanying paper template to output it on an accompanying paper. See Editing accompanying paper templates.
Select a logo on the Wallscreen
The logo must be selected on the Wallscreen for it to display as a splash screen on the Wallscreen:
1.Go to "myWallscreen > myCustomer" on the Wallscreen (1).

2.Select "myCustomer: Background image" in the context menu (2).
The "Background image " dialog displays.

3.Select "Custom background".
4.Click "Select image file" (1).
A list of the images imported to the Cockpit opens.
5.Select the image (2).
6.Confirm your selection (3).
The selected image is used directly as the splash screen for the Wallscreen.
The "Devices" tab gives you an overview of all the devices you set up.
The following functions are available to you:
•Enable/disable the printing of accompanying papers and time sheets
•Assign a printer for printing accompanying papers and time sheets
•Select an accompanying paper template for accompanying papers and time sheets
Assign an accompanying paper/time sheet template to a device
A device must have been assigned a template if the device is to print an accompanying paper and/or a time sheet.
Proceed as follows:
1.Go to "Administration > Device configuration > Devices".
2.Select the device to be assigned a template in the list box.
3.Click "Open".
The "<device name>" window displays.

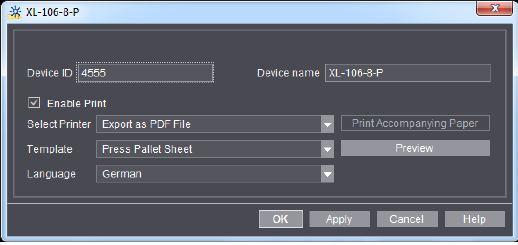
The following settings are available:
"Enable Print" option
You can print accompanying papers and/or time sheets for this device when this option is enabled. Disable this option if you never want to print them for this device.
This is where you select the printer on which to print the accompanying paper and/or time sheet. You can print the accompanying paper and time sheet directly to a connected printer or export them as PDF.
•Option 1: Print to a connected printer.
All printers that were set up beforehand are available. To set up a printer, see Defining Windows printers on the Prinect server.
•Option 2: Export as PDF.
The accompanying paper or time sheet is saved as a PDF on the Prinect server: "<servername> > PTJobs > AD-PDF > <DeviceID>".

Note: If you wish to print the PDF directly to a printer, you must set up your printer or print spooler accordingly beforehand. Read the user manual of your printer for details.
"Template" list box
This is where you can select all the accompanying paper templates available for this device.
•"Daily Time Sheet Only" option
With this template, you can only print the time sheet for the selected device on the machine (see Print Time Sheet on the Machine). Select one of the other templates if you wish to print pallet sheets and time sheets. These templates let you print time sheets and pallet sheets.
"Preview" Button
With this button, you open a preview of the selected accompanying paper.
Button "Print accompanying paper"
With this button, you start a test print of the accompanying paper on the selected printer.
4.Confirm your settings with "OK".
The settings are applied and are immediately active.
If you have a license for Analyze Point, time protocols and time evaluations are available at several points in it (e.g. time evaluation, job evaluation, machine evaluation, etc.). Configuration of the time categories is relevant only if you want a time evaluation in Analyze Point.
See Time Evaluation for a detailed explanation of time evaluation.
You have the following setup options in the "Time category" tab:
•Assigning a Time Type to a Time Category
You have to do this only if you created a new time type beforehand for an operation (PDC message). All predefined time types are already assigned to a time category.
•Modify name (designation) of a time category
In some countries, it may be necessary to modify the designation of the time categories. In Germany, we recommend keeping the predefined designations. These are in compliance with the guidelines of the German Association of Print and Media.
Adding further time categories is not planned. By default, the following time types and time categories are predefined:
|
Time category |
Time type |
|---|---|
|
Production time |
Setup time |
|
Execution time |
|
|
Miscellaneous production time |
|
|
Auxiliary time |
Auxiliary time |
|
Down time |
Down time |
Assigning a Time Type to a Time Category
If you created a time type manually, you must assign it to a time category. You can do this in the "Time category" tab if you did not already do this when creating the time type.
Proceed as follows:
1.Go to "Administration > Device configuration > Time category".
2.Select the time category to which you want to assign a time type.
3.Click "Open".
The "Time category" dialog displays.

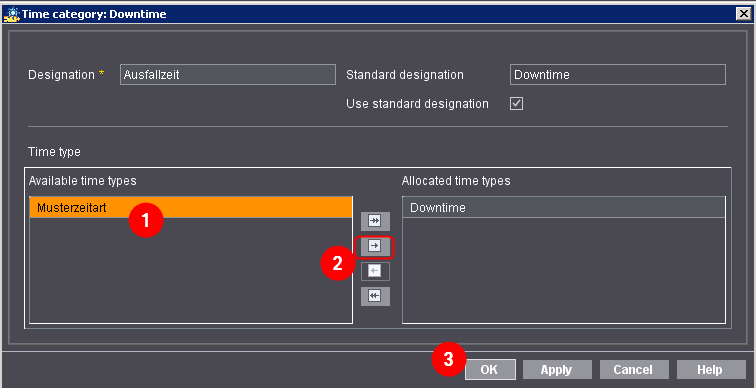
4.Select the time type you wish to assign from the "Available time types" list on the left (1).
5.Click the arrow pointing right (2).
The time type is now in the "Allocated time types" list.
6.Confirm your input with "OK" (3).
The window closes and the time type is assigned to the time category.
Modify name (designation) of a time category
The designation of the time categories can be seen in the time evaluation in Analyze Point. In some countries, it may be necessary to modify the designation of the time categories. In Germany, we recommend keeping the predefined designations. These are in compliance with the guidelines of the German Association of Print and Media.
Proceed as follows to modify:
1.Go to "Administration > Device configuration > Time category".
2.Select the time category whose designation you want to modify.
3.Click "Open".
The "Time category" dialog displays.

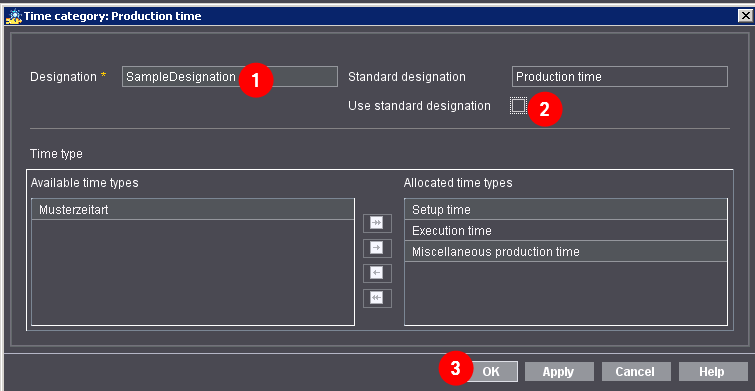
4.Enter the designation you want (1).
5.Disable "Use standard designation" (2).
Only then will the new designation be really used.
6.Confirm your input with "OK" (3).
The window closes and the change is active immediately.
If you have a license for Analyze Point, time protocols and time evaluations are available at several points in it (e.g. time evaluation, job evaluation, machine evaluation, etc.). Configuration of the time types is relevant only if you want a time evaluation in Analyze Point.
See Time Evaluation for a detailed explanation of time evaluation.
You have the following setup options in the "Time type" tab:
•Defining a New Time Type
You have to do this only if you created a new action beforehand and this cannot be assigned to any existing time type.
•Assign an action to a time type
This is necessary only if you created a new action beforehand. All predefined actions are already assigned to a time type.
•Modify name (designation) of a time type
In some countries, it may be necessary to modify the designation of the time type. In Germany, we recommend keeping the predefined designations. These are in compliance with the guidelines of the German Association of Print and Media.
You have to do this only if you created a new action beforehand and this cannot be assigned to any existing time type.
Proceed as follows to create a new time type:
1.Go to "Administration > Device configuration > Time type".
2.Click "Create".
3.The "Time type" dialog displays.

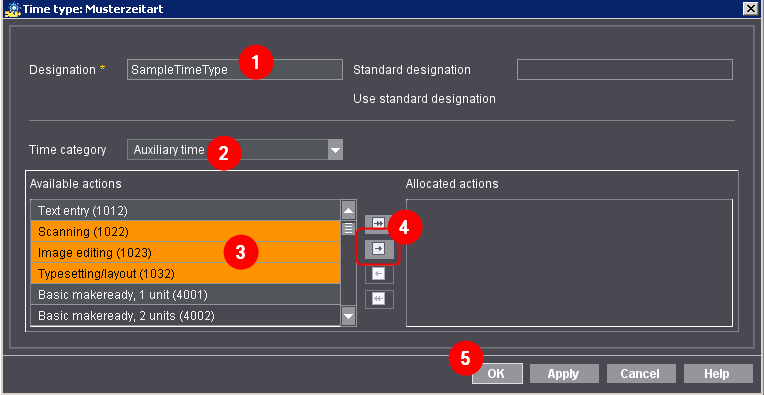
4.Enter a designation for the time type (1).
This designation appears later in time evaluation in Analyze Point.
5.Select the time category for the time type (2).
6.Select the action that is to be assigned to the time type from the "Available actions" list on the left (multiple selection is possible) (3).
7.Click the arrow pointing right (4).
The action is now in the "Allocated actions" list.
8.Confirm your input with "OK" (5).
The window closes and the new time type with its action is created.
Assign an action to a time type
This is necessary only if you created a new action beforehand. All predefined actions are already assigned to a time type.
Proceed as follows to assign an action to a time type:
1.Go to "Administration > Device configuration > Time type".
2.Select the time type to which you want to assign an action.
3.Click "Open".
The "Time type" dialog displays.

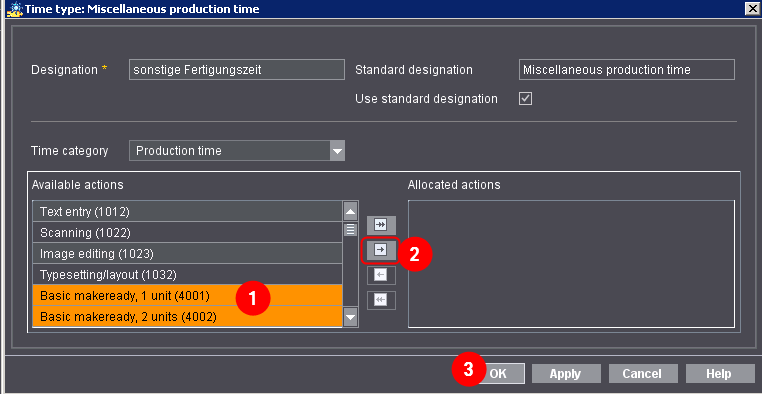
4.Select the action you wish to assign from the "Available actions" list on the left (1).
5.Click the arrow pointing right (2).
The action is now in the "Allocated actions" list.
6.Confirm your input with "OK" (3).
The window closes and the action is assigned to the time type.
Modify name (designation) of a time type
The designation of the time types can be seen in the time evaluation in Analyze Point. In some countries, it may be necessary to modify the designation of the predefined time types. In Germany, we recommend keeping the standard designation. These are in compliance with the guidelines of the German Association of Print and Media.
Proceed as follows to modify:
1.Go to "Administration > Device configuration > Time type".
2.Select the time type whose designation you want to modify.
3.Click "Open".
The "Time type" dialog displays.

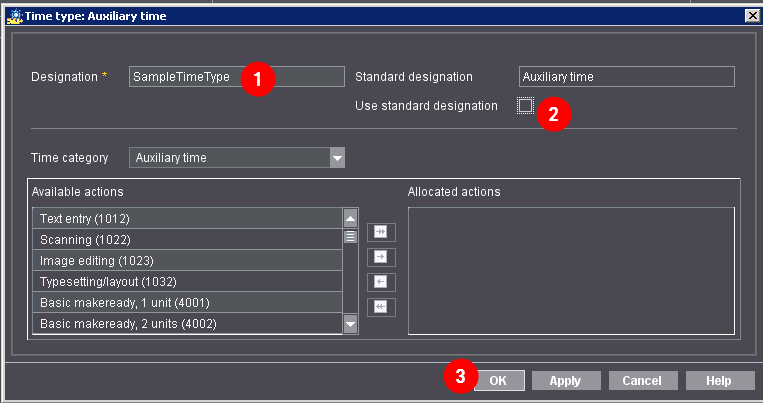
4.Enter the designation you want (1).
5.Disable "Use standard designation" (2).
Only then will the new designation be really used.
6.Confirm your input with "OK" (3).
The window closes and the change is active immediately.