Configuration of the Labelfire LVIS
The Prinect interface must be configured in the Labelfire LVIS (Linoprint Variable Image System) to enable the Labelfire to receive print data from the Prinect Digital Front End.
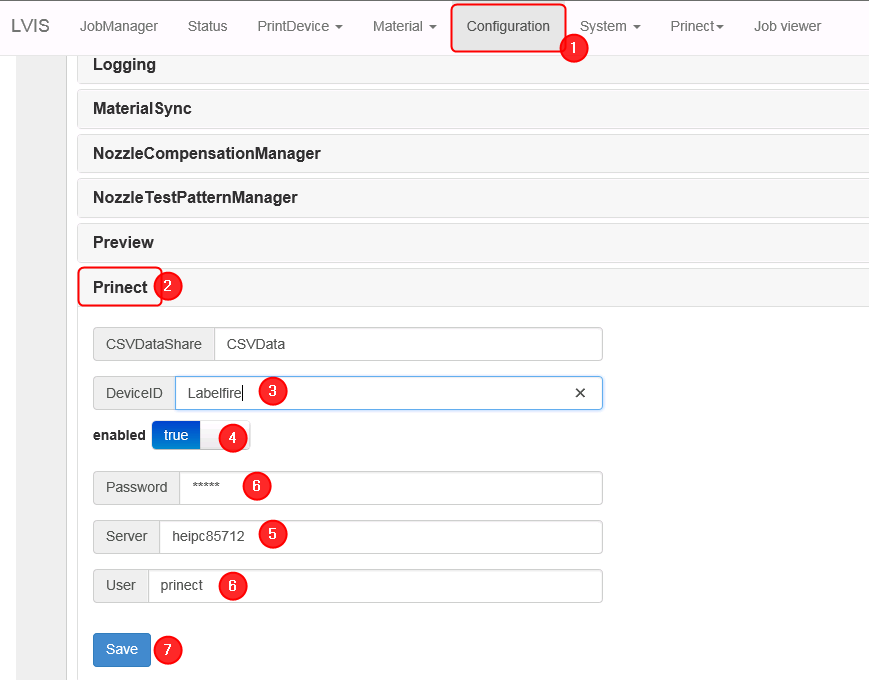
1.In the LVIS of the press, go to the "Configuration" menu (1).
2.Go to "Prinect" (2).
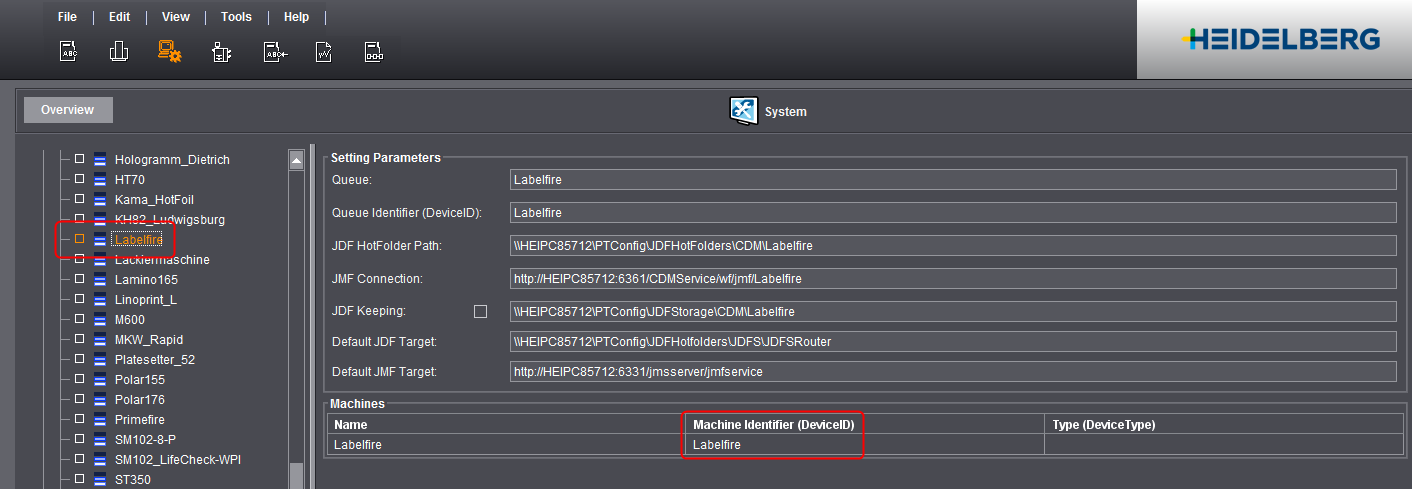
3.In "DeviceID" (3), enter the ID you specified as Device ID in the CDM set-up dialog.
4.Select "true" for "enabled" (4).
5.Enter the name or the IP address of the Prinect Server in the "Server" box.
6.Specify a user having access to the Prinect Server in the "User" and "Password" boxes (6).
7.Save your settings with "Save" (7).

Note: It may take some time until the status is updated after you have saved the settings.
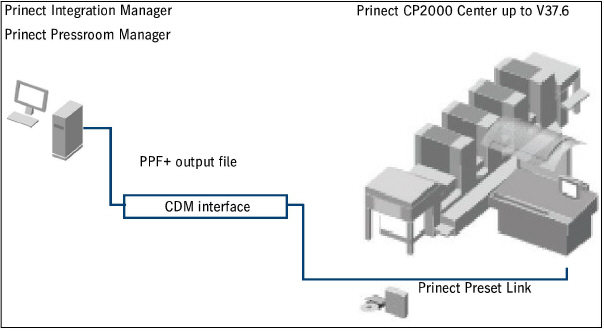
You can use an offline connection to provide older Heidelberg presses with the area coverage values for ink presetting. The data is provided via a PPF+ output file.
The job is loaded at the press using the "PrepressInterface (PPF)" data storage unit and the preferences made available from a folder created beforehand.
Limitation compared to an online connection
Generally, an online connection of your presses is recommended. This is the only way you have optimal integration. The following restrictions are applicable for an offline connection:
•The printing process ends when the PPF+ file is generated.
•These devices are not taken into account in Analyze Point and Scheduler.
•If the prepress system sends the same PPF file again with changes, the PPF+ output file is not recalculated.
This means that changes from the prepress system are not taken into account in a PPF+ output file that has already been generated.
Requirements on the printing press
A connection to the Prinect Integration Manager/Prinect Pressroom Manager can only be established if the following requirements are fulfilled:
•The software module "Prinect Preset Link" (Prinect CP2000 Center as of software version V32.8)
•The "Prinect Online Kit" software module.
Create Press for Offline Connection at the CDM
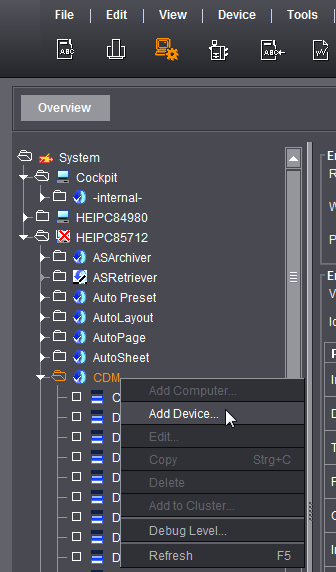
1.Go to "Administration > Settings > System" and highlight the name of your computer.
Select "Add device" in the context-sensitive menu.


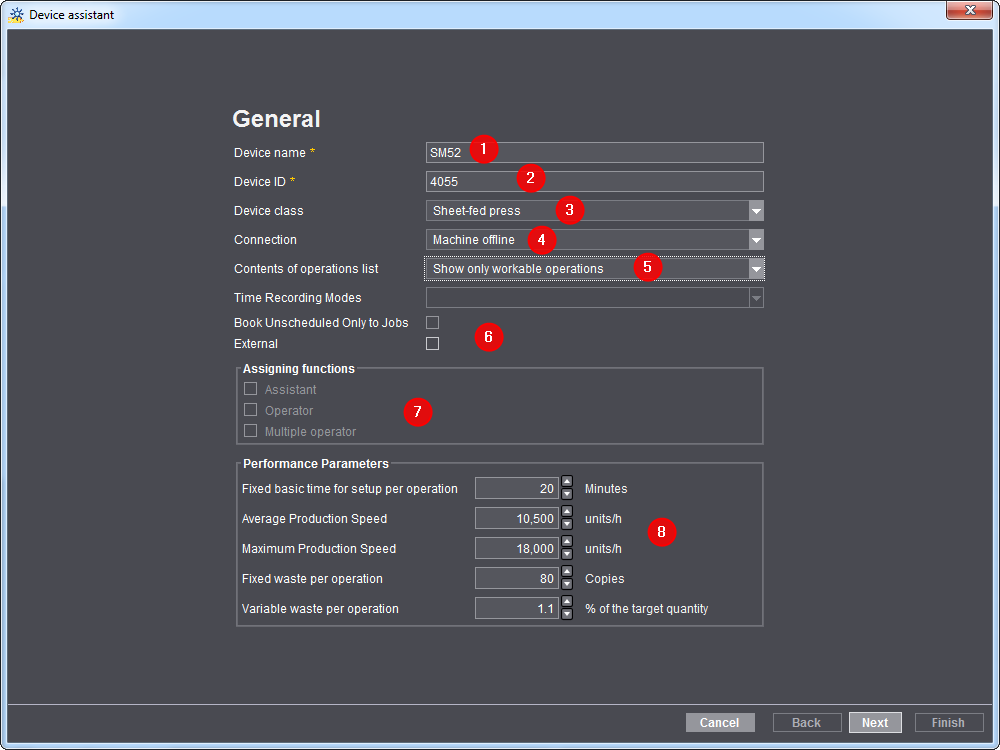
2.Under "Device name", enter the designation for the press you wish to connect (1).
The designation of the workplace/machine in the Prinect workflow must be unique. You may use no more than 30 characters. This designation identifies the press for users in the entire Prinect workflow (in the Scheduler and in Analyze Point, for example).
3.Enter a device ID (2).
·The "DeviceID" must contain only the characters [a-z], [A-Z], [0-9].
·If the device ID has already been assigned, a corresponding message appears and you have to enter a new one.
·The device ID serves for unique assignment of the machine in your Prinect workflow. The device ID must be synchronized with the Management Information System.
4.In the "Device class" list box, select the "Sheet-fed press" list item (3).
5.Select the "Machine offline" list entry in the "Connection" list box (4).
6.Select the desired item from the "Contents of operations list" list box (5).
You can find a detailed description of the effects of the selection in General.
7.Disable the option "External" (6).
8.You do not have to enter anything in "Assigning functions" (7) and "Performance parameters" (8) for an offline connection. This information is not needed as an offline connection is ignored in the Scheduler and Analyze Point.
9.Click "Next".
The dialog for press configuration displays.

10.Configure the press by selecting the type you wish to connect.
Configure generation of presetting data

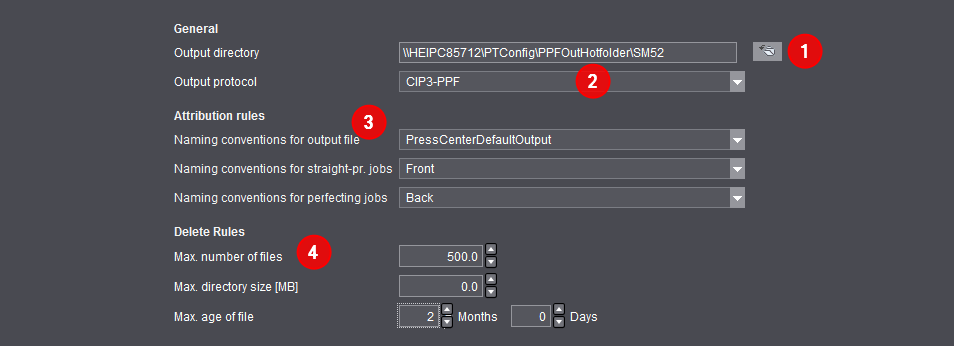
11.In "Output directory" (1) enter the folder where the generated PPF+ output files will be saved. Generally, you should use the default folder and change it only if it is really necessary.
You must enter the folder later at the Prinect CP2000 Center when configuring the PPF import interface ("PrepressInterface (PPF)") (if the Workplace Interface cannot be licensed).

Note: If you define a directory that is not located on the Prinect server (external computer), you must ensure that the corresponding "prinect" user has been created with the corresponding privileges on this external computer and that the source file is released for this user.
12.In addition select the suitable output protocol for your press (2).
For Heidelberg presses, you must select the output protocol "CIP3-PPF". You must select other output protocols if you are going to connect a third-party machine (for example, a Komori 28-3000). Our Prinect Service support will be glad to assist you in this case. You can contact them at the following e-mail address:
support.prinectpress@heidelberg.com.
13.If necessary, select attribution rules that have already been created (3).
You can find a detailed description in Attribution Rules (filtering information from the PPF/CIP file).
14.Define deletion rules for the created files with the presetting data (4). You can find a detailed description in Deletion rules.
Press configuration
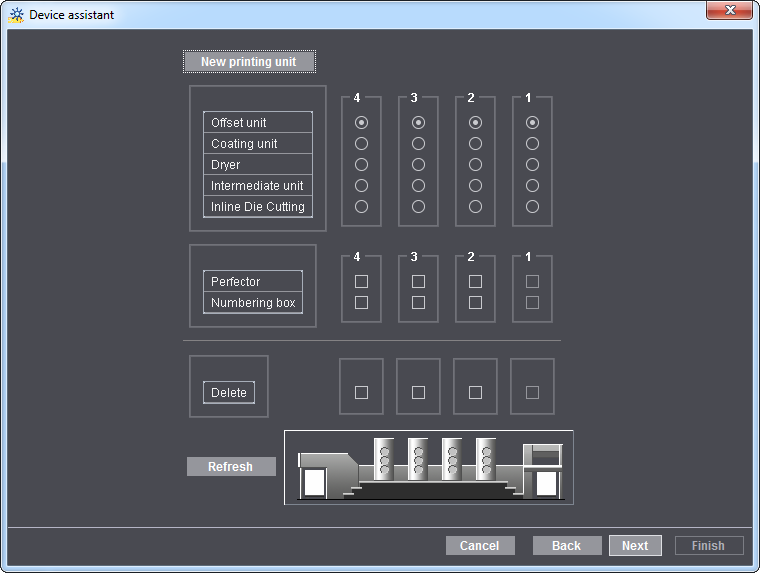
15.Specify the number of printing units and, if necessary, other data such as coating unit and perfector.
16.Click "Next".
Finally, you can view a summary of your configuration. In this summary, you can check all your settings and, if necessary, make changes using "Back".
17.Click "Finish" to conclude the procedure.