
"Layout settings" tab for toner-based digital presses (Heidelberg Versafire)
Prerequisite: The icons shown below display only if a digital press that supports duplex printing is used, e.g. Heidelberg Versafire presses. If a Heidelberg digital press with only single-sided printing (Primefire, Labelfire) is connected, you cannot select a sheet layout type because "Single-sided" is always set as the layout type.


You can select one of the following layout types:
|
|
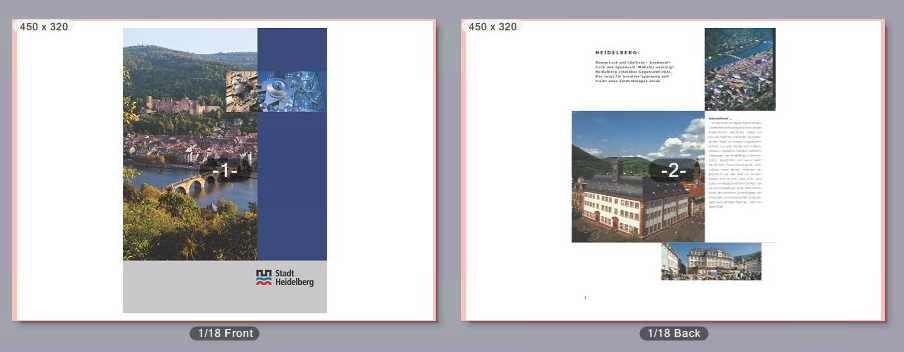
Single-sided layout In this layout type, document pages are only output on the front of the substrate. |
|
|
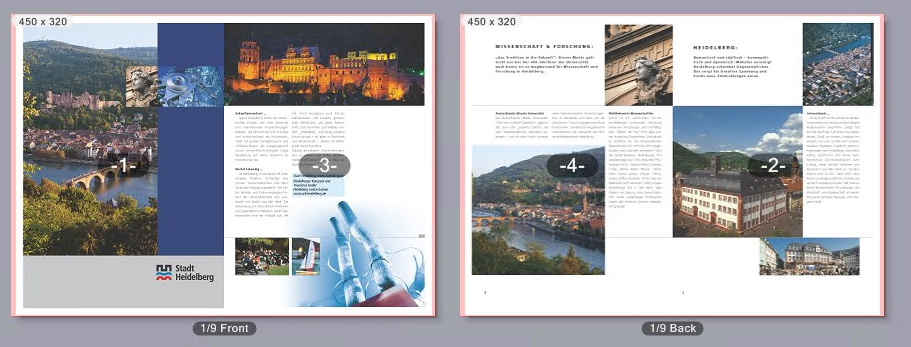
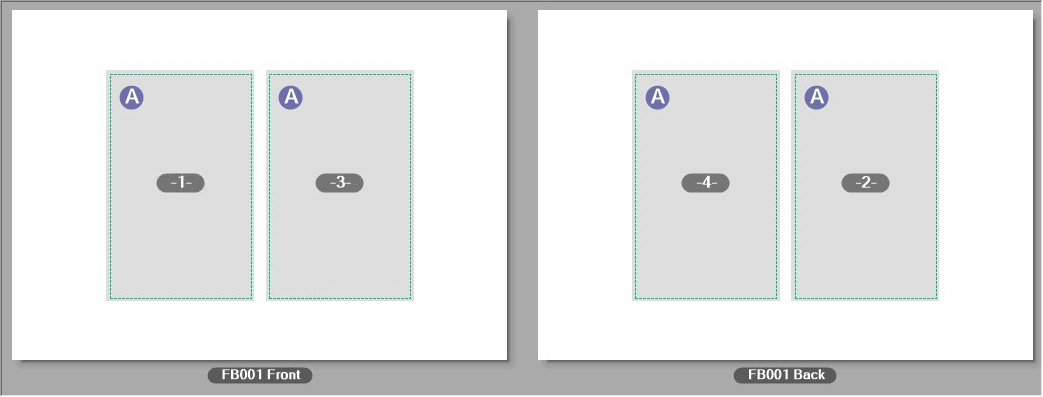
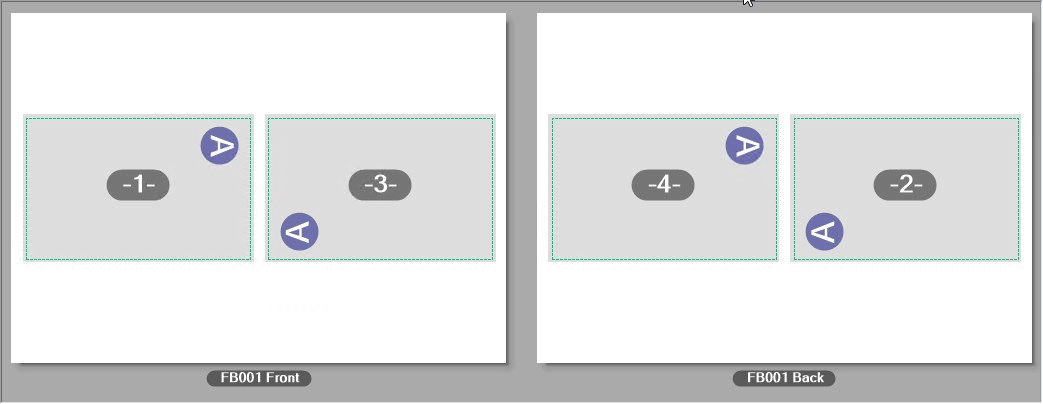
Double-sided layout In this layout type, document pages are placed so that the first page is placed on the front of the substrate and the second page on the back, the third on the front again, and so on. The back pages are oriented the same as the front pages. |
|
|
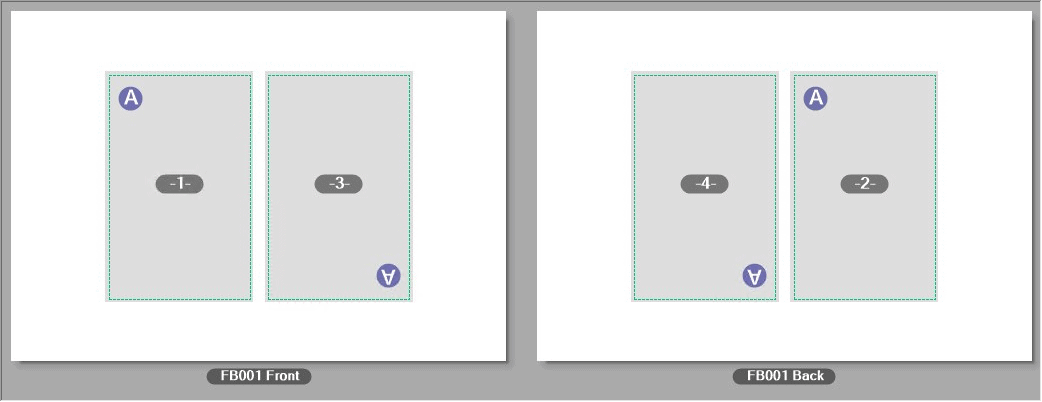
Calendar layout In this layout type, the document pages are placed so that the first page is placed on the front of the substrate and the second page on the back, the third on the front again, and so on. The back pages are oriented upside down facing the front pages (like a flip-over calendar). |
|
|
Booklet layout This layout type creates a booklet that can be, for example, folded and bound with perfect binding or saddlestitching. |
|
|
Scheme Editor You invoke the Scheme Editor with this button (see Scheme Editor). |
|
|
Montage Editor |
If you selected a booklet layout, you can choose between "Perfect Binding" and "Saddle Stitch" as the binding method in this list box.
•Saddlestitching:
All sheets are first collated and then folded.
•Perfect binding:
All sheets are first folded and then collated.
•Saddlestitching right:
For some Asian languages (e.g. Japanese, Korean, Chinese), the book margin is on the right. You can set saddlestitching to the "right" for this.
•Perfect binding right:
For some Asian languages (e.g. Japanese, Korean, Chinese), the book margin is on the right. You can set perfect binding to the "right" for this.
"Press Sheet Layout" group
"AutoArrange Folding Sheets" option
If you enable this option, the pages or, in the case of a booklet, the folding sheets are automatically arranged so that the substrate is utilized as far as possible. In other words, this option uses the maximum values for "columns" and "rows" that are possible with the substrate used.
If the "Repeat" options are checked (for both columns and rows), the pages/folding sheet are arranged by repeating, i.e. they are duplicated. If not, the pages/folding sheets are not duplicated, but placed consecutively.
"Cut & Stack" option
You can use "Cut and Stack" if you placed a number of different folding sheets on one press sheet.
•Function is not enabled:
Each press sheet is cut separately. The cuts sort out the folding sheets.
The order/arrangement of the pages/folding sheets on the press sheet remains unchanged.
•Function is enabled:
Each printed copy is delivered to several stacks, with the order of pages divided up in such a way that the stacks only have to be laid on top of each other after output to have a complete copy with the correct order of pages.
Example: One copy comprises 500 pages and is delivered to five stacks of 100 pages each. The first stack then has pages 1 thru 100, the second stack pages 101 thru 200, the third stack pages 201 thru 300, etc.
"Cut & Stack" option for processing PDF/VT files
If PDF/VT files (i.e. PDF files with large page ranges defined as "records") are processed, then "Cut & Stack" acts as follows if several data records are placed on one sheet:
•Function is not enabled:
The pages (subjects) of a data record are distributed in succession on the subsequent surfaces. If several pages are to be on one surface, all the unused page positions of the surfaces are filled up after all pages of the first data record are distributed.
Example: Two pages can be placed on one surface. A data record contains four pages. The first data record is then distributed in such a way that one page of the data record is placed on one surface. In other words, four surfaces are filled with data. The pages of the second data record are placed in each case on the second page placeholders of these four surfaces. Four new surfaces, each with one page, are filled with the third data record. The second page placeholders of these surfaces are again filled with the fourth data record, and so on. If the front and back are printed, this is taken into account when assigning the surfaces, resulting in the matching back being printed for a front

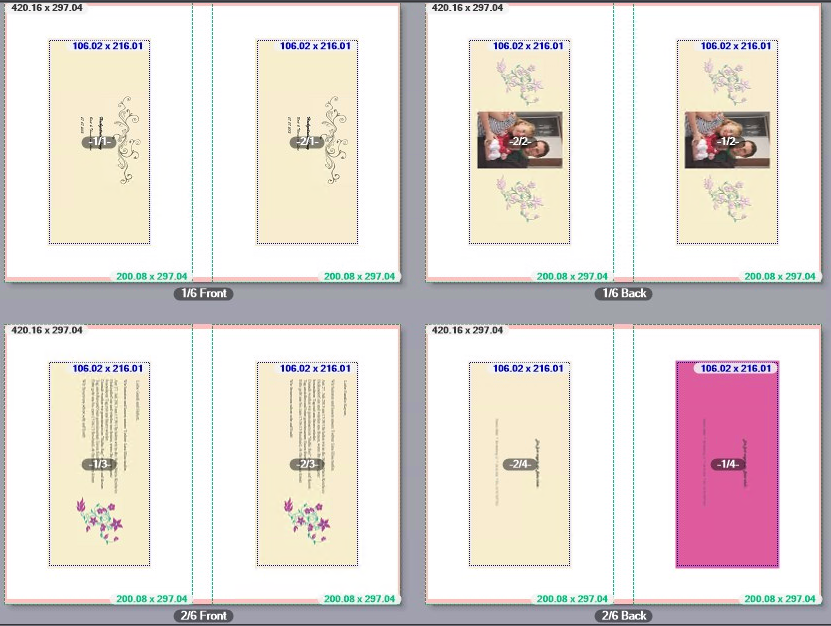
The numbering of the subject identifies the number of the data record/page of the data record, e.g. 2/3 is the third page of the second data record.
•Function is enabled:
In this case, the pages of the data records are split so that the page order is optimized for finishing afterwards. This means that each printed copy is delivered for finishing (cut, stack) to be done so that the stacks only have to be placed one on top of the other after finishing to have complete copies in the correct page order.

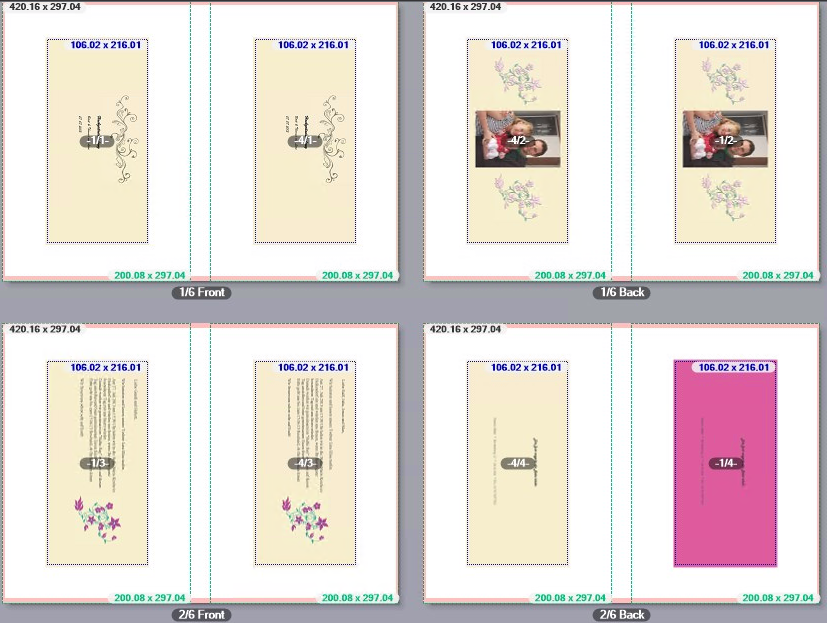
In the example shown, the first pages of the first and fourth data record are placed on the first surface. The second pages of the first and fourth data record are placed on the second surface (back). The third pages of the first and fourth data record are placed on the fourth surface. The fourth pages of the first and fourth data record are placed on the third surface. The subsequent pages are distributed accordingly on further surfaces.
This is where you define the number of pages/folding sheets on the press sheet.

Prerequisite: These options can be used only if the "AutoArrange Folding Sheets" option is not enabled.
You always start off with one folding sheet per press sheet. In other words, folding sheet 1 is placed on press sheet 1, folding sheet 2 on press sheet 2, etc.
The "Repeat" option only has an effect if the "Rows" or "Columns" box contains a number equal to or greater than "2".
•"Rows" without "Repeat"
The "Repeat" option is not enabled. The number in the "Rows" box indicates how many of the pages/folding sheets related to a press sheet will be placed side by side on this press sheet.
Example: In a "Double-sided" layout, page 1 is placed on the front of press sheet 1 and page 2 is placed on the back of press sheet 1.
The "Rows" and "Columns" boxes each contain the number 1 and the "Repeat" options are not enabled:

Now enter a "2" in the "Rows" box.
Then pages 1 and 3 are placed side by side on the front side of press sheet 1. In line with this, pages 2 and 4 are placed side by side on the back of press sheet 1.

•"Rows" with "Repeat"
In the "Row" box a number equal to or greater than "2" can be entered and the "Repeat" option is enabled.
Then the number in the "Rows" box defines how many repetitions of the pages/folding sheets will be arranged side by side on a press sheet.
Example: In a "Double-sided" layout, page 1 is placed on the front of press sheet 1 and page 2 is placed on the back of press sheet 1.
The "Rows" and "Columns" boxes each contain the number 1 and the "Repeat" options are not enabled:


Enter a "2" in the "Columns" box and enable "Repeat" beside the "Rows" box.
Then, page 1 is placed twice side by side on the front side of press sheet 1. In line with his, page 2 is placed twice side by side on the back of press sheet 1.

•"Columns" with/without "Repeat"
The behavior is the same as described above for "Rows" with/without "Repeat", only that the pages/folding sheets are arranged one below the other.
"Rotation" option (angle sign)
In this list box, you can set a rotation angle for all pages/folding sheets placed on the surfaces. In doing so, the page content is rotated too.
In the "Double-sided" and "Booklet Printing" layouts, the pages are always rotated so that the front and back pages of the document pages are rotated synchronously. In a "Calendar" layout, the pages are always rotated so that the front and back pages of the document pages are rotated in opposite directions.
If only one page/folding sheet is placed on a surface, the rotation angles 0°, 90°, 180° or 270° clockwise are available.
Example: Two pages are placed on a sheet with the "Double-sided" setting. Parameters: Columns = 2, Repeat = Off.
The angle of rotation is set to "0°":
Now the rotation angle is set to "90°":
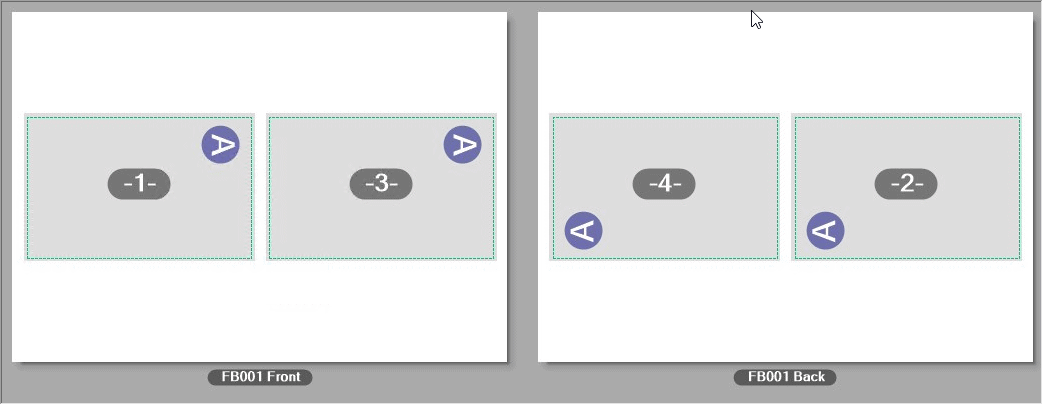
If two or more pages are placed on a surface, the angles ">< 0°", ">< 90°", ">< 180°" and ">< 270°" are also available as settings. With these settings, the pages/folding sheets on a surface (front or back) are counter-rotated. In addition, the pages are oriented on the surface in the set angle. Orientation of the back depends on the selected layout type (see Selection of the layout type).
Example: Two pages are placed on a surface with the "Double-sided" setting. Parameters: Columns = 2, Repeat = Off.
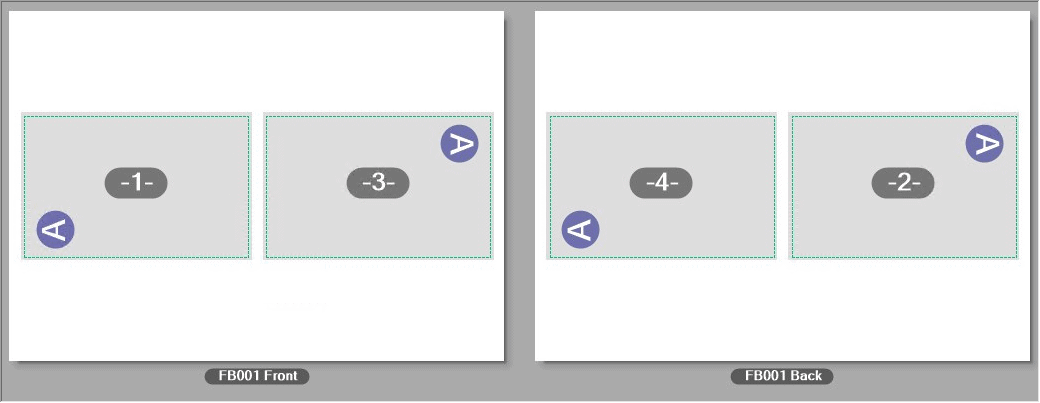
With a rotation angle of ">< 0°", the pages are rotated to each other so that the pages on the surfaces are counter-rotated on every sheet, with the first page on the front surfaces unrotated and the second page rotated by 180°. The corresponding pages on the back surfaces are oriented the same as the front surfaces:
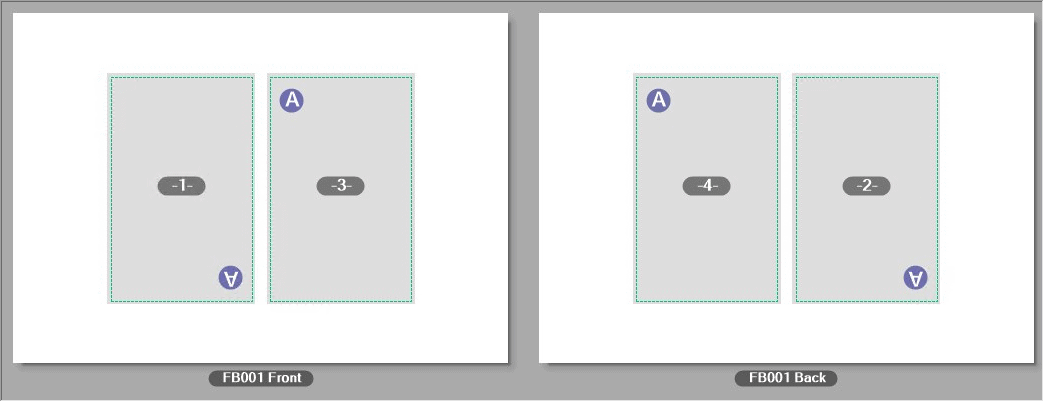
With a rotation angle setting of ">< 90°", the pages are rotated to each other so that the top edges of the pages face each other on each surface:
Accordingly, with a rotation angle setting of ">< 270°" the bottom edges of the pages face each other:
With a rotation angle setting of ">< 180°", the pages are rotated to each other so that the pages on the surfaces are counter-rotated on every sheet, with the first page on the front surfaces rotated by 180° and the second page unrotated. The corresponding pages on the back surfaces are oriented the same as the front surfaces:
Automatic
You can select "Automatic" as the rotation angle setting if the "AutoArrange Folding Sheets" option is enabled. The folding sheets are then rotated automatically to be able to place the greatest number of folding sheets on the printing material.
"Vertical/horizontal distance" options

Prerequisite: More than one page/folding sheet are placed in horizontal and/or vertical direction on the sheet layout.
With these options you can set up the vertical and/or horizontal gap between the pages or folding sheets.
|
|
Vertical gap between folding sheets.
|
|
|
Horizontal gap between folding sheets. |

Prerequisite: The "creeping" option can only be used when "Booklet Printing" is set as the layout type.
Creeping describes a displacement of pages as a result of paper thickness. Creeping occurs when stitching or binding stacks of pages, for example, when sheets are stacked and folded for saddlestitching.
The creeping value that you can set in this box offsets creeping between two successive two-page spreads, resulting in the page contents lying accurately one on top of the other after trimming.
A positive value shifts the inner pages inwards (towards the spine). A negative value shifts the inner pages outwards.
The value determines the offset per fold layer.
The page spacing changes if you enter a value for creeping on the sheet layout.
Creeping Marks/Fixed Marks: This option can be used to adjust the position of the cut marks to the desired end product, depending on whether the folding sheets are to be nested (saddlestitching) or stacked one on top of the one another (perfect binding). Creeping compensates the shift of the inner pages outwards. The setting is taken into account in all cases except when the schema only contains one page. The cut marks are not shifted inwards if the "Fixed Marks" setting is set.
By clicking the icon for fixed marks/creeping marks, you can toggle between the following conditions:
|
|
The page cut marks are moved with the creeping.
|
|
|
Fixed Marks: Even if a creeping value is defined, the cut marks remain at the same position. |

Note: In "Administration > Templates", you can choose between two creeping methods in a PagePrint sequence for digital presses that support this function:
·Creeping by offset and
·creeping by scaling.
See also Layout settings > Booklet settings > Creeping.

Prerequisite: The "Back Margin" box can only be used when "Booklet Printing" is set as the layout type.
In this box you can define the width of the back margin in booklet printing. Accordingly, the pages on a sheet are moved apart from each other.
"Gripper for Saddlestitcher (Collator)" option
Normally, a strip of the substrate is needed to pull the folding sheets onto the saddle if a saddlestitcher is used to collate the sheets. The position of the gripper margin on the folding sheet depends on the folding sheet scheme. The folding sheet becomes bigger because of the gripper margin. As a result, all the pages are shifted.
Choose between a front fold and rear fold if you need a gripper margin.
•Not Present
•Fold Rear
Gripper margin on the back of the folding sheet
•Fold Front
Gripper margin on the front of the folding sheet

Note: In the preview of the "Digital Printing" window, the sheets are shown so that their orientation corresponds to the way paper runs through the press. In other words, the sheets run through the press from right to left in the orientation shown. The back of a sheet is always thus the right side in the display and the front is always the left side.
"Margin" box
This is where you can enter the width of the gripper margin.


