
Configure the corresponding data storage unit on the Prinect CP2000 Center
1.Firstly you have to carry out the following steps on the printing press (Prinect CP2000 Center) according to the software version:
Open the "DataControl" software module as of version V.37.6 and above.

Open the "DataControl" data storage unit as of version V.41.6 and above.


Open the "Workplace Interface" data storage unit as of version V.44.0 and above.


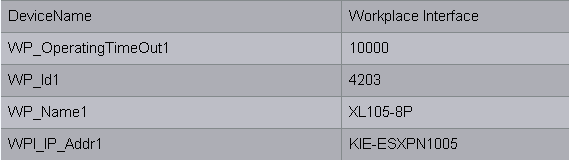
The following window appears in all three cases.

|
CDM devices |
Prinect CP2000 Center |
|---|---|
|
Workplace ID |
"WP_Id1" |
|
Device name |
"WP_Name1" |
|
Name of the Prinect server |
"WPI_IP_Addr1" |
Overview of the attribute assignments:
2.Under the attribute "WP_Id1", enter the number that you entered previously in the Prinect Integration Manager/Prinect Pressroom Manager. In our example this is "4203".
The attribute "WP_Id1" uniquely identifies the press in the Prinect Integration Manager/Prinect Pressroom Manager at a later time.
3.Enter the desired device designation for the attribute "WP_Name1". In our example this is "XL105-8P".
You have already specified this device name in the Prinect Integration Manager/Prinect Pressroom Manager under "Device name".
4.Enter the designation of the Prinect server for the attribute "WPI_IP_Addr1". In our example this is "KIE-ESXPN1005". The connection to the Prinect Integration Manager/Prinect Pressroom Manager should now be established.
Synchronization of the PDC configuration with the press
After setting up the press, you must run a synchronization between the PDC configuration and the Prinect CP2000 Center (see the Synchronization of the PDC configuration with the press.
Configure the color measurement directory on the Prinect CP2000 Center (only if Prinect Axis Control I is connected)
Configuration of the color data folder is described in detail in Configuring color data export on the Prinect Press Center.