
Information about Consecutive Steps
When you process a job in the Cockpit, some of the steps listed above are done in a certain order. Basically, the steps are done from left to right in the order set by default in the workflow bar.
In some cases, however, single steps are to be skipped or the predefined order was changed. See Workflow. In some situations, different steps can be done next.
To indicate which steps can be done or are to be done next, a small arrow highlights each of these steps to you:
A tooltip with information about a process displays when you let the mouse cursor hover over the arrow for a while:

If there are a number of subsequent steps, as shown in the example, you can decide, for example, with the help of a tooltip, which step you will do next. In the example, a digital printing job offering proofing also as an option displays. You can decide whether you will proof the job before digital printing or output it directly in the digital printing step and skip proofing.
This information about subsequent steps is determined depending on the system configuration and the job settings from the Prinect Manager. This help guides you fast and reliably through job processing.
You can invoke a context menu for each of the steps using the other mouse button.

The context menu contains the following items:
|
Work Step Status - Completed |
The step is defined as "completed". At the same time, the "Work Step Status - Completed" dialog opens. You can enter a comment about the completed step in this dialog. The comment displays as a tooltip for the step icon. |
|
Work Step Status and Precursors - Completed |
The step and all preceding steps are defined as "completed". At the same time, the "Work Step Status and Precursors - Completed" dialog opens. You can enter a comment about the completed step in this dialog. The comment displays as a tooltip for the current step icon and for the icons of all the preceding steps. |
|
Due Date |
The "Set Due Date" dialog opens. This is where you can set a due date or remove an existing due date. See Due Dates for Steps (Milestones). |
|
Show Text |
The text, e.g. "Documents", in the step icon is shown or hidden. |
Keyboard shortcuts in the workflow bar:
|
Key combinations |
|
|---|---|
|
"Ctrl + space bar" |
Go forward one step |
|
"Ctrl + Shift key + space bar" |
Go back one step |
Due Dates for Steps (Milestones)
You can set a due date for some steps, one in each case. In this connection, steps are also referred to as "milestones". If an MIS is connected to the Prinect Manager, these milestones are synchronized between the Prinect Manager and the MIS. This means that the milestones display for each job in the MIS and you can assign due dates to the milestones there. The due dates are transmitted immediately to the Cockpit and can be seen there (see below).
•In the case of the Prinect Business Manager, this synchronization is done on both sides. In other words, the due dates of the milestones or the processing status of the milestone can be changed both on the Business Manager and in the Prinect Cockpit. These changes are seen immediately in the other system. However, the view may have to be refreshed manually in the Business Manager to display the changes made in the Cockpit.
•If a third-party MIS is connected, it is only possible to transmit the data from the MIS to the Cockpit.
•When importing a gang layout to a job, any printing date and delivery date will be copied from the gang layout to the job. The use of these data impacts both manually imported gang layouts and automatically imported layouts. The due dates can be seen in the workflow bar of the open job.
Define a due date in the Cockpit
Position the mouse pointer over the step you want and select "Set Due Date" in the context menu. The following window displays:
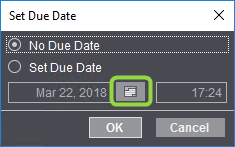
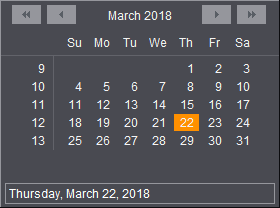
Click the calendar icon and you can then set the due date you want in a calendar view.
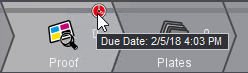
After you entered or selected a due date and confirmed the dialog with "OK", the step is flagged by a small clock. This also displays if a due date was set in the MIS.
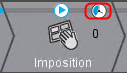
The icon turns red if the due date is already exceeded. The icon is blue if the due date is still in the future.
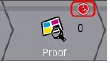
The due date displays in a tooltip if you let the mouse pointer hover over the clock.
Processing status of the steps
The clock icon disappears when a step is completed. Now the next due date in the subsequent steps is relevant. A step can be given "completed" as its status either after all processes in the step were completely finished or after the step was set manually to "Completed" (with "Work Step Status - Completed" or "Work Step Status and Precursors - Completed" in the context menu). See also Set Work Step Status.
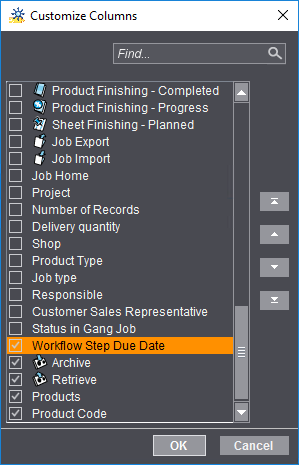
Show due date in the job list
You can show the "Workflow Step Due Date" column in the job list.
This column displays the next workflow step due date of the job concerned. The icon of the current step displays to the right.
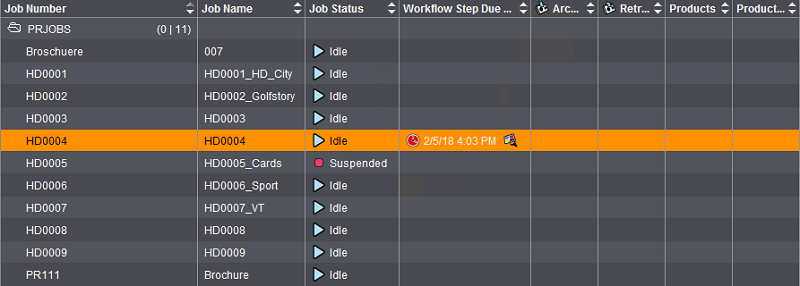
The next due date displays when this step is completed.

Note: You can use the "Due Date" filter rule to filter the job list by jobs with different milestone states. See Example: Due Date.
The status panel is located below the area for the steps or parameters.

It displays details about the current processing state of the job and in particular about the progress of running processes.