Import devices, cost centers, and operations
You do not have to set up devices (such as presses) again in Prinect Manager if they are already set up in Prinect Business. The following devices with their cost centers can be imported from Business Manager to the Master Data Store.
What data are copied?
When a device is imported, the following data is copied to the Master Data Store:
•Device name
•DeviceID
•Device class (sheetfed press, folder, digital press, etc.)
•Cost center
The cost center is created automatically from the DeviceID. Variants are unknown to Prinect Business. For that reason, you must check and, if necessary, match the cost centers after Import.
•Actions
Actions are called "activities" in Business Manager. Activities are manually assigned to actions during import. It is also possible to create missing actions manually.
•Connection type
By default, all devices are imported to the Master Data Store as "Data Terminal" devices. If necessary, you must customize the connection type after importing.
•Other machine parameters
Besides the parameters mentioned above, there are other device parameters like machine type (XL105, Labelfire, etc.), number of printing units, etc. These parameters can be set in the Cockpit Device Assistant and must be checked manually for each device and adjusted if necessary.
Notes on import
•The data cannot be updated automatically.
When you edit device data in Business Manager, such changes will not be included when reimporting to the Master Data Store. You must update these changes in Cockpit later.
•If Business Manager imports data to the MDS, only the data of one device is imported and not the data of several devices at the same time.
How to import device data records
1.In Prinect Cockpit, go to "Administration > System".
2.Click the name of the Prinect Server in the tree structure to the left.

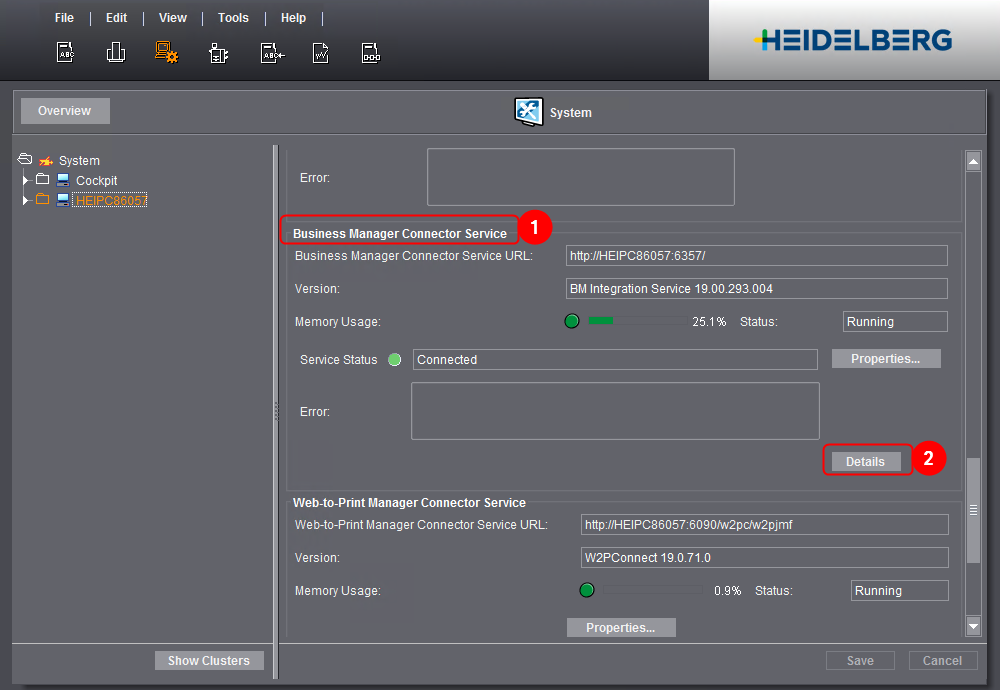
3.Scroll to "Business Manager Connector Service" (1) on the right side.
4.Click the "Apply" button (2).
The Internet Browser opens the "Configuration Status" page.
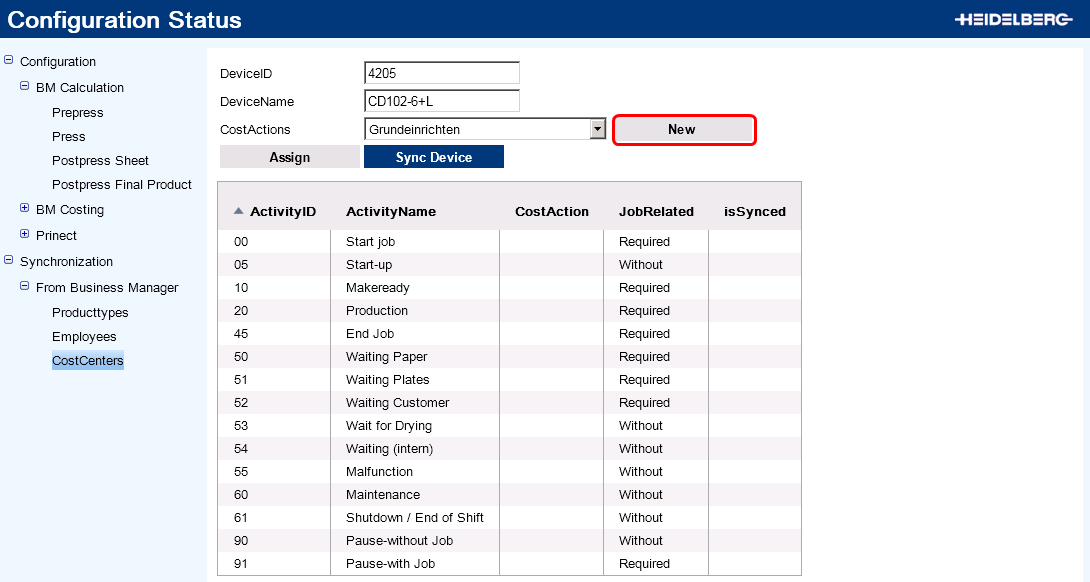
5.In the tree structure to the left, go to "Synchronization > From Business Manager > CostCenters"
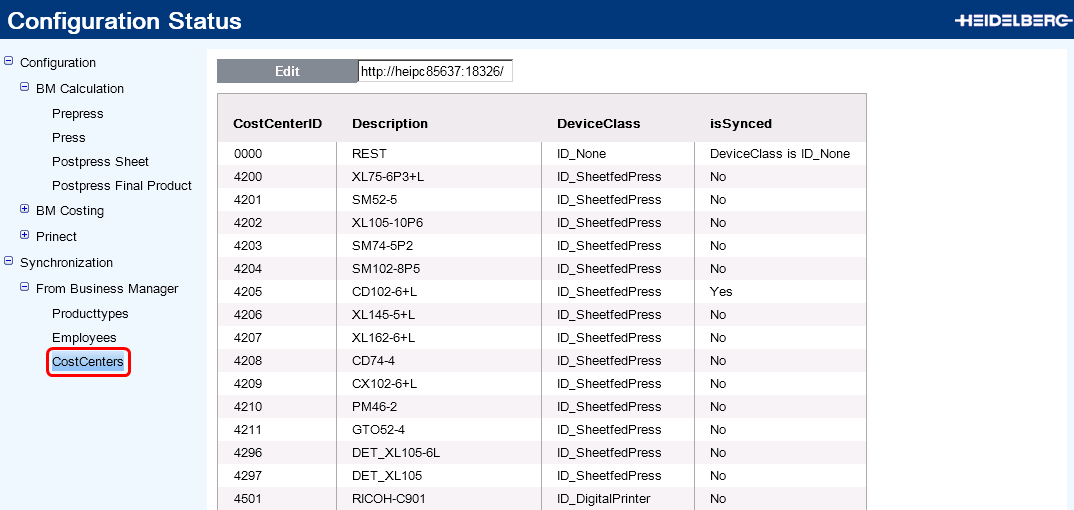
The list displays all devices set up in Prinect Business. The "isSynced" column shows you whether the data was already imported ("Yes") or not ("No"). These data records cannot be altered later. If you edit device data in Business Manager, you must also make the respective changes manually in Prinect Cockpit.
6.Select the device you wish to import in the list.
7.Click "Edit".
A page opens where you can configure the device.
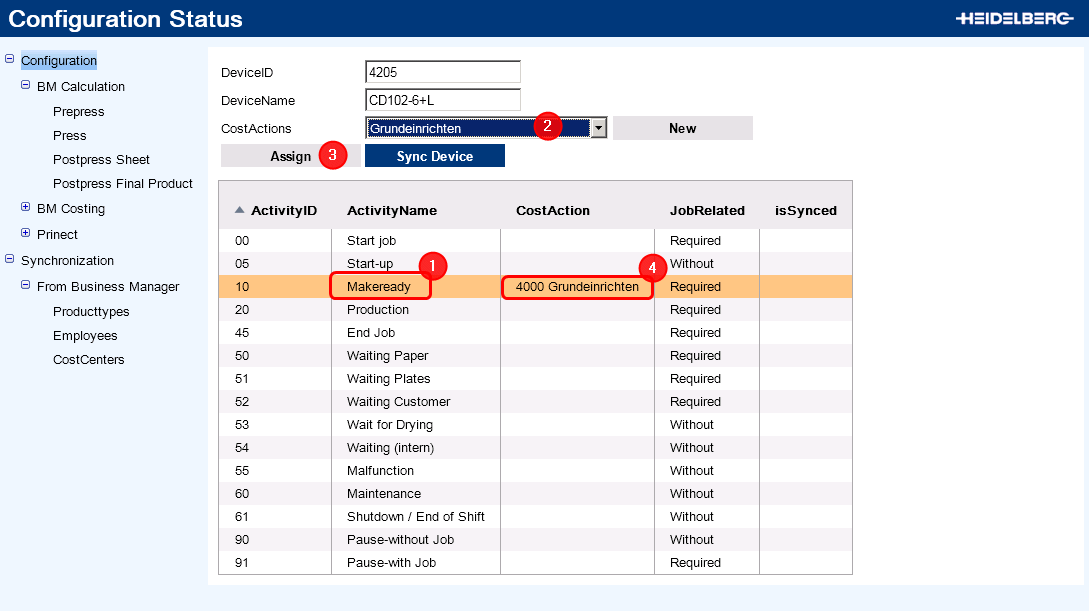
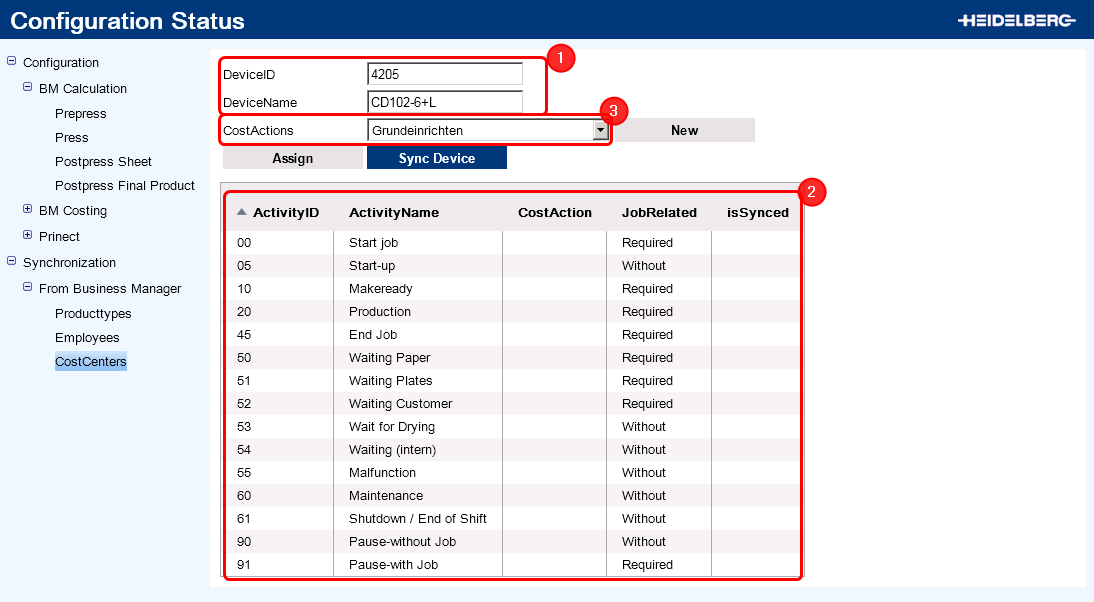
The entries for "DeviceID" and "DeviceName" were provided by Business Manager (1). Do not change these.
The list shows all "activities" ("actions"i n Cockpit ) that are set up in Business Manager. You must assign each of the "activities" to be used for job costing for this device an operation in Cockpit.
8.Select the respective "Activity" item in the list (2).
9.Create the pertaining action in Cockpit (3).
If the action does not exist, you can create a new one with the plus sign "+". See Create a new Action.
10.Click "Assign" (4).
The activity is now assigned to the action.
11.Repeat assignment for further activities if necessary.
12.Click "Sync Device" (5) once all activities have been assigned to the corresponding actions.
Importing can take a few seconds. You automatically return to the "CostCenters" list as soon as import is finished. "Yes" displays in the "isSynced" column.
13.You can check the settings in Cockpit.
14.Go to "Administration > Device configuration > Cost Centers".
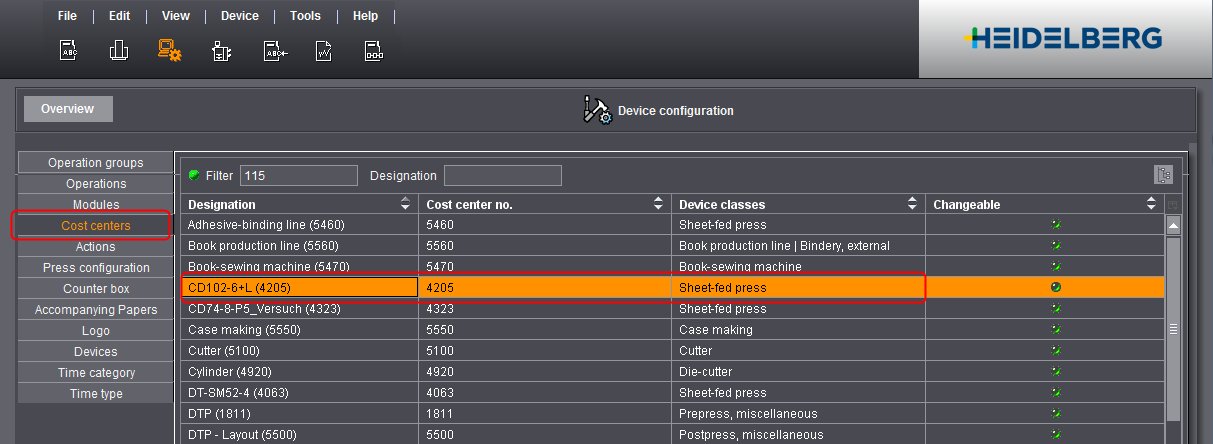
In this section, a cost center was created automatically from the "Device name" and the "Device ID" parameters. Depending on how these parameters were configured in Business Manager, you must adjust the parameters here.
15.Check the other device settings. Switch to the "Administration > System" view and open "[Prinect server name] > CMD" by clicking on it in the left-hand tree structure. The imported devices are displayed here (possibly alongside the devices set up in Cockpit).
16.Select the imported device you want to check and select "Edit" in the context menu.
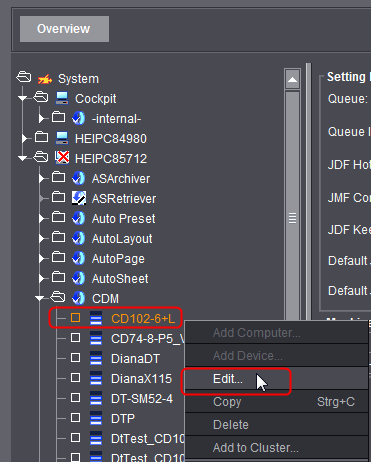
The device assistant appears.
17.Check the connection type. The device was set up automatically as a "Data Terminal device" and you may have to correct it.
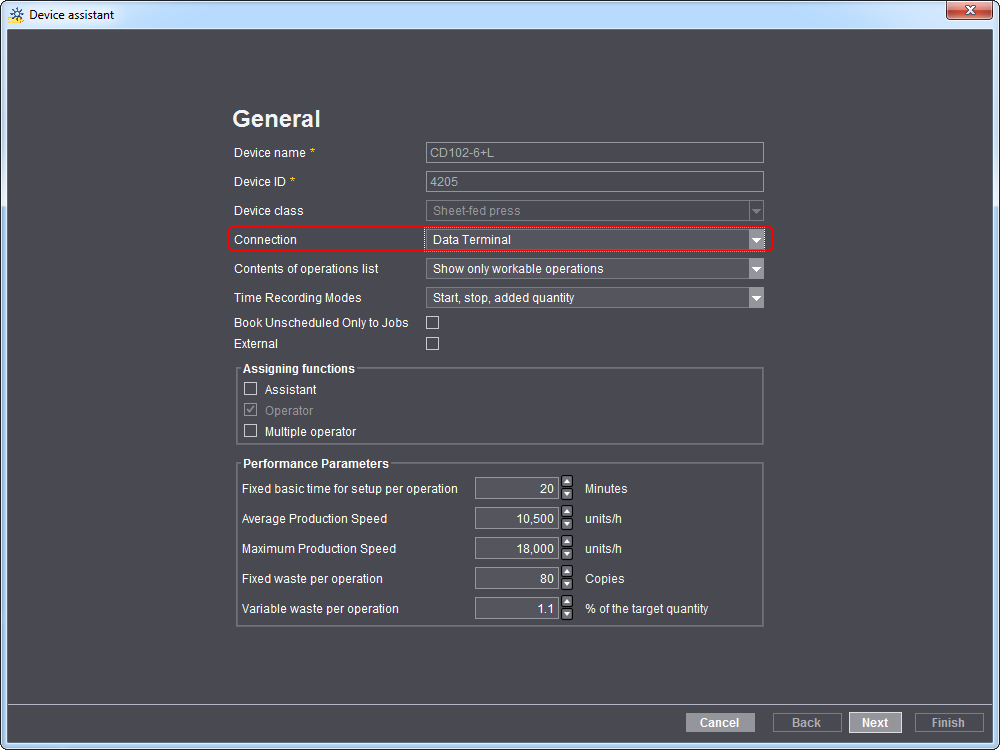
18.Click "Next".
19.Check the machine settings in the other dialogs and, if necessary, match them to your needs.
20.In particular, check the variants.
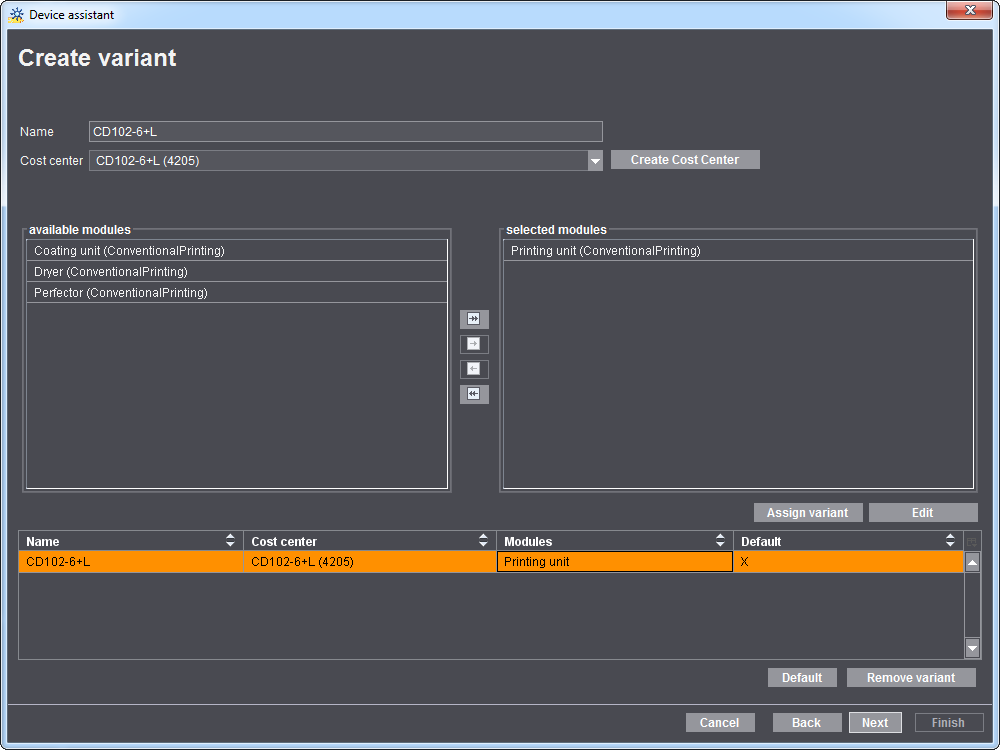
Business Manager does not support variants. It only recognizes cost centers that are assigned to a machine. This can mean that several cost centers are assigned to one machine. These cost centers must be set up as variants in Cockpit.
21.Click "Next".
22.If necessary, enable "Enable Extended Job Ticket" and "Enable Print". See also "Enable Extended Job Ticket" option (1) and "Enable Print" option.
23.Click "Finish".
This concludes the import and manual changes.
1.In the Prinect Cockpit, go to "Administration > System".
2.Click the name of the Prinect Server in the tree structure to the left.
3.Scroll to "Business Manager Connector Service" (1) on the right side.
4.Click the "Apply" button (2).
The Internet Browser opens the "Configuration Status" page.
5.In the tree structure to the left, go to "Synchronization > From Business Manager > CostCenters"
6.Click the "New" button.
The dialog where you can create a new action opens:
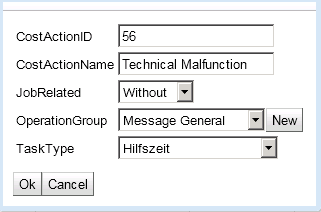
You can edit the following parameters:
"CostActionID": Enter an ID for the action in this box. This ID need not be identical with any "ActivityID" of Prinect Business. It is vital that this action ID is not used for another action in Prinect Integration.
"CostActionName": Enter the name of the action here. We recommend using the same name as the one you used for the pertaining "activity" ("ActivityName") in Business Manager.
"JobRelated": When you set up the action, an operation (PDC message) with the same name is created in Prinect Integration at the same time.
•Select "Required" if the "Operation", i.e. the collection of production data for this action is to always take place with reference to the respective print job. This means that the production data is reported in connection with the job data (e.g. to the MIS or Analyze Point).
•Select "Without" if the "Operation", i.e. the collection of production data for this action is to always take place with reference to the respective print job.
"OperationGroup": With this parameter, you assign an "operation group" to the action. On machines that can report production data, the messages for collecting production data can be combined into "operation groups". This enhances the overview if the appropriate operation is to be selected on the machine. By default, there are four operation groups. You can set up more operation groups with "New".
"TaskType": With this parameter, you assign a time type to the action. You will find more information on each of the time types here: Time Type.
7.Confirm the settings with "OK".
The action is created and appears in the "CostActions" list box. You can now assign an activity to the new action.
In Prinect Cockpit, the newly created work process is displayed in the "Administration > Device configuration > Actions" view. When you set up a new action, an operation (PDC message) with the same name is created at the same time. This operation is automatically assigned to the new action.
Privacy Policy | Imprint | Prinect Know How | Prinect Release Notes