Privacy Policy | Imprint | Prinect Know How | Prinect Release Notes ![]()
 Prerequisite: The Prinect "Versioning" option must be licensed in order for version-specific input fields to be displayed.
You can create or rename product parts and versions in this window.
 Note: Once the "Versioning" step has been completed in the Prepare sequence, the name of a master version can no longer be changed. The other versions are dimmed until they are assigned to a layout. After that, these version names can no longer be changed either.
Product parts can be structured hierarchically. In other words, product parts can in turn contain product parts and are nested in this way.
The functions in this window only allow you to edit product parts or versions within a hierarchy level, i.e. you open the "Edit Products of..." window by selecting the corresponding product part in the left-hand area and calling up the context menu command "Edit -> Product part".
The top hierarchy level is marked by the term "End product". The window caption displays the name of the product part you are currently editing.
To create versioned product parts, you must open the "Edit Products of" window twice in succession:
•Before the first time, select the "End product" item or a product part if the new product part is to be created in the hierarchy below a product part. Then create a new product part in the "Edit Products of..." window. Close the window and then select the newly created product part and open the context menu command "Edit -> Product part" again.
•The second time you open the context menu, you create the versions intended for the product part.
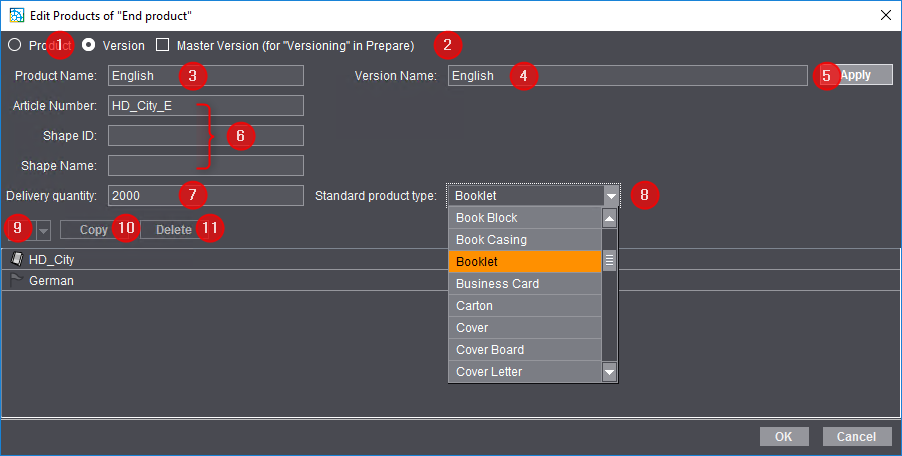
"Product" or "Version" options (1)
Depending on which of these options is selected, a product part or a version is created or edited.
•To create a new product part, enable the "Product" option and enter the product part name in the "Product name" field. Fill in the other fields in the window and confirm with "OK".
•To create a version, open the window again and enable the "Version" option. The product name of the selected product part is displayed in the "Product name" field. Enter the name for the new version in the "Version name" field. Fill in the other fields in the window and confirm with "OK".
"Master Version (for "Versioning" in Prepare)" (2)
This option is only available if the "Version" option is enabled. If you enable this option, the newly created version becomes a master version. Once the job has been processed with a "Prepare" sequence and the "Versioning" option, the name of the master version can no longer be changed. See "Versioning" Option.
Product Name (3)
Enter the name of a new product part here. If the window was opened with a selected product part, the name of this product part is displayed here.
Version Name (4)
Enter the name of a new version here. If you are editing an existing version, the name of this version is displayed here.
"Apply" button (5)
Click on this button to apply all the changes made in the window without closing the window.
1.For example, to create several new product parts, enter the name of the first product part in the "Product name" window and then configure the other properties of the product part. Then click on "Apply".
2.Leave the window open and replace the existing product name with a new product part name. Configure the parameters for the other properties of this product part and then click on "Apply" again.
3.Continue in the same way for further product parts. By doing this, you can create all the required product parts and their associated versions. A list of new or changed elements for the selected hierarchy level will appear in the bottom area of the window.
4.When you have finished configuring the parameters for all product parts and versions, click on "OK". The last changed parameters are applied and the window is closed.
Article Number/Shape ID/Shape Name (6)
Note: These parameters are required only for packaging printing.
Enter the values in the respective fields.
Delivery quantity (7)
Enter the planned delivery quantity for the product part or version here.
"Standard product type" list box (8)
By selecting an entry from the list, you can define a standard product type for the product or version.
List box for product parts (9)
Select one of the existing product parts here. The name of the selected product part is displayed in the corresponding boxes, depending on the version ("Version name" box) or the product ("Product name" box).
"Copy" button (10)
Use this button to copy the product part you are currently editing. This allows you to create several similar product parts with correspondingly defined versions.
Example:
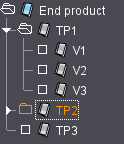
1.To transfer the properties of an existing product part "TP1" to a product part "TP2", select (with the "Edit Products of..." window closed) the product part "TP2" in the product part tree structure.
2.Select "Edit > Product part" in the context menu. The "Edit Products of" window opens with the properties of the product part "TP2".
3.Select the product part "TP1" from the "List box for product parts" (9) and click on the "Copy" button.
The "Edit Products of" window for the product part "TP2" is populated with the parameters of the selected product part "TP1", including the defined versions, if any. Clicking "OK" to apply the properties for the product part "TP2" and close the "Edit Products of..." window.
"Delete" button (11)
To delete one or more elements in the product part tree structure, select the relevant elements and click on the "Delete" button.
Privacy Policy | Imprint | Prinect Know How | Prinect Release Notes