Privacy Policy | Imprint | Prinect Know How | Prinect Release Notes ![]()
"Print marks settings" tab for Jetfire 50 and Versafire LV / LP digital presses
This tab allows you to set and modify marks that refer to the layout or folding sheet.
Folding Sheet Cuts, Cut Marks, Folding Marks, Fold Lay Marks
You can edit the following values for these mark types:
•"Shift": The mark is moved outwards by this value.
•"Length" / "Width": Length and width of the mark.
Color control bar
You can specify an offset for color control bars. Use "Offset" to set the vertical position of the color control bar. The top left corner (offset = 0) of the trim box is the reference point (zero point) for the color control bar.
Register marks
In the input fields, define the offset in the X- and Y-direction and the width (line width, vertical and horizontal) of the marks.
The list box is where you define the position of the register marks, whether they will be "Floating", "On side" or "Top/Bottom".
Pull Lay
 Prerequisite: This mark type is available only for CTP devices (PlateSetter Devices).
For pull lays you can specify the position in each case for the front and the back. In addition you can also set the offset of the mark to the sheet edge.
Collating Marks
You can select between the following options in the list box:
•"Automatic": The length and width of the collating mark is defined automatically.
•"User-defined": You enter the length and width of the collating mark manually in the box to the side.
Option "Finishing Marks"
Enabling this option allows you to parameterize finishing marks for offline finishers configured with a Jetfire 50 or Versafire LV/LP machine. Preset marks are available for selection for some finishers. The PDF files containing these marks and the corresponding mark XML files are stored in the Prinect Server file system. The XML files can be used as templates for individually created marks by editing them with a text editor and saving them under a new name.
The mark files are located in the Prinect Server file system at the following location:
\\...\PTConfig\SysConfig\Resources\Marks\FinishingMarks
There is a dedicated subfolder containing the respective mark files for each finishing device. If necessary, you can create new folders for other finishers here and fill them with the appropriate mark files. These folders or devices will then be added to the "Finishing Device" and "Mark Template" list boxes.
 Note: To create a new finishing mark, you can copy existing finishing marks to the newly created folder and adapt these marks to the new finisher by changing the program number of the cutting program (see "Program Number" input field). Experienced users can also edit the template mark XML files to create customized finishing marks. See Defining Finishing Marks.
You can define the following settings in the "Finishing Marks" section:
"Finishing Device" list box
This is where you select the Finisher whose marks you want to configure.
Mark Template
This is where you select the mark PDF file to use or to configure. Suitable mark templates are offered for the selected finisher.
Program Number
Normally, finishing marks differ mainly in the number of the respective cutting program. You can adapt a finishing mark to a different cutting program by entering the corresponding program number in this box. This will overwrite the program number in the selected mark.
Option "Use from mark template"
If this option is enabled, the program number originally entered in the selected mark template will be used.
Finisher feed direction
This is where you set the paper feed direction in the respective finisher. This determines where the finishing mark is positioned on the sheet.
If necessary, you can edit or regenerate the XML codes of the finishing marks for Jetfire 50 or Versafire LV/LP machines. You can use the following codes for this:
Parameter description for <PDFMarkParameter> for PDF marks (Typ = "PDFMark")
Parameters | Explanation |
|---|---|
FileSpec | Path to the PDF file used as a template (e.g.: PDF/SampleLetterhead.pdf). |
OnFront | Indicates whether the mark is placed on the front of the sheet (true or false). |
OnBack | Indicates whether the mark is placed on the back of the sheet (true or false). |
Usage | Indicates whether the mark should only be placed on the cover (Usage = "Cover") (Horizon iCE Stichliner). |
Unit | Unit of measurement for position specifications (point, mm for millimeter). |
PositionFront | X and Y position of the mark on the front, separated by a space (e.g.: 0 0). |
PositionBack | X and Y position of the mark on the back, separated by a space (e.g.: 0 0). |
Rotate | Rotation angle of the mark in degrees (0, 90, 180, or 270). |
Scale | Scaling factor of the mark (e.g.: 1 = 100%, 0.5 = 50%). |
Alignment | Reference point for the placement of the mark (e.g., PaperLL = lower left corner of the paper). •PaperLL: lower left corner of the paper •PaperLR: lower right corner of the paper •PaperUL: upper left corner of the paper •PaperUR: upper right corner of the paper •SubjectLL: lower left corner of the subject (image content on the paper) •SubjectLR: lower right corner of the subject •SubjectUL: upper left corner of the subject •SubjectUR: upper right corner of the subject |
SheetRanges | Indicates on which pages the mark will be placed. Ranges are indicated with ~, individual pages are separated by spaces (e.g. 1~3 5 8 ~ 10 = pages 1 to 3, 5, 8 to 10). Examples for SheetRanges: •Include specific sheets: Example: SheetRanges="5~10" > Pages 5 to 10 are included. •Include from one sheet to the end: Example: SheetRanges="5~-1" > All sheets from sheet 5 to the last sheet are included. •Include from one page up to a specific number before the end: Example: SheetRanges="5~-3" > All sheets from sheet 5 to the third-to-last sheet are included. •Exclude the last sheets (from the end backwards): Example: SheetRanges="-3~-1" > The last 3 sheets are excluded. |
Parameter description for <PDFMarkParameter> Barcode marks (Typ = "Barcode")
Parameters | Explanation |
|---|---|
FileSpec | empty (" ") |
OnFront | Indicates whether the mark is placed on the front of the sheet (true or false). |
OnBack | Indicates whether the mark is placed on the back of the sheet (true or false). |
Usage | Indicates whether the mark should only be placed on the cover (Usage = "Cover") (Horizon iCE Stichliner). |
Unit | Unit of measurement for position specifications (point, mm for millimeter). |
PositionFront | X and Y position of the mark on the front, separated by a space (e.g.: 0 0). |
PositionBack | X and Y position of the mark on the back, separated by a space (e.g.: 0 0). |
Rotate | Rotation angle of the mark in degrees (0, 90, 180, or 270). |
Scale | Scaling factor of the mark (e.g.: 1 = 100%, 0.5 = 50%). |
Alignment | Reference point for the placement of the mark (e.g., PaperLL = lower left corner of the paper). •PaperLL: lower left corner of the paper •PaperLR: lower right corner of the paper •PaperUL: upper left corner of the paper •PaperUR: upper right corner of the paper •SubjectLL: lower left corner of the subject (image content on the paper) •SubjectLR: lower right corner of the subject •SubjectUL: upper left corner of the subject •SubjectUR: upper right corner of the subject |
SheetRanges | Indicates on which pages the mark will be placed. Ranges are indicated with ~, individual pages are separated by spaces (e.g. 1~3 5 8 ~ 10 = pages 1 to 3, 5, 8 to 10). Examples for SheetRanges: •Include specific sheets: Example: SheetRanges="5~10" > Pages 5 to 10 are included. •Include from one sheet to the end: Example: SheetRanges="5~-1" > All sheets from sheet 5 to the last sheet are included. •Include from one page up to a specific number before the end: Example: SheetRanges="5~-3" > All sheets from sheet 5 to the third-to-last sheet are included. •Exclude the last sheets (from the end backwards): Example: SheetRanges="-3~-1" > The last 3 sheets are excluded. |
Parameter description for <BarcodeParameter> for Barcode marks (Typ = "Barcode")
These parameters control the appearance, positioning, and content of the barcode on the print sheet.
Parameters | Explanation |
|---|---|
Type | Specifies the barcode type. e.g.: "Code 128" (widely used 1D barcode). Note: Currently in Use: "Code 39" (Duplo), "Code 128" (CP Bourg), "DataMatrix" (Horizon). |
Text | The content encoded in the barcode. Placeholders such as $[Jobno:6], $[Layoutno:2], $[Sectionno:5] are replaced at runtime with specific values (e.g., job number, layout number, section number) or fixed text specifications (e.g., "12583665"). |
UseFont | Indicates whether a font should be used for the barcode (true or false). For barcodes, usually false, as the lines are generated graphically. |
Font | Name of the font, if UseFont="true" is set (e.g.: "HELVETICA"). Usually irrelevant for barcodes. |
FontSize | Font size, if UseFont="true" (e.g.: 3). Usually irrelevant for barcodes. |
FixedWidth | Fixed width of the barcode in the specified unit of measurement (e.g.: 50). |
FixedHeight | Fixed height of the barcode in the specified unit of measurement (e.g., 3). |
ModuleWidth | Width of a single barcode module (narrowest bar) in millimeters (e.g., 0.254 mm). |
ModuleHeight | Height of a single module (e.g., 8 mm). |
Dimension | Indicates the matrix size of the Data Matrix code (e.g., "BC_DMDIM_18x18" for 18x18 modules). |
Center | Indicates whether the barcode should be centered (true or false). |
Allowed values for the dimensions of the barcodes
The barcode parameter "Dimension" may take the following values:
BC_DMDIM_AUTOMATIC | BC_DMDIM_10x10 | BC_DMDIM_12x12 |
BC_DMDIM_14x14 | BC_DMDIM_16x16 | BC_DMDIM_18x18 |
BC_DMDIM_20x20 | BC_DMDIM_22x22 | BC_DMDIM_24x24 |
BC_DMDIM_26x26 | BC_DMDIM_32x32 | BC_DMDIM_36x36 |
BC_DMDIM_40x40 | BC_DMDIM_44x44 | BC_DMDIM_48x48 |
BC_DMDIM_52x52 | BC_DMDIM_64x64 | BC_DMDIM_72x72 |
BC_DMDIM_80x80 | BC_DMDIM_88x88 | BC_DMDIM_96x96 |
BC_DMDIM_104x104 | BC_DMDIM_120x120 | BC_DMDIM_132x132 |
BC_DMDIM_144x144 | BC_DMDIM_8x18 | BC_DMDIM_8x32 |
BC_DMDIM_12x26 | BC_DMDIM_12x36 | BC_DMDIM_16x36 |
BC_DMDIM_16x48 |
Example: A barcode mark should only be printed on the first and last page.
For this example, the XML code of a barcode label might look as follows:
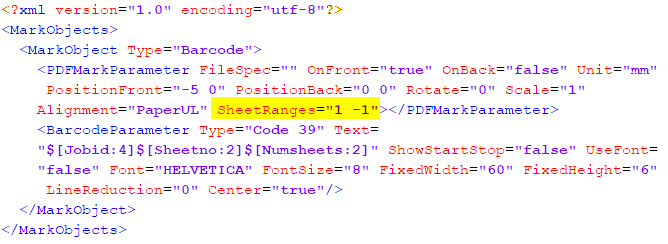
In this example, a barcode mark of type 39: "Duplo" is placed only on the first and last page: SheetRanges="1 -1" (the first 1 defines the first page, the -1 defines the last page). The marks are printed only on the front (OnFront="true" OnBack="false").
Info Text
You can use this option to define special text marks by entering the appropriate text in the edit box. For example, you can enter information on specific output options, or comments on finishing.
In the "X" and "Y" boxes define the position of the mark, starting from the reference point in the bottom left corner of the subject.
You define the orientation of the mark in the angle list box. The angles of rotation are measured in the clockwise direction. A rotation angle of 90° produces text running vertically upwards, that is read from top to bottom. A rotation angle of 270° produces text running vertically upwards, that is read from bottom to top.
Example 1 in the diagram below displays info text in the horizontal direction, example 2 shows it in the vertical direction.
Note: For Labelfire digital presses, info text marks are rotated by default by 90° in clockwise direction to save space on the substrate. This setting displays in the Angle list box. If necessary, you can modify the angle.
Job ID (inserted automatically)
The job ID (job number) of the print job is printed in the related print mark for unique identification of the job when the "Info Text" option is enabled.
Number of PDF/VT records (inserted automatically)
For PDF/VT jobs, the numbers of the PDF/VT records printed on the sheets are output in the slugline.
"Extended job information" option
Enabling this option lets you include additional information on the print job such as information on the printed documents, colors, and special effects in the slugline.
Privacy Policy | Imprint | Prinect Know How | Prinect Release Notes