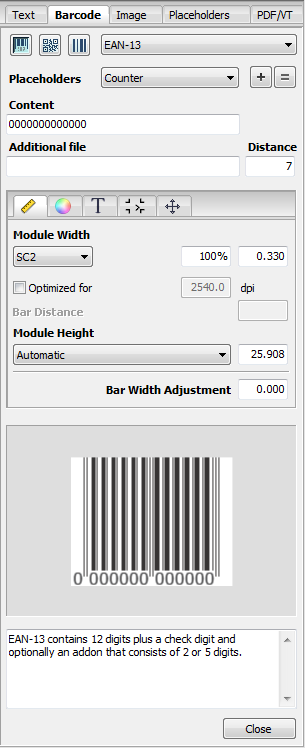
In the "Barcode" tab, you can create barcodes with dynamic placeholders and edit or correct existing ones. You can customize the geometry, color, etc. of each barcode.
You select and set up the barcode in the top part of the tab. You can customize the barcode in the middle part.
The lower part shows you a preview of the currently setup barcode. There is a panel for messages, properties or comments on the currently selected barcode below the preview of this.
To position a barcode, click the preview image and drag-and-drop it to the PDF document. You can also use the buttons in the toolbar. See Toolbar and Context-sensitive Menu.
Barcode type
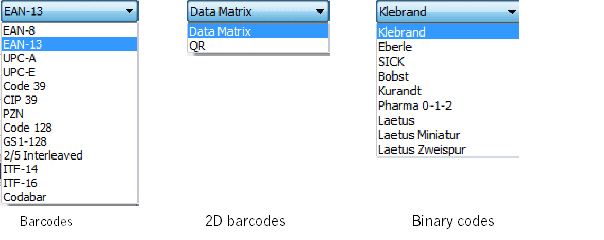
Select the barcode type you want. Click the "Barcodes", "2D barcodes" or "Binary codes" buttons.

A difference is made only between these three types. You then select the barcode you want in the right list box.
You can selected the following barcodes at present:
The view can vary according to what you selected.

|
Note: Code 39 supports "*" as a start or stop character. If set in the CSV file, these limiters will be ignored. You can enable or disable the display of "*" in the "T" (Text) subtab. |
Placeholders
This is where you select the placeholder that contains the content of the barcode. You define the CSV file with the barcodes beforehand in the "Placeholders" tab.
Content
This is where you enter the content of the barcodes. You can also insert placeholders. For 2D barcodes, you can also import .vcf or .txt text files.
Control characters (only for 2D barcodes)
Select "Hexadecimal 00..FF" from the list box to use the special address code format of Deutsche Post (German postal service).
Data Record Placement (not for iVDP)
This is where you can assign the data record if you have several placeholders of the same kind on one page. First, type the number of the data record and then click the placeholder. See also Data Record Placement (not for iVDP).
When you edit the placeholder, e.g. change its color or size, the final result is not necessarily clear just based on the view of the variables. For that reason, checkmark this box to view a preview of the data records.

The narrowest element in a barcode is known as a module.
•"Module width", "Module height":
You can enter a module width in these boxes or modify the set one. You can define the module height yourself or use the one suggested. You can set "Module Width" and "Module Height" in points or millimeters.
Barcodes are specified in 10 sizes (SC0 thru SC9). The SC sizes determine the module width, in other words, the width of the narrowest bar.
The following table shows you the dimensions for EAN-13:
|
|
Size/module width (mm) |
Module width (%) |
|---|---|---|
|
|
SC0 / 0.27 |
28 |
|
|
SC1 / 0.297 |
90 |
|
|
SC2 / 0.33 |
100 |
|
|
SC3 / 0.363 |
110 |
|
|
SC4 / 0.396 |
120 |
|
|
SC5 / 0.445 |
135 |
|
|
SC6 / 0.495 |
150 |
|
|
SC7 / 0.544 |
165 |
|
|
SC8 / 0.610 |
185 |
|
|
SC9 / 0.66 |
200 |
•"Optimized for...":
Optimizes the module with regard to the target resolution.
•"Bar Distance":
Some barcodes permit the bar distance to be modified manually.
•"Bar Width Adjustment":
You can set bar width adjustment in points or millimeters.
You can offset the dot gain resulting, for example, from the absorbency of the paper used with bar width adjustment. Dot gain would make the bars wider than intended, a fact which would noticeably restrict the read capability of the barcode.

You can set or select the color of the barcode itself (lines and text) and the background color (body color).
|
|
You can select color data from the current document using the pipette tool. |
|
|
This lets you create a custom color. A dialog displays with sliders for setting the color you want. |
•"Barcode Color" (lines):
The colors suggested in the list box depend on the document. All colors in the document as well as "Knockout" (no color) and "User-defined" are presented.
•"Text Color" (text):
All the colors in the document and "User-defined" are presented.
•"Body Color":
A body color can be placed beneath barcodes (lines and text), for example, for printing to foils. All colors in the document as well as "Transparent" and "Knockout" are presented.
•"Background Color":
All colors in the document as well as "Transparent", "Knockout" and "User-defined" are presented.
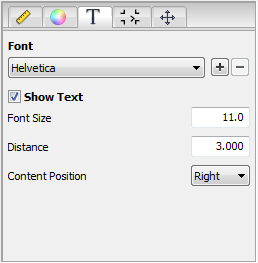
In the "Text" subtab, you define which font you will use for text in the barcode and whether this text will be shown.
Font
Select the font you want. The standard fonts, Helvetica, Courier and Times-Roman, are available for selection. In addition, all the fonts embedded in the PDF are listed.

|
Note: Often not all the characters are embedded or correctly defined in PDF-internal fonts. This especially concerns non-ASCII characters or characters that are not used. |
You can also add other fonts installed on your system.
|
|
|
"+": This lets you add another installed font to the list box. "-": This lets you remove a font from the list box. |
Show Text
Disable "Show Text" if you just want bars in the barcode, i.e. no text.
•"Font Size" / "Distance":
Enter the font size you want and the spacing between lines and text.
•"Content Position":
You define the starting position of the content using the list box.
•"Addon Position":
Only possible with certain barcodes. This lets you define the position of the text set in the "Additional file" box.

This is where you define the borders around the barcode or general borders.
•"Additional Margins":
Enter a value for an additional margin at the position you want.
•Border marks:
You can choose between different border marks, depending on the barcode type.
For barcodes, the start and end of the barcode can be indicated by a border mark. Depending on the barcode selected, an "acute angle" displays where possible. The border is not part of the barcode.
These border marks are type-dependent and not allowed in all barcodes.
Example: EAN-13 has an acute angle sign only on the right if text is enabled because there is no space for it on the left.
•"Width of Border Marks":
This is where you can define the border width of the barcode.
•Triangular marks:
The triangular marks are designed for binary codes during production. They define the start and end of the binary code, making it easier to detect it, for example, in a folder-gluer.
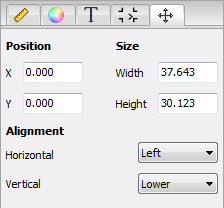
This is where you can customize the position and size of the barcode and its horizontal and vertical orientation.
A warning is issued in the Info box if the size is too small to display all of the barcode content:

The automatic setting is used if you do not enter a value for width or height or if you enter a "0" in these boxes.