![]()
A master page is a parameter set for a page placeholder in a scheme. A master page defines, for example, the size of the page placeholder in the scheme (trimmed size), the Bleed and the Trim .
"Master Pages" tab
|
|
A master page is a parameter set for a page placeholder in a scheme. A master page defines, for example, the size of the page placeholder in the scheme (trimmed size), the Bleed and the Trim . |
Master Pages
Lists the master pages found in the PDF. A master page is always assigned to each page placeholder. The "Default" master page is assigned by default to each page placeholder.
|
|
+": You can create a new master page with this button. Type a name for the new master page in the dialog.
"-": This function lets you remove the master page you selected in the list box. You can only remove a master page if a page placeholder is not assigned to it. |
The parameters of the master pages include:
Page Size
•You can select predefined sizes for the trimmed size (or page placeholder) in this list box.
The size of the master page is equivalent to the size of the trimmed size on the press sheet.
"From PDF" is the predominant size of all the trim boxes of the PDF document. See also "Boxes" group .
•"Width" / "Height":
You can type in values for the trimmed size in these boxes. "Custom" then displays in the "Standard Sizes" list box.
Orientation
This is where you define whether the master page is portrait or landscape.
Placement rule for the assigned pages. This is where you define how an assigned page will be placed in the page placeholder (e.g. "Center").
•"Center":
The assigned page is centered on the trimmed size. Page content that juts over the trimmed size or bleed is cut off.
•"Lower Left":
The bottom left corner of the assigned page is placed on the bottom left corner of the trimmed size. Page that juts over the trimmed size or bleed is cut off.
•"Scale to Fit":
The assigned page is scaled proportionally to fit exactly into the trimmed size.
•"Unconditional":
The bottom left corner of the assigned page is placed with no constraints on the bottom left corner of the trimmed size. For example, a page that is too big is not scaled and the page content juts over the trimmed size. The projecting part is not cut off.
Trim Allowance for Pages
•"Automatic calculation of Trim Allowance":
When you set this option, the Trim is calculated so that the folding sheet and printing material are the same size. This saves you cutting along the outer edge.
The folding sheet bounding box is the same size as the printing material if there are several folding sheets on the printing material.
•"Left", "Right", "Top", "Bottom":
These are the page margins for which you can define a trim.
The trim is assigned to the page content. This means that "Top" is always the trim at the head of the page, no matter what orientation the page has.
•"On even Pages" "Swap Left/Right":
This function makes it easy for you to define a back margin. The values for the right and left margin are swapped when this option is set.
•"On even Pages" "Swap Top/Bottom":
This function makes it easy for you to define a back margin for calendars. The values for the top and bottom margin are swapped when this option is set.
The procedure is the same as for "On even Pages" "Swap Left/Right".
•"Bleed":
This is where you define the Bleed.
Bleed is used to specify the maximum amount of page content outside of the Trim Box that is to be printed. If bleed is defined for a PDF page (via PDF BleedBox), but the bleed is smaller than the master page bleed, the printout is limited to the size of the BleedBox.
Tips:
If a bleed unexpectedly does not appear, the following can be the cause:
·No TrimBox is defined in the PDF pages, or BleedBox is smaller than or the same size as TrimBox.
Remedies: Correct the bleed box / trim box or set the correct height and width for your own trim size; in addition, set the page policies to "Centered".
·No trim allowances for the pages are defined in the master page.
Remedy: Define sufficient trim allowance for the pages.
·The limit value for the bleed in the master page is "0".
Remedy: Correct the limit value for the bleed.
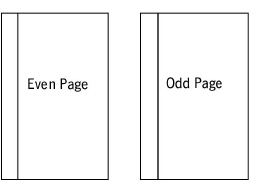
Example of How to Define a Back Margin
The following example will be used to illustrate the function:
•Binding is to be on the left side on pages with odd numbers.
•Binding is to be on the right side on pages with even numbers.
Proceed as follows if you wish to set a trim only on the binding edges:
1.Type in the trim you want for your binding edge in "Left".
The trim is shown as a hatched area in the graphics below:
2.Set the "Swap Left/Right" option.
As a result, the values in "Left" and "Right" are swapped for the even pages. In this way, you set the trim only on the binding edges as you wanted.
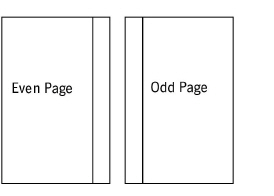
Trim left/right are swapped!
See also View properties.
HD Privacy Statement | Imprint | Prinect Know How