Background information about boxes
Five boxes play a role in the printing of PDF documents: MediaBox, TrimBox, BleedBox, CropBox and ArtBox. They can be set or corrected for a PDF document.
It often happens that PDF files lack boxes (e.g. no margin with trim marks), feature incorrectly set boxes (e.g. media boxes too big) or inconsistent boxes in one document. Geometry Control allows these boxes to be set or corrected for a PDF document.
The media box comprises all objects of a page, including text and images that appear on the page or extend beyond the page.
From a technical point of view, the media box defines the limits of the physical medium on which the page is to be printed. Apart from the complete page, it can comprise space for trim marks, color control bars and other elements.
Contents outside the media box can be deleted without changing the essential PDF file contents because Adobe® Acrobat® ignores objects outside the media box when creating PDF files.
The crop box defines the area the page content is cropped to for display or output. In contrast to the other box types this box does not convey any meaning in relation to the physical page geometry or the intended use. It merely defines how the page contents are cropped. The crop box defines the way the page contents are positioned on the output medium if no other information is available (e.g. imposition instructions defined in a JDF or PJTF job).
The bleed box represents an extended area around the trim box, causing the entire page contents to be trimmed when a bleed area is defined. A document requiring a bleed also requires a bleed box. The bleed box is always larger than the trim box and smaller than the media box. The bleed area of a printed page can have print, folding and cut marks, slug lines, etc.
TrimBox
The trim box shows the final document size after printing and cutting. A document configured to be printed in a print shop requires a trim box. The trim box must be smaller than the bleed box or media box.
The art box represents a page area (e.g. a graphic file) that will be positioned when the PDF content is to be placed in an application such as a DTP program. The art box must be smaller than the bleed box.

|
Note: The very least you should define is the trim box as imposition is usually based on the trim box. No box must be larger than the media box. |
List box for boxes to be edited
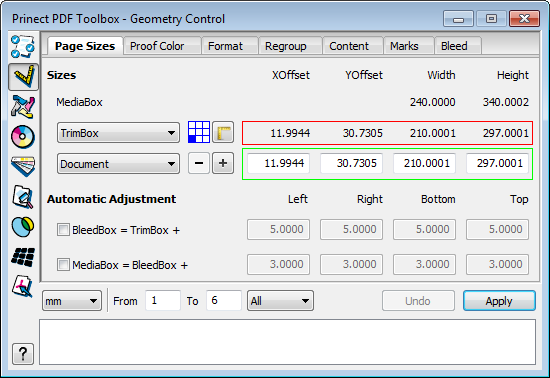
The box type to be edited is selected and displays in the first list box.
The selected box is identified by a green line in the PDF, the values in the dialog have a red frame (actual value).
|
|
|
|
|
The reference point for the distance values and the coordinate origin are set with this button. By default, the reference point is the bottom left corner. You can place the reference point on one of the four corners, on the center of the page or on the middle of the edges by clicking the appropriate box. This function is useful, for example, to check the direction in which the trim box expands.
|
||
|
|
|
|
|
You can use the measure tool to determine the distance between two points. Click two points one after the other. The following information then displays in the Info window: |
||
|
|
[1] Coordinates of the first point P1 (x1, y1)
[2] Coordinates of the second point P2 (x2, y2)
[3] Distance of the points in x direction (Δx = Ix2-x1I )
[4] Distance of the points in y direction (Δy = Iy2-y1I )
[5] Length of the connecting line between the points
[6] Angle of the connecting line with the x axis
The coordinates naturally depend on the coordinate origin selected.
Keep the mouse button pressed down when selecting the point to display the current pointer coordinates in the Info window.

|
Note: After you measure the distance between two points, you must normally click the button again to measure the next distance. To run a number of measurements one after the other, keep the Shift key pressed down when clicking the measure tool button. By doing this, you enable the permanent mode. When one measurement ends, this lets you start the next one right away. The marker points are kept as long as you do not exit the mode by clicking the button again or hitting the ESC key. |
•Distance (XOffset, YOffset) of the selected box from the coordinate origin. This is always measured from the reference point. If the coordinate origin is in the top left corner, then the distance between the top left corner of the box and the coordinate origin displays. On the other hand, if the reference point is on the center of the page, then the distance to the center of the box displays.
•Width and height of the selected box.
List box for dimensions to apply
You can assign the selected box a size and distances from a template using the second list box. You can define custom templates and delete them again with the plus and minus buttons. See Define/delete a custom parameter set.
The width and height of the document and the distance (XOffset, YOffset) to the coordinate origin display.

|
Note: The crop box is used as the default if boxes are not defined, with the media box used if a crop box is not defined. |
If you select a default to be applied, it turns into a green line (setpoint). The actual value still present is retained as a red line.
When you click "Apply", the setpoints turn into actual values (setpoint = actual value). The PDF shows the result as a green line.
1.To edit the parameters for a box, select the box to edit in the "MediaBox" combo box.
The application comes with the following boxes: Media Box, Crop Box, Bleed Box, Trim Box and Art Box. You cannot overwrite these presettings. You will find a description of each of the boxes on the preceding pages.
2.In the second list box, select a box size you want from the presettings. A red line in the PDF indicates the result of this change.
The application comes with the following boxes: User, Content, Automatic, Document, DIN A3, DIN A4, DIN A5, DIN A6, DIN A7, DIN A8, US Legal, US Letter. You cannot overwrite these presettings. You can, however, define and save your own parameter sets. See Define/delete a custom parameter set. In addition, you can select separations in the file as boxes. However, you can use them only on the current page. For example, if the PDF has a "die-cut" separation, you can set that the trim box is centered automatically onto the path.
(3).As an alternative, you can type the X/Y offsets or the width and height in the text boxes or drag the green lines in the PDF.
In addition to the default and custom sizes, you also have the following two options in the list box:
•Automatic
Select "Automatic" if you have a PDF without a trim box. The trim box is set automatically at the cut marks if you set this option.
•Content
This lets you align boxes to the content. For example, if you have an object on a PDF page, you can select any frame that then envelopes the object precisely.

|
Note: You can move the box lines with the arrow keys while keeping the Shift key pressed, or with the mouse. |
•Pressing the Shift key while moving with the mouse lets you change the X or Y value only, depending on the direction you start moving the line.
•Grabbing the box at one of its corners while pressing the Shift key at the same time allows you to proportionally scale the width and height of the box while you move the mouse.
To move the trim box (e.g. in packaging printing):
You can move the trim box (lines) to another position.
Hold down the Alt key. The cursor changes shape. Click the dieline. The trim box moves to the hull you clicked.
The list box automatically displays the "User" item.

Depending on the option you have chosen, the bleed box is based on your trim box settings, or the media box is based on the definition for the bleed box. The values you type in the text boxes define the scaling factor by which the box to be adjusted is to be enlarged in relation to the reference box.
•To do so, enable one or both options in the "Automatic Adjustment" section and type values for scaling the respective box in the text boxes.
Automatic box calculation works in both directions, i.e. using the values above, the values of the media box also result in appropriate changes of bleed and trim boxes.
In this way, you can, for example, add an appropriate margin area to a document that comes without cut marks and trim. You can then set the cut marks automatically in the "Marks" tab.

|
Note: The status panel at the bottom of the dialog indicates whether the current presettings can be applied or whether a box would be too large (i.e. larger than the media box). |
4.Specify the page range of the document to which to apply the new parameters.
5.Click “Apply” to conclude. The new box definition is applied to the selected pages.

|
Note: After you have clicked the "Apply" button it will be disabled until you choose another box or edit any of the values. |
Define/delete a custom parameter set
![]()
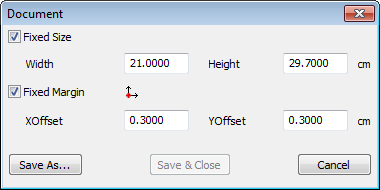
1.To define or delete a custom set, click the "+" (define) or "-" (delete) sign beside the sizes in the "Page Sizes" tab. The following window opens for this purpose:


|
Note: The “Save & Close” button is disabled because predefined parameter sets are only available before you create your own parameter set for the first time. To edit one of your own parameter sets later, you must select this parameter set in the list box before you click the button with the "+". |
You can now define the selected box by either specifying a fixed size (width/height) and/or fixed offsets.
2.To do so, enable the “Fixed Size” option and type values for the width and the height. The values of the set selected in the list box are set by default in the text boxes.
3.Enable the "Fixed Margin" option and type values for the X and Y offsets (the origin is the bottom left media box corner).
The selected box with the specified size is centered in the media box if you specified only the "Fixed Size" option.
Enabling the "Fixed Margin" option only will center the selected box in the media box using the specified X and Y offsets while its size is adapted to the surrounding media box.
4.Click “Save As” to conclude. The "Save As" dialog appears.
5.Enter a descriptive name for the parameter set and then click “OK”.
6.Also close the previous window.
The new parameter set now appears in the parameter set list box.
Context-sensitive menu functionality
Right-click anywhere in the tab to invoke the context-sensitive menu:
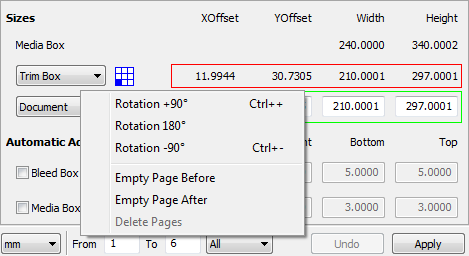
You can insert blank pages before and after the current page.
When you insert blank pages into a PDF/VT document, these are placed as set in all the data records. For example, if you have a PDF/VT file with two pages per data record and if you insert a blank page after the second page, then all the data records will have three pages afterwards, with the third page a blank page.
You can delete pages but at least one page must remain in the document. This function is inactive if all pages are selected.
HD Privacy Statement | Imprint | Prinect Know How
