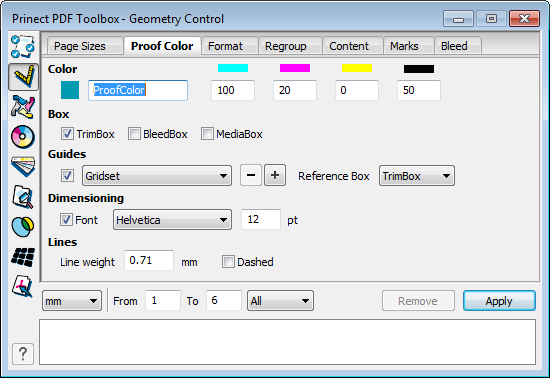
In the "Proof Color" tab, you can add the current values for the trim, bleed and/or media box to the page content as lines and text. As a result, the size and name of the boxes are shown in the PDF document and can be seen on the paper, e.g. of a proof. The contents are created as overprinting spot color elements. You can assign a name (default "ProofColor") and alternate color of your choice.

|
Note: In current Heidelberg workflow products, page contents where "ProofColor" is defined as the color are automatically output only in the proof while they are suppressed automatically for a high-res output. This prevents that, for example, a film or plate of the "ProofColor" separation is imaged inadvertently. |
This is where you can set the color of the boxes. The selected color is valid for the box type selected.
This is where you can select whether broken lines will be used to display the boxes and what is the line weight. You can also select whether or not the trim box, bleed box and/or media box will also be shown as text labels.

|
Note: The selected font (Helvetica, Courier, Times Roman) will be embedded in the PDF if the Resource/Font folder of Adobe Acrobat contains a PostScript Type1 font with the same file name (e.g. "Helvetica"). |
Here, you can create guides and save them as parameter record. You can customize the guides accordingly to a reference value (box).
This functionality can make it easier for you to visually check positions and spacing.
Click the "+" sign to open the window for setting the data:
•Order:
This is where you define the starting point for the distance values that you enter in the X or Y input boxes. For example, if you select "From left" and enter "3.0" in the first box for X, a guide is then set 3 mm from the left.
With "Alternate", the first line is drawn from the left and the second line from the right, etc.
•X / Y:
This is where you enter the distance values. The unit for the values depends on the settings you made beforehand in the "Proof Color" tab in the list box at the bottom left ("mm", "cm", "pt" or "inch"). The value in the first box is taken from the margin. Each other line indicates the distance to the preceding line.
•Repeat Lines:
Existing lines are repeated when this option is enabled. For example, this lets you create a grid.
•Mirror:
This function lets you set whether or not the guides will be shown mirrored on the back.
There is a "Remove" button and not an "Undo" button in the lower part of the "Proof Color" tab. All the elements in the selected Proof Color are removed when you click "Remove". You can remove elements from several documents if you hold down the Shift key when clicking "Remove". See Apply settings to several documents.
HD Privacy Statement | Imprint | Prinect Know How