In the toolbar at the top, you will find various functions that let you rotate, insert or delete objects (barcodes, images, etc.) and fit the view.
The following controls are possible:
Zoom In
Scale up the view or scale down using Ctrl key as well
Previous View Return to the previous view
Fit the width Fit view to the width
Fit Height Fit view to the height
Create PDF file for barcode
You can output the barcode currently shown in the preview to a PDF file.
Use template
This lets you load and use data that already have barcodes. The barcodes of all the pages are used if the page count of the template matches that of the current document.
If the page count is different, the barcode of the first page of the template is applied to the document page currently shown.
Keep the "Shift" key pressed down when you click this button if you wish to open the file selection dialog at the file location of the current document.
Create Template
Create template Click this button to create a new PDF file containing only the placeholders. All static content will be removed.
This allows you to create a template for use in another project.
Paste
Insert the element currently shown in the preview (placeholder, barcode or image). Alternatively, you can also drag the element to the page using the mouse.
Delete
Delete the currently selected element. Alternatively, you can delete the element also with the appropriate function in the context menu or with the "Del" key.
Rotate
"Rotate" lets you rotate the element. You will also find this function in the context menu.
Mark one or more objects and click this button. A box surrounding the objects displays. Click a corner point and drag it with the mouse. The content of the box is jointly rotated, with the diagonally opposite corner point as the pivot.
You can only rotate step-by-step (step size = 5°) if you keep the Shift key pressed during rotation.
This function is not available for iVP.
Tape measure
With the tape measure (ruler) you can quickly determine the dimensions of objects. Click the starting point of the length you would like to measure. Hold down the mouse button and move the mouse to the end of the length. The distance displays directly. Keep the Shift key pressed down to measure only horizontal or vertical lengths.
You can choose the following units: mm, points, inch, cm
Reference point for Dimensioning
This is where you can set the zero point for the position coordinates. To do this, select the required square, e.g. "Top left".
Select the box from the selection list (e.g. TrimBox) to which the reference point should refer.
"Guides" list box
You can show guides to make the correct placement of elements easier for you. In the list box, you can set "None", "Default" or custom guides. See Guides.
"Autostart" checkbox
When this checkbox is enabled, the Barcode & VDP Editor opens automatically the next time a file containing variable placeholders opens.
"iVDP" checkbox
Enable this option when you are working in the iVDP workflow. Dynamic placeholders are then replaced only during printing. As not all editing functions are supported by the press, the user interface is restricted accordingly. For example, a rotation is only possible by a multiple of 90°. Use the "iVDP Configuration" button to adjust the user interface to the options of your machine version.
"iVDP Configuration" button
This lets you confine the user interface to the functions that are possible with your press version.
When "iVDP" is enabled, you can use this button to select a configuration file for your press where all possible functionalities are stored.
Context menu
You can display the context menu by right-clicking an object. It offers you some of the functions of the toolbar but it also gives you the option of copying objects and inserting them on another page as well as undoing changes.
The context menu has the following functions:
•Zoom In/Zoom Out Keep the "Ctrl" key pressed down to scale down the view.
•Previous View Restores the view directly before the present one.
•Copy This lets you copy placeholders and insert them on another page in the same document. Use the "Load Templates" function in the toolbar to copy barcodes to another document. See Use template.
•Paste This lets you insert copied placeholders.
•Step and Repeat This lets you repeat an object spaced the same way on the page. Automatic data record replacement is possible when doing this. See Step and Repeat.
•Add Insert the element currently shown in the preview (placeholder, barcode or image). Alternatively, you can also drag the element to the page using the mouse or use the button in the toolbar.
•Delete Delete the currently selected element. Alternatively, you can delete the element also using the toolbar or with the "Del" key.
•Rotate This lets you rotate single or multiple objects. See Rotate.
•Orientation Aligns the object at an angle of 0°, 90°, 180° or 270° to the lower side edge.
•Mirror horizontal Mirrors the object on the right side of the object, swapping left and right. This is a good idea, for example, if a transparent material is to be printed on the back and a barcode accordingly has to be applied inverted.
•Mirror vertical Mirrors the object on the top side of the object, swapping top and bottom.
•Undo Undoes the last change.
•Redo Restores the last change that was undone.
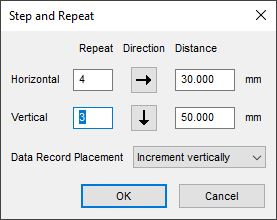
Step and Repeat
The "Step and Repeat" function in the context menu lets you repeat an object spaced the same way on the page. Automatic data record replacement is possible when doing this.
1.Place the object (placeholder, barcode, text, etc.) on the position you want. You can also place a number of objects.
2.Mark one or more objects. Only one object will be described below.
3.Right-click the object and select "Step and Repeat". The following dialog displays:
4.Enter how many times the object is to be in horizontal and vertical direction on the page. The object is repeated twice if you enter "2".
5.Select the direction in which the objects are to be added in relation to the start object.
6.Enter the spacing you want between the objects. You can use the tape measure, if necessary, if you are not sure about the exact value. See Tape measure.
7.For "Data Record Placement" set whether the data record is to be incremented automatically (vertically or horizontally) or whether the object is to be repeated as it is.